AskJoeB: Sense of Scale

Showing scale?
Showing scale?

Valeriano submitted this photo to me and as usual, I like to share the photographer’s words with everyone. I find that there’s a lot of people out there that have either experienced a similar situation or have thought similar ideas. Here’s what he had to say:

“Hi Joe,
I’d like to submit a photo to your blog’s section “Ask Joe”.

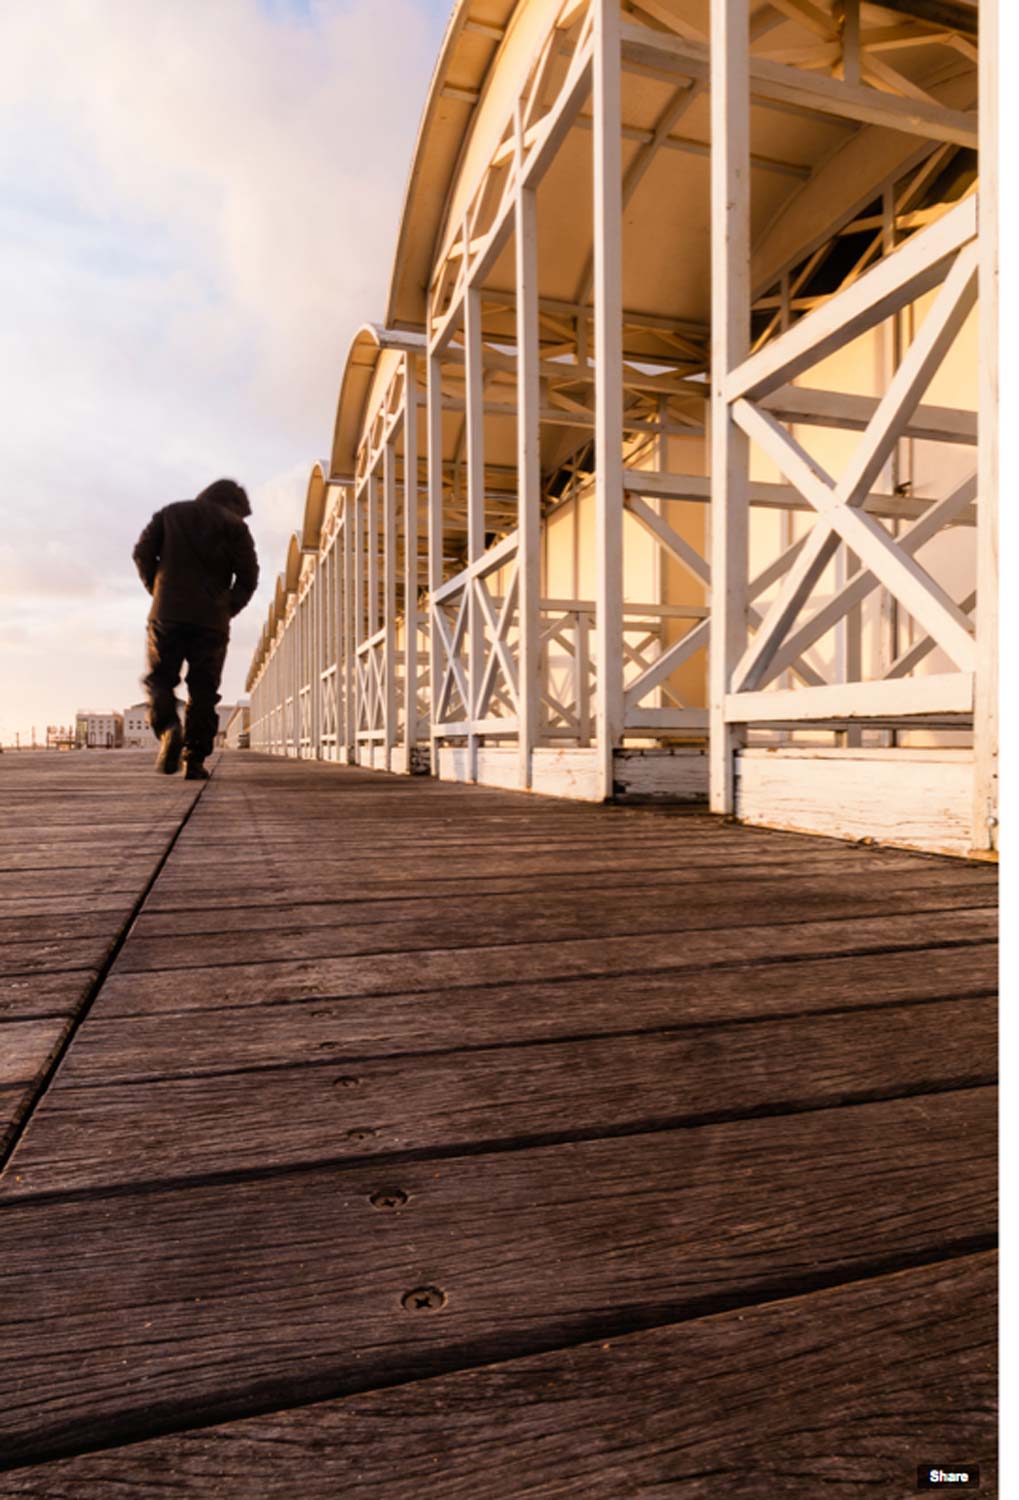
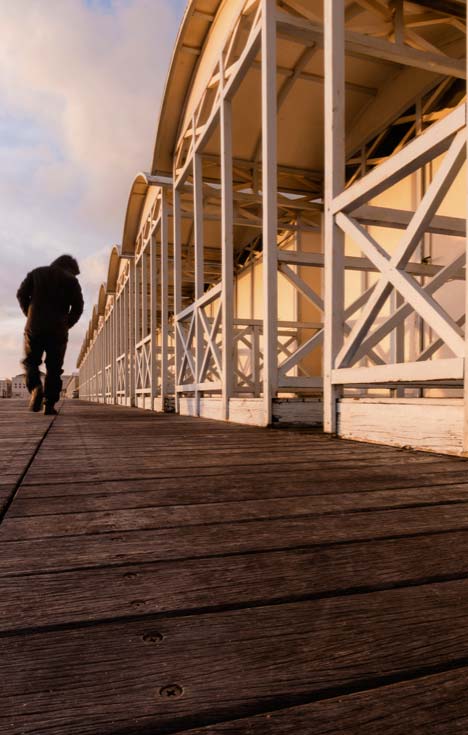
I was working this subject (cabin’s at the beach), and after finding a nice composition I decided to add a person to the picture to give it a sense of scale. Not having anybody else than myself to model, I decided to self model.

After I’ve found and set the right exposure, I set my camera with a timed shutter release, and I start to walk into the frame.
Out of the several attempt, this one I think is the picture that I’d like the most.

What do you think about it?

PS I haven’t shot this horizontal, indeed I’m having a problem when trying to compose this kind pictures horizontally: distortion I cannot get rid of n camera. The vertical lines on the edge of the frame are always leaning and trying to correct them in camera seems always quite impossible (I’ll always end up with a composition I don’t like). Do you have any trick or suggestion for this issue?

Thanks,
Valeriano.”

Valeiano,

First of all, as I tell my online class with the PPSOP, and my “Stretching Your Frame of Mind workshops” I conduct around the planet, the key to taking your imagery what I refer to as “up a notch” is to “make pictures” not just take pictures. What you have done by putting yourself in this composition is “making pictures”. So many of my fellow photographers are content in taking pictures of what they see, instead of taking pictures of what they could see if they just stretched their frame of mind.

Ok, having said that, let’s talk about “Showing Scale to Your Photos”. In a nutshell, here’s the important part of that post: “The best way to show the scale within my composition is by including something whose size is already known. That being a person, ship, auto, etc. Without something in your photo, the viewer won’t have any reference as to just how big an area he’s looking at.”

In your photo, there’s really not that much difference in size between everything in your composition, namely the person and the building,  I’m not sure scale is what you were thinking.

Moving on, there’s a lot for the viewer to look at, and the more we give him the more he’ll stick around: There’s a Vanishing Point, Patterns, Texture, Visual Tension, Shape, and light. These are the things found on my ‘Artist Palette’ and have taken this photo “up a notch”.

Take a look at this crop. I’ve made the Negative Space that surrounds the man walking equal on both sides and now feels more balanced. I’ve also darkened it and now there’s more depth in the colors and a greater degree of contrast between the light and dark areas that border each other.

Tightened up a little.

One last note, the vertical lines should be as easy to straighten in a vertical as well as in a horizontal format, so I’m not sure why it is you have trouble. It’s a matter of tilting your camera down to straighten lines that bend in, and tilting your camera up to straighten lines that appear to bend out.

Whenever I’m composing, the first two things I do is to make sure the horizon line is straight, then I tilt the camera up and down and watch the vertical lines close to the edge of the frame until they’re parallel to it.

It’s a nice photo, so thanks for sharing it.

Visit my website at: www.joebaraban.com and check out my 2013 workshop schedule at the top of this blog. Come shoot with me sometime.

Don’t forget to send me a photo and question to AskjoeB@gmail.com.

JoeB

Food For Digital Thought: Protecting Your Photographs

Even the biggest of companies try to use your photos without permission.

I’ve been an advertising and corporate photographer for forty-five years, and in that time, I’ve had my share of legal problems over the unauthorized use of my images. For some incredible reason, people think that they can just come and take my photos for their own use and not pay for them. Since I’ve spent the majority of these years in film, it was a constant issue, and one which was very hard to find out about.

I had to see my photo in a magazine, a brochure, on a billboard, or for a second on the television. The only other way was to have someone (usually another photographer) recognize my shot and call me to let me know. I once was sitting at a light and glanced over to a bench next to a bus stop and saw a photo that I knew a friend of mine had taken. I decided to call him and “lo and behold,” he knew nothing about it.

In my online class with the PPSOP, and in my “Stretching Your Frame of Mind” workshops I conduct around the planet, I’m always telling my fellow photographers that putting a copyright stamp with the year on your image does not fully protect it.  People always think it does, but I have some bad news for you…it doesn’t. Your image has to be registered with the Library of Congress to even be able to sue for infringement. Not only does it have to be registered, but also, if it was not registered before the commencement of the infringement, you will be severely limited in how much you can recover from settlement or suit.  Because most infringements of photographs involve an advertising use – and it’s virtually impossible to prove the amount of profits “attributable to the (advertising) infringement” – if the image is not registered prior to the infringement, you can only recover the license fee you could have charged for the use in an “arms-length” transaction.  Compare that recovery with what you can get if registered before infringement; statutory damages of up to $150,000 per work infringed plus attorneys’ fees, expert witness fees, court costs and interest.

I was teaching at the Julia Dean Workshop in Hollywood and made a comment on the size one of my students had embedded her name and copyright mark on her submission for review. It was too large and quite distracting. Another of my students asked me if I had ever heard of a company called Digimarc. I said I hadn’t so he proceeded to fill me in on what is proving to be one of the best pieces of advice ever given to me in my long career.

That being said, Digimarc offers a solution to protect your digital photos by allowing you to embed an imperceptible digital watermark into your image; a very simple and subtle way to help identify infringers of your image. The real beauty about using Digimarc is that they will monitor your images by continuously searching the Internet for your unique digital ids, for any infringement of your copyright.

For this post, I’ve called on my attorney to make a statement about his experience on Copyright issues. Dana LeJune is a Houston based lawyer who is one of the foremost authorities on the current issues involving copyright infringement. Here’s what he had to say:

“Copyright infringement in the areas of music, film, photography, and architecture is at an all-time high.  Home builders are hiring draftsmen (usually,  licensed architects won’t risk it) to redraw house plans, ad agencies are downloading images from Google, or scanning them from magazines, and teens are using file-sharing to pirate popular music every day, in every part of the country.   Because litigating such a case can be very expensive for the copyright holder, the contingent fee arrangement may make prosecution affordable for the “little guy.”  Here’s what you need to understand: if the work was not registered before the infringement began, the potential recovery is often insufficient for the lawyer to pursue using the contingent fee arrangement.  Without the ability to recover statutory damages and attorneys’ fees, and because of the likely inability to prove what profits were attributable to the infringement (in an advertising use), most lawyers will decline to accept the case.

The moral of the story is, REGISTER YOUR WORK REGULARLY.  Photographers have a special prerogative to register their works, en masse, so there’s not a huge financial disincentive.  Just make sure to list the name of each photo in the registration separately, even if on an attached list. This way the single registration for several hundred images will (probably) permit the recovery of multiple statutory damage awards for a single registration.

If you have any questions that are not answered by my web site, www.copyrightsuit.net, I don’t charge for telephone consultations, so don’t hesitate to ask me a question.  You may also email me at dlejune@triallawyers.net.  Good luck and wealth in the New Year!”

In closing, I want it to be clear that neither my attorney nor myself will reap any monetary benefits from Digimarc for writing this post. I have not been paid nor will be. I only care about helping other photographers protect themselves from thieves that obviously have no class.

By putting the Digimarc logo on this blog, people interested can use the promotional code “BARABAN for a discount of 20% for an image subscription. Here’s the link: www.digimarc.com/digimarc-for-images.

Visit my website at: www.joebaraban.com and check out my 2013 workshop schedule at the top of this blog. Come shoot with me sometime.

Don’t forget to send me a photo and question to: AskjoeB@gmail.com.

JoeB

AskJoeB: Fisheye Photos

Valeriano, a past student of mine sent me this photo to talk about. For a better understanding of where the photographer is coming from, and what his or her thought process was at the time, I like to copy exactly what they say when submitting. Another reason is that often is the case that others are thinking the same thing or have experienced similar situations.

Here’s what Valeriano had to say:

“Hi Joe,

I’ve recently broken your class rule for the fish-eye lens when composing this subject. Since also at dawn the monument wasn’t lit, the sky was dull gray and hazy with no clue of getting a single ray of dun at sunrise. I’ve also decided to break another of your class rules about white balance and set mine on Tungsten knowing I would get a bluish color cast on what wasn’t lit by artificial lights. Not having any one to model for me, I had to rely on pedestrians climbing the stairs in order to give a sense of scale by having a human figure in the composition.

Please let me know your thoughts, and-as-usual-thank you a lot for your invaluable critique and advice.

Cheers,

Valeriano” 

Ok Valeriano, let me first offer up a quote that was said by a very famous photographer named Ansel Adams. He said, “There are no rules for good pictures, there’s just good pictures”. In my online class with the PPSOP, and in my “Stretching Your Frame of Mind” workshops I conduct around the planet, I do have rules. These rules are only intended for my classes, not necessarily rules you have to live by. I have these rules because I’m a firm believer in teaching fellow photographers how to become stronger at their craft; by using their imagination not gimmicks.

To me, a good photographer doesn’t need to resort to specialty/trick lens or to wash everything in a specific color. A good photographer will rely on his wit, his ability to create good photos in the camera, and a knowledge of the elements of visual design and composition that he’ll get in my class. This has been my thinking for the past forty-six years and I’ve managed to take pretty good pictures without resorting to tricks or manipulation. I guess it’s all about being comfortable in my own skin. When I go out to shoot, I’m confident I’ll come back with something that will be timeless, memorable, and classic…but that’s just me.

In your photo, I hope that the people that view it loves blue, because it’s blue from corner to corner and edge to edge. Even the people you added for scale are blue!!! I’d be interested in seeing how it would look all yellow, or green, or even red? What I’d really like to have seen is this photo looking real. The reason is that you had all the elements to have created an interesting well composed photo that included several of the elements from my ‘Artist Palette’.

For example: Shape (the triangle at the top left), Pattern (the steps), Line (the lines you have that lead the viewer in and out of your frame),  Tension (placing the people close to the edge of your frame), and Scale. In my opinion it would have been enough to carry it without turning everything blue.

As far as the Fisheye lens goes, there are definitely times when it’s used, for example in aerials or to solve industry related problems, but for me those times do not include the concept of “creativity”.  In my opinion, the distortion is distracting, and there’s just not a place for it in the day to day world of picture taking.

askjoebvalerianosecond-fisheye Here is another photo Valeriano shot with a Fisheye and submitted to me. For me, I think it’s an interesting picture that’s obviously well balanced and composed, and I’m sure that there will be people that will “ooh and aah” and there will even be people (usually friends or family) that will say…”Cool man”! If those are the people you’re trying to impress, then I say go for it and don’t take that lens off.

Again, that’s just one opinion, and now I want to leave you with this last thought, “If you have a hammer in your hand and everything looks like a nail, then you have a problem”.

As usual, thanks for sharing your photo and thoughts.

Visit my website at: www.joebaraban.com and check out my 2013 workshop schedule at the top of this blog. Come shoot with me sometime, but please…leave the Fisheye at home.

Don’t forget to send me a photo and question to: AskJoeB@gmail.com

JoeB

Julia Dean Workshop 2012

A wonderful photo taken by my student at the LA county museum of Art.

I recently returned from teaching at the Julia Dean Workshop in Hollywood, CA. It was my third time out there, and I always enjoy shooting there…except for the traffic!!! The diversity of subject matters is refreshing and it always shows in my student’s photos when we critique them from day to day.

As is always the case, whether it be with my online students at the PPSOP or my “Stretching Your Frame of Mind” workshop I conduct around the planet, I show fellow photographers how to incorporate the elements of visual design and good composition into their imagery. Each person is given an imaginary ‘Artist Palette’ with nothing on it. During the course of the five-day workshop we work on: Line, Negative Space, Vanishing Points, Perspective, Texture, Pattern, Form, Shape, Light and Color, and how to introduce them into their thought process, finally ending up in their composition.

We also work on the six principles of Gestalt I’ve written about in an article for Adorama.

Working with my students.

For these amateur photographers whose passion lies not only in their love for the craft but in their need to take their photos “up a notch”, the results only after five days are impressive, and the level of creativity is comparably to the majority of working professional out there working as I write this post.

The above featured photo was taken during a workshop trip to the LA County museum of Art.

Here are some of their images…enjoy as I have:

Visit my website at: www.joebaraban.com and check out my new 2013 workshop schedule at the top of this blog. Come shoot with me sometime.

Don’t forget to send a photo and a question to: AskJoeB@gmail.com.

JoeB

2012 Maine Media Workshop

Pam knows “Light is everything”.

I just finished a week at the Maine Media Workshop, teaching my “Stretching Your Frame of Mind” class. It was my seventeenth year, and it was still as much fun as it was in the eighties. I always pick the same week, as it’s the same time as the Lobster Festival just down the road in Rockland, and the State Fair in Bangor. I pick this week so it  gives my class something else to shoot besides small fishing villages, lighthouses, beautiful scenery, local artists, old historical houses and barns, and flowers in full bloom..as if that isn’t enough!!!

My 2012 Maine Media Workshop class.

I had a full workshop, and as usual there were students that have also take my online class with the PPSOP,  so the diversity of the photos shot and submitted for a review were interesting, and it made for a good time in between the daily morning and evening shoots. As always, my class is about teaching photographers how to incorporate the elements of visual design and composition into their imagery. Negative Space, Vanishing points, Perspective, Tension, Patterns, Texture, Line, Shape, Form, Light , and Color are the elements that my students walk away with that are now found on their  new ‘Artist Palette’.

Working on Vanishing Points.

The photo featured above was taken by a student that not only was in my Maine Media Workshop class, but enrolled in both my part I and part II online class, as well as my six month mentoring program. Pam’s  an exceptional photographer that’s now on her way to making photography not just a passion, but a potential career as well.

Below is a slideshow of some of the student’s work, and you’ll be as impressed with these photos as I am; these were taken over a five day span.

Enjoy:


Visit my website at: www.joebaraban.com, and stay tuned for my 2013 workshop schedule. Come shoot with me sometime.

Don’t forget to submit a question and photo to: AskJoeB@gmail.com

JoeB

AskJoeB: The Little White Chapel

The little white chapel.

Valeriano sent me this photo to talk about. As usual I like to have people read what was said to me when the image was submitted. I find that a lot of photographers share the same problems, or the same stories, or the same ideas so it’s nice to know that you’re not alone. Here’s what he had to say:

“Hi Joe,
I’d really like your critique about this photograph and mainly about my composition.

The little white chapel (with the cypress trees “guarding” it) is an iconic landmark in this Tuscan area named Val d’Orcia (a UNESCO world heritage site). I’ve shot it in many different ways and in many light situations and seasonal situations, as well as with different weather conditions.

Thus this time I went there again, I really wanted to find a different point of view for this subject. The sculpture in the immediate foreground is something that I thought could work to define a frame within a frame composition. I’ve got the idea cause I was together with another photographer at the place I usually go, and he “hates” these sculptures that the landlord allowed to be put on its property by an artist. I always wondered if there was some interesting way to shot ’em, I probably have found one.

Unfortunately this idea came up to me at very last moment I was in my stay at this place. Moreover I was in a very bad creative vision moment for my photography, which, as usual, will start to improve as I’m at the end of a time slice exclusively dedicated to photography.

I didn’t shot it with the right light conditions I would had rather have: at sunset with a nice side light which would had let the texture of the sculpture pop up. Therefore I shot it at twilight.On the left side, in the background, there is also the profile of the little town Pienza, another well known place of this area.

Please let me know your thoughts about it and if there is anything I can improve with this composition.
Thanks a lot,

Valeriano.

Valeriano,

The first thing I felt I needed to do was to turn your photo upside down. For those of you out there that don’t know why I do this, it’s to show how well a composition is balanced. I’m talking about the balance between the Negative Space and the Positive space. In Valeriano’s photo, the Positive Space is the sculpture in the foreground, the small chapel, and the land mass and town in the left background. The Negative Space is the blue sky.

When you look at this photo right side up, the way you meant it to be,  you’re looking at it with the right side of your brain; the creative side. You see a sculpture, a chapel, and a small town, and blue sky. When you look at this photo upside down, you’re looking at it with the left side of your brain; the analytical side. The sculpture, the chapel, the town, and the sky don’t exist anymore. Now, all you see are shapes and how they relate to one another. Now it’s easy to see how well the balance between the Negative and Positive Space actually is.

Is this photo balanced? To me, it’s very heavy on the right side of an imaginary line drawn down the middle. Don’t get me wrong, I’m the first one that would disrupt the way a viewer perceives then processes one of my photos, but when you have an object this large anchored in the foreground, it’s too much.

Since Valeriano wanted to show both the chapel and the town, I would have moved a few steps to the right so as to balance the sky on both sides of the sculpture.

Ok, Valeriano mentioned “framing within a frame”. Since he took my online class with the PPSOP, he learned several ways to create Visual Tension. I also teach this in my “Stretching Your Frame of Mind” workshops I conduct around the planet. One of the ways is to frame a subject, or an object or a scene within a frame. By cleverly using the sculpture and the right edge to frame the chapel, he succeeded. I also show my students how to use perspective to create the feeling of depth. By ‘anchoring’ the sculpture in the foreground he created “layers of interest” which in turn created the feeling of not only depth, but distance and scale as well.

The last thing I want to mention is that people that follow my blog and my work know that I’m very big on light, since light is everything!!! However, in this photo I like the absence of directional light here. There’s something magical about this photo and waiting for the twilight color to take effect. The psychological effect color has on our psyche can’t be dismissed as it has been proven to have certain powers.

A very cool photo!!!!! You were definitely “Stretching your Frame of mind”.

By the way, did you know that there was a time when the color blue was believed to soothe illness and treat pain; ancient cultures practiced Chromotherapy  or the use of color to heal.

Thanks for the submission.

Visit my website at: www.joebaraban.com and watch for my 2013 workshop schedule. Come shoot with me sometime.

Keep those questions and photos coming in at: AskJoeB@gmail.com

JoeB

PPSOP: August Class

Cecilia’s self portrait.

Each month I teach a class with the PPSOP. It’s an online four week class, and each month I usually get twenty to twenty five participants; and they’re more than likely just like you. That is, they’re amateur photographers passionate  about photography, and want to take their images up to the next level but just don’t know how to go about it.

Both in my online class and my “Stretching your Frame of Mind” workshops I conduct around the planet, I teach students how to incorporate the Elements of Visual Design and Composition into their image making. Negative Space, Vanishing Point, Perspective, Line, Texture, Pattern, Form, Shape, Light and Color are the elements that we work together on. Each week the class is given a different lesson to work on, while taking what they’ve learned in the prior lesson with them to the next week’s assignment. At the end of the four weeks, they walk away with an ‘Artist Palette’ with all these elements on it.

As the month progresses, the level of work changes with each day. Once each student embraces a particular element they can integrate in into their thought process and “make a picture” using it.

I want to share some of their wonderful pictures with you they have taken over the course of the four weeks, so you can see how their new Palette has helped take their imagery what I refer to in class as, “Up a notch”. What you see is a small representation of the work that was created. The level of work is incredible  and unfortunately there were just too many to show all of them, so I tried to represent all the elements that they learned how to use. Can you see them?

Enjoy!

Visit my website at: www.joebaraban.com and I’m working on my 2013 workshop schedule, so stay tuned. Come shoot all the elements with me sometime.

Keep those questions and photos coming to: AskJoeB@gmail.com

JoeB

AskJoeB: Three Favorite Photos.

#1

Since I think that a lot of you out there share similar feelings, levels of expertise and situations as the photographers that write into me think it’s important to share the comments i receive with all of you. Here’s one from Mark, a recent student of mine in my online class with the PPSOP. Here’s what he had to say:

“Hi Joe,

Having recently traveled for business, I was anxious to Stretch My Frame of Mind when time permitted. With my newly expanded Artist Palette ready to be deployed, Las Vegas was surely a land of opportunity!

After taking your class, I must admit, the world looks a lot different these days. Shapes, texture, patterns & colors seem to be everywhere. For example, the silhouette image was taken at 1:00AM after returning from a banquet. Entering my room with the lights off was a gift. Everything about the view was screaming, “take my picture” (lines, reflections, framing, etc). Adding myself in the image seemed to add perspective and negative space.

Here are 3 of my favorite images from the trip. Feel free to re-post, comment or delete if you don’t like them! 🙂

Cheers,
Mark Carruthers”

Hi Mark, good to hear from you again. I always like to stay in contact with former students. Since I like your submissions, I won’t delete them. :-)))))

I can tell by looking at these images that you are using my “Artist Palette” I not only teach with the PPSOP, but also with my “Stretching Your Frame of Mind” workshops I conduct around the planet. I like the Vegas photo (#1) for a couple of reasons: One is the silhouette you included. You do remember the week we spent on the silhouette in my Part II class. It adds not only a “layer of interest” creating Perspective, but it now has a level of Visual Tension crated by the contrast between the dark silhouette and the bright lights outside. I also see that you intentionally created some Negative Space inside his arms…clearly defining them. Nice job!!!

#2

In the photo of the sign (#2), You’ve done well grasshopper!! By getting “up close and personal” with the sign, you’ve also created a “layer of interest” which creates Perspective. You’ve taken control of what the viewer will perceive and process by leading him around your frame. By adding the silhouette, you’ve not only generated Visual Tension, but you’ve given the viewer lots of things to discover in your photo…just what we want him to do because the more elements he’ll discover, the longer he’ll stick around looking…a very good thing!!!

#3

What I like about the man playing the guitar (#3) is that you’ve placed the man “up close and personal” while creating a Vanishing Point (the fence) that will lead the viewer the walkway. This also represents one of the six principles of Gestalt I write about and teach in my classes. This one is called Continuance. If you want to read more about them you can read my recent article with Adorama. You can find it here at:
http://www.adorama.com/alc/0013706/article/6-Principles-of-Gestalt-Psychology-That-Can-Improve-Your-Photography

Thanks for the submissions. The next step is to come shoot with me sometime!!!

JoeB

Visit my website at: www.joeBaraban.com, and check out my 2012 workshop schedule at the top of this blog. come shoot with me sometime.

Don’t forget to send me a question and photo to: AskjoeB@gmail.com

Student Work: PPSOP June Class, 2012

Shot by Philippe. Lesson one on the Vanishing
Point.

This is the first time I’ve written a post centered around one of my classes that I teach at the online school called the PPSOP. I usually showcase one of the assignments I give in the last week where I give each student a color and letter to go out and find. The reason for this assignment is to get them to start “seeing past first impressions” and be able to focus on a particular color or object. As I tell them and also my students attending my “Stretching Your Frame of Mind” workshops I conduct around the planet, one of my favorite quotes was said by Henry David Thoreau. He said, “It’s not what you look at it’s what you see”.

However, this time I’m featuring photos from the first week until the last because it was one of my strongest group of students I’ve had since I began teaching online at the school.

Each week my class is given a different lesson and they all are about creating their Artist Palette. On this palette will soon be the elements of visual design and composition: Negative Space, Vanishing Point, Perspective, Visual Tension, Pattern, Balance, Texture, Shape, Line, and of course Light and Color. At the end of the four weeks, they’re armed with the means to create photographs not just in great light, but midday light and gray days.

Knowing how these elements work gives them the ability to dissect their individual work which is necessary if they want to take their imagery what I refer to as “Up a Notch”. Discussing their photos through the use of my video critiques clearly shows them a new path in which to lead their newly developed ‘Eye’ and thought process.

To me, following the guidelines of the Psychology of Gestalt (follow this link for my article in Adorama:http://www.adorama.com/alc/0013706/article/6-Principles-of-Gestalt-Psychology-That-Can-Improve-Your-Photography ) is important in creating memorable photographs, and it’s a big part of the information I give. The key is to take control of how the viewer perceives and processes our photos. Make him an active part by leading him around the frame, giving him ways to leave and enter our composition, having him keep discovering new things in our photo are a few ways to keep him around longer…just what we want him to do!!!

The following are just some of the images they took during the four week class, and as you will see the reason they look the way they do is because they’re chocked full of all the elements listed above that are now on their new ‘Artist Palette’. There’s so many more but impossible to show all of them.

Enjoy!

Visit my website at: www.joebaraban.com and check out my workshop schedule at the top of this blog. Come shoot with me sometime.

Don’t forget to send me a photo and question to: AskjoeB@gmail.com

JoeB

AskJoeB: Q Stands For Quality

'Q' for quality

Valeriano sent this image to me with this explanation:

“This shot was taken by me in 2007 for a PPSOP class about “Learning to see creatively”, and the assignment was about pattern.
I’d chosen to compose this image with the cup in that position to imply the letter “Q” by its shape. The “Q” letter should also stand for the concept “Quality”.
As you may know for Italians like me, a good coffee it’s something very important we cannot ever give up. ;)”.

Ok, the photo: If you hadn’t mentioned what you were trying to achieve with the letter ‘Q’, I don’t think the viewer would pick up on it…as I didn’t. I like to think of myself as a fairly intuitive/creative thinker, but I didn’t get the letter ‘Q’ or the word Quality. If you look at how the capital ‘Q’ is made, you’ll see that it’s different enough from your cup to make the difference between getting/seeing it or not. I think I might have taken a close look on how the capital letter ‘Q’ is made.

The important thing to always remember is that you won’t be around to explain your thought process. Your photo will need to stand on its own. It needs to be what I refer to as a “quick read”,  unless you’re asking the viewer to comment on an abstract representation of some reality your portraying in your photo. Now, as I continue to look at your image, seeing the letter becomes easier. However, you can’t expect the viewer to look at your photographs that long. If they don’t get it right away, and there’s not a lot of other elements for them to discover in your photos, they’ll move on.

In my online class with the PPSOP, and in my “Stretching Your Frame of Mind” workshops, I tell my students to Consider the scene and its outcome. Make sure what you’re trying to get across is not toooooooo ‘esoteric’.

As far as the photo itself goes, I think it’s a really good shot that accomplished the assignment in a creative way. I think I might also have tried one where their was actual brewed coffee in the cup, and still had the patterns of the beans on the bottom..with some Cognac in it”!!!

🙂

Thanks for the submission Valeriano, and feel free to send me images any time.

Visit my website at: www.joebaraban.com, and check out my 2012 workshop schedule at the top of this blog. Come shoot with me sometime.

JoeB

AskJoeB: On Canon Lens

Canon 5D Mark II with a 17-40mm F/4 lens

Henning  from Germany, sent me this question that I thought I would share:

“Joe,

I know you shoot with Canon. So I would like your advice on the following question of mine: I am thinking of purchasing a few additional lenses for my Canon camera. At the moment, I own a Canon model with APS-C sensor (30D), but I would like to buy my lenses with a future upgrade to a full-format sensor camera in mind.

I have always loved shooting with a fast fixed-focus small tele lens for portraits, and I am starting to really enjoy shooting with a wide angle lens, as well, thanks to your online course “Stretching your Frame of Mind” (a great course, by the way). Fixed focus lenses would be okay for me – I actually like shooting with them. I am looking to upgrade in terms of picture quality (in particular, my Canon kit zoom 4.0 – 5.6 / 17 – 85 mm is not the greatest, I find)

My current favo rite combination would be a Canon 4.0 / 17mm – 40 mm and either a Canon 1.8 / 85 mm or a  2.8 / 100 mm Macro lens (not so much looking for a Macro lens in particular, but rather for a high-quality portrait / multi-purpose small tele lens). I would keep my 1.4 / 50 mm to cover the “middle” range and to have at least one faster lens available. As an alternative to this combination,  Canon’s 2.8 / 24 – 70 mm lens sounds like an interesting option.

I am not a professional photographer, so I am on a budget. However, I would be willing to spend some money on good quality lenses that I can continue to use after my next camera upgrade and that give me a range of options from wide angle to small tele.Which lenses would you recommend in my case?Your feedback would be much appreciated.
Thanks,

Henning”

Here’s my response to him:
Henning, your choices are right on! I actually have both of these lens and I’ve always been very happy with them. When buying these lens, remember that it would be a lifetime investment, and providing that you take care of them you probably would never have to replace them.
FYI, when I was buying my first digital wide angle lens, I inadvertently bought the 17-40mm F/4 when I meant to buy the 16-35mm F’2.8. I didn’t realize it until i got my lens and was shooting with it for a while. I guess some might suggest a “senior moment’!!! I was going to send it back but after using it for a while I decided to keep it because I was really liking it.
The stop I lost going from a F/2.8 to a F/4 was negligible since I virtually always use a tripod, and I’m very fast with it!!! If you’re the type that doesn’t want complete control of your photographs and you hand hold your camera, then that one stop would/could make the difference in being able to shoot in a low light situation (without having to crank up your ISO, and then forgetting that you did later on). Of course, that one stop makes a huge difference in price. The 17-40mm lens sells for $US840.00, while the 16-35mm goes for $US1700.00. You’re paying a lot for that stop but to me it’s worth it when you think of it as a one-time investment and amortize it over the course of your photographic lifetime.
I really love my F/2.8 100mm Macro, and like you I use it for portraiture as well as other situations besides Macro work. A fantastic lens!!! As far as the F/2.8 24-70mm lens, I also have it and let me tell you that it’s an incredible piece of glass!!! Down the road, it’s a ‘must have’ lens for you.
There’s always going to be a lot more you can do with zooms over fixed lens. At one time, i traveled with fifteen lens, now, I carry four and I have everything from 17-200mm and my life is soooooooo much easier.
Since light is so fleeting, and can vanish in a blink of an eye I don’t want to miss it by changing lens. even as fast as I am, I’m not as fast as Mother Nature.
One last note Henning: When it’s time for you to upgrade your camera body, I would absolutely go with the Canon 5D Mark II. To me, it’s unbeatable. I’ve been shooting with them for a long time and I have no desire to change. As they say, “if it ain’t broke, why fix it”? One thing I will tell you and hope you’ll remember is that buying your first 5D Mark II won’t make you a better photographer, but what it will do is to make you the very proud owner of a Canon 5D Mark II. It’s not the camera, it’s the ten inches behind it that’s important!!!
I hope this helps.
JoeB

The Law of Common Fate, Part II

threecowboys_DM

In a recent blog post, I talked about “The Law of Common Fate,” and how this concept in the Psychology of Gestalt can help take our imagery “up a notch”.

I talked about having two or more people moving in the same direction to create a directional line. Together they have a common destiny, and this destiny is what makes the viewer become an active participant by having him wonder where they’re going. These directional lines can be shapes as well as organic forms.

Another important concept in The law of Common Fate is when the viewer sees a group of arrows or hands raised in the air, and one of the arrows or hands is pointing in the opposite direction. This creates Tension because the viewer doesn’t associate it with the whole.

Because Tension is so important in our photography, I use people in the same way as I would have one arrow or one hand pointing in a direction that’s different than the rest of the arrows or hands in the same photograph. By the way, I’ll usually have my subject looking directly into the camera. The reason I do this is because Line is probably the most important of all the elements of visual design, and the implied line between the subjects eyes and the lens is very powerful.

The following slideshow gives you an example of The law of Common Fate by using people to create Tension in your photography.

Check out my website at: www.joebaraban.com and come shoot with me sometime.

JoeB

Sunpath Software: How to Determine Sun Positions

Maine Lobster-Fisherman/workshop student.

Have you ever wished you were at a location at sunrise when instead, you were there at sunset? The wrong time at the right place?

Here’s the reason my work looks like it does:

For most of my career, I’ve known exactly where the sun would come up (to the degree), and exactly where it would set…anywhere in the world, on any date I choose. I also know exactly what time (to the minute) it will hit the horizon coming up and going down. I know how long ‘dawn’ is (the glow in the sky) prior to the actual sunrise, and how long ‘dusk’ is (the after glow in the sky) after the sunset.

I use a computer program called “Sunpath“. Whenever I know where I’m going to be shooting and when I’m going to be there, I put that information into it and it prints out a chart. From that, I know where I need to be to get the early morning light and  late afternoon light.

Now, I use a “hand bearing compass” that you can get online. It’s called a Morin 2000, and it looks like a hockey puck. Inside it is a wheel with the 360 degrees marked on it. You can sight with it like you would a camera. When you go to the site, there’s a demonstration of how you use it.

I picked the date New Years Eve. 2011, and the location is for Crockett, Texas where I have my private “Stretching Your Frame of Mind” workshop for two couples.

Remember that these times will be when the sun actually hits the horizon. If you look at this chart, you’ll see when the first light of dawn occurs and how much time you have before the sun comes up. The same with how long you’ll have shooting in the after glow (dusk) until it’s dark. Look where it says dawn and dusk.

Now with this information, I can plan all my shots that I’ve scouted beforehand with my readings and compass. What I do is stand at a location I want to shoot, and look through my compass. The wheel inside floats in water, so what I do is point the compass to the appropriate degree from my readings (keeping it level with the ground).

I’ll know if a mountain or a building will block the sun right at sunrise, and I’ll know when the sun will break clear, and what time it will.

If you look at the bottom of the chart, you’ll see a graph. The graph charts the sun all day long. If you follow the curved line, you’ll notice a series of small black dots on it…that’s the sun. That’s the altitude of the sun in degrees. I have an instrument called an ‘Inclinometer’ . This device measures the altitude. So, together with the compass and the Inclinometer (you can get it in one instrument from Suunto called a tandem), I know where the sun is going to be all day long; from the time it hits the horizon on its way up to the time it hits the horizon on its way down.

This way, I can move to another location and return to that spot when the sun is clear of any obstacles…also, it sure is nice knowing exactly where the shadows will be all the time…24/7/365!!!!!! A lot of people always asks me how my color is so saturated, and the light always looks good…well now you realize that it’s not by chance. I always know where to stand, when to stand there and how long I have to stand there!

The Inclinometer is important for me to being precise, but the compass (Morin 2000) is all you would need if you think you can’t figure out the the altitude.

Finally, I’ve been told that the iPhone has an application that will give you the readings, but here’s the problem I have with that: First, it won’t tell you until your standing there. I’ll know a year in advance. Second, what happens when you don’t have service? I’m pretty sure you couldn’t get service in Big Bend National Park, with anyone!!! Of course, that’s subject to new technology.

I can get a GPS reading on my cell phone, but it’s not as accurate as looking through the Morin2000, and what happens if I don’t have a signal? Also there is a free download called a Photo Ephemeris that will also give you the information, but it’s very complicated and “above my pay grade”.

Having this kind of knowledge and tool is SOOOOOO powerful in creating photographs. I’m sure you can imagine!

With this knowledge, you’ll know if the glow behind a skyline, and it’s reflection on a body of water, will look the best at sunrise or sunset.

For people that have or will take a week workshop with me know, or will find out how ‘uncomplicated’ this really is. It may only seem difficult, but in reality it’s quite easy. You’ll get it in fifteen minutes on the first day.

The above photograph is an image I took while teaching my “Stretching Your Frame of Mind” workshop at the Maine Media Workshop. The class wanted to see how I go about setting up  a photograph, from scouting locations with Sunpath and my compass, to gathering props, and a way to light him. By the way, this was one of my students we turned into a Lobster-Fisherman. At first, he didn’t want to put the trap over his shoulder because he said that they never did that.

I had to convince him that it was “taking license for the sake of art”!!!!!!

Based on my readings, I knew ahead of time that the sun was going to rise behind him and give me that glow.

Below is another example of having to know exactly where the sun was going to set.

What an advantage!

JoeB