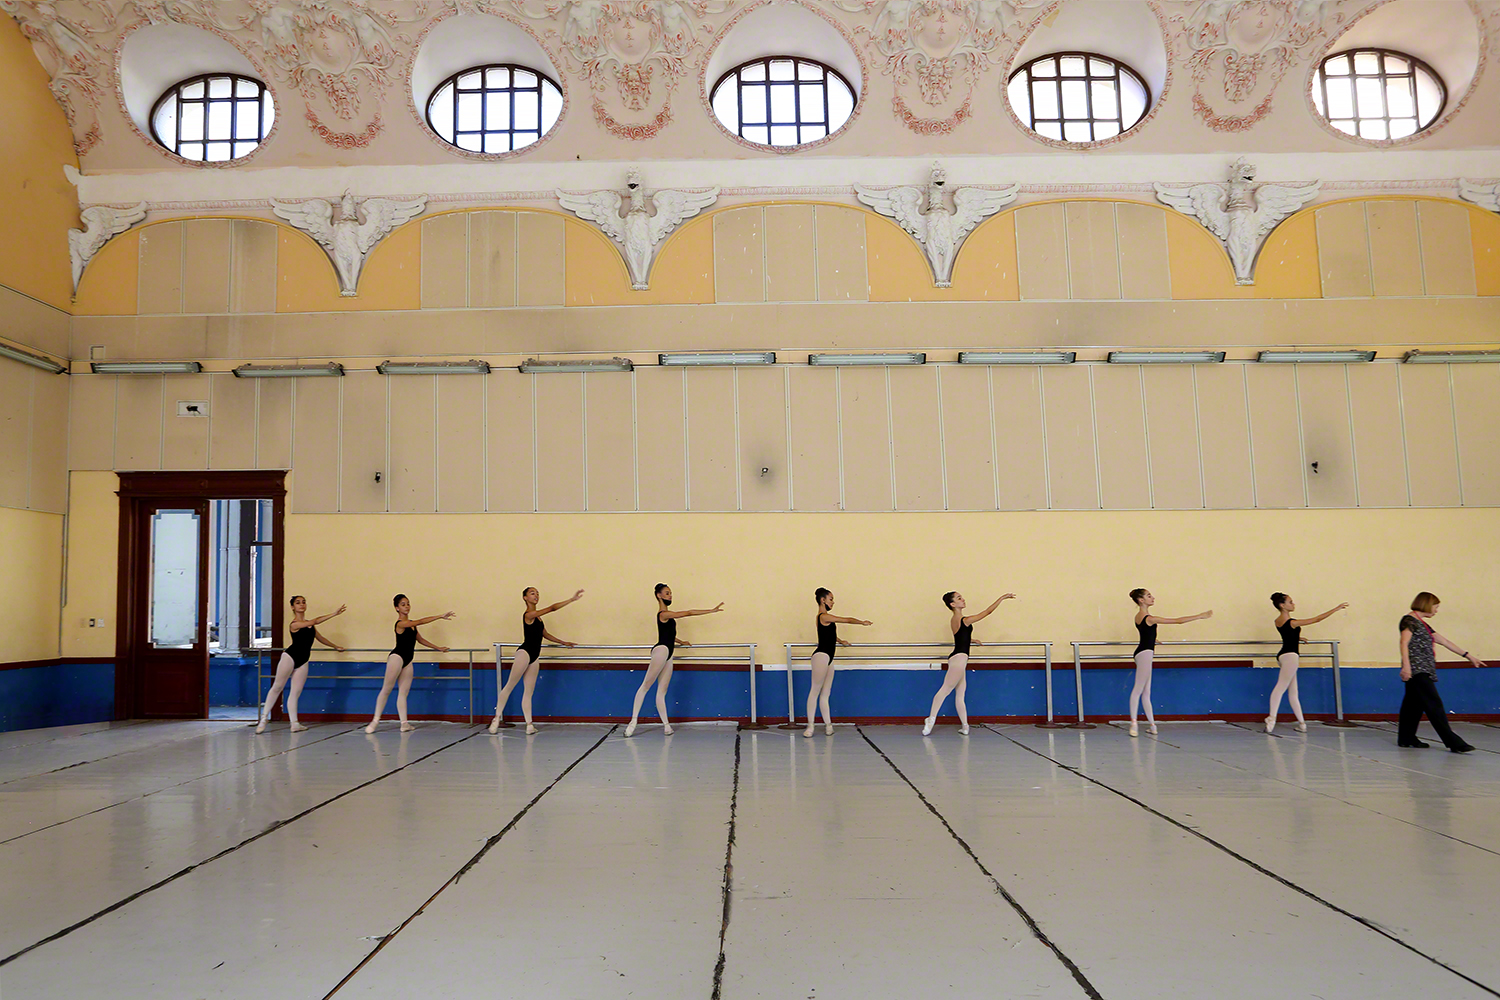
≡ Menu

Life Before Photoshop: Hawaii

16Look ma, no Photoshop  
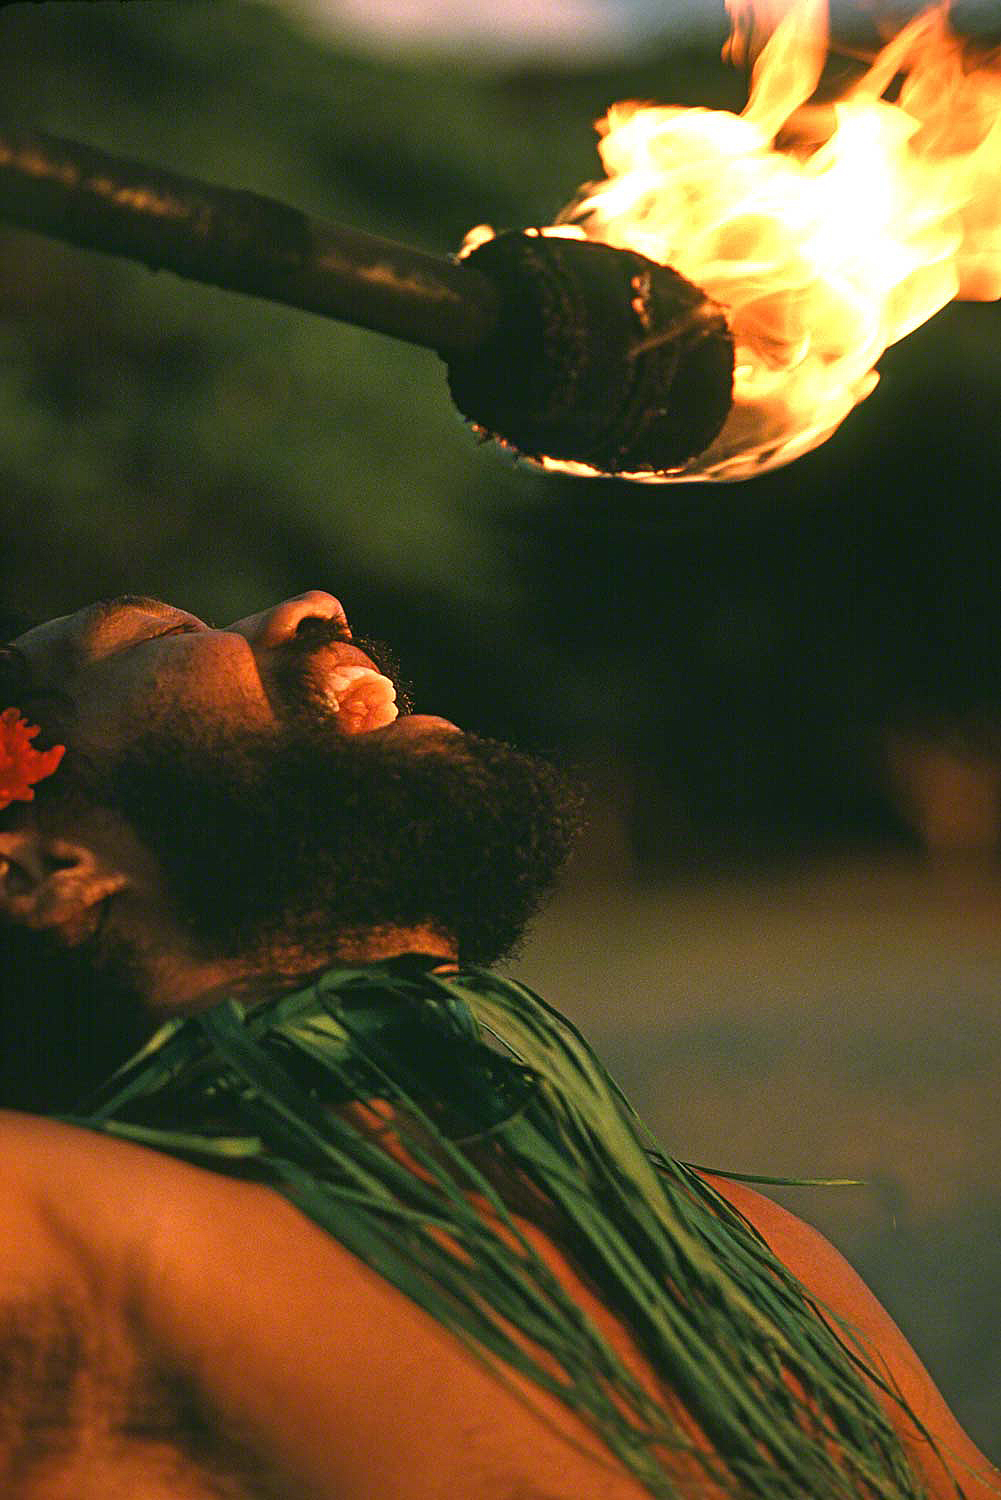
I teach a four week online class with the BPSOP, and I also  conduct my “Stretching Your Frame of Mind” workshops around the planet. What’s the single thread that connects all my fellow photographers to one another? It’s the fact that the vast majority began their love for this creative institution after the advent of the digital camera. Virtually every month , I  try to educate these students of mine that you don’t need Lightroom or Photoshop to make good photos. I’m not saying there not great tools, just that you don’t need them to make a good photo.

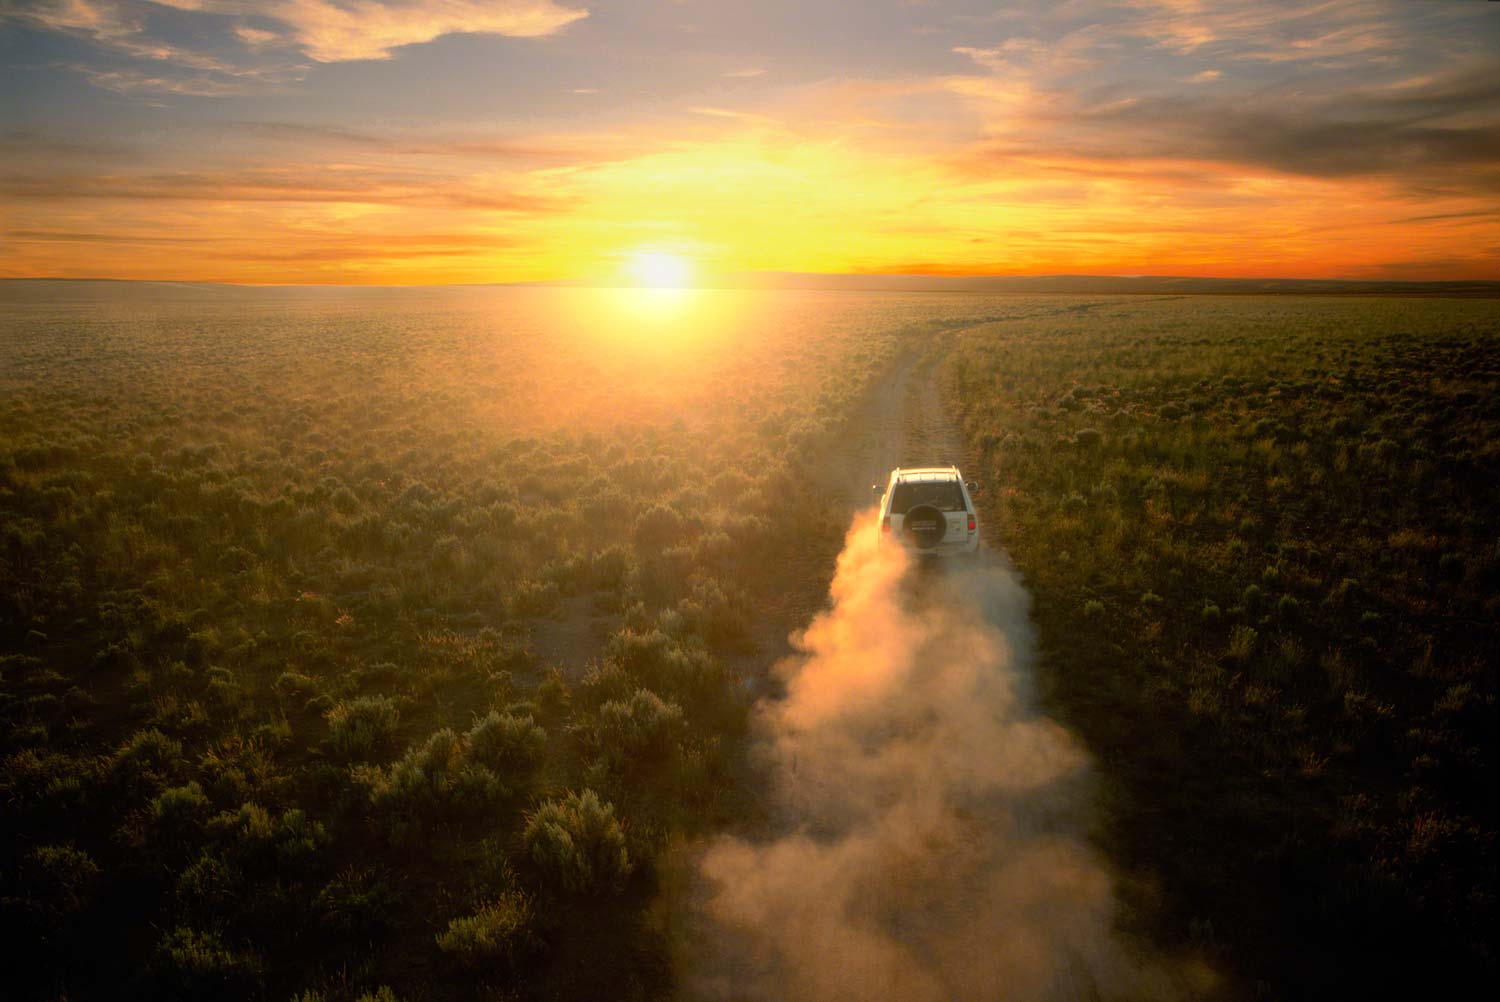
I recently had a student ask me if I bracketed my photos and combined them in HDR to get the “correct exposure”. This is a clear sign that validates my thinking…she had been told that there was a correct exposure….What????? First of all there’s no such thing as a correct exposure. every picture I’ve ever taken had a different “correct exposure”. How can there be a universal correct exposure? Beat’s the hell out of me. I guess it’s just another one of those things that lie just above my pay grade.

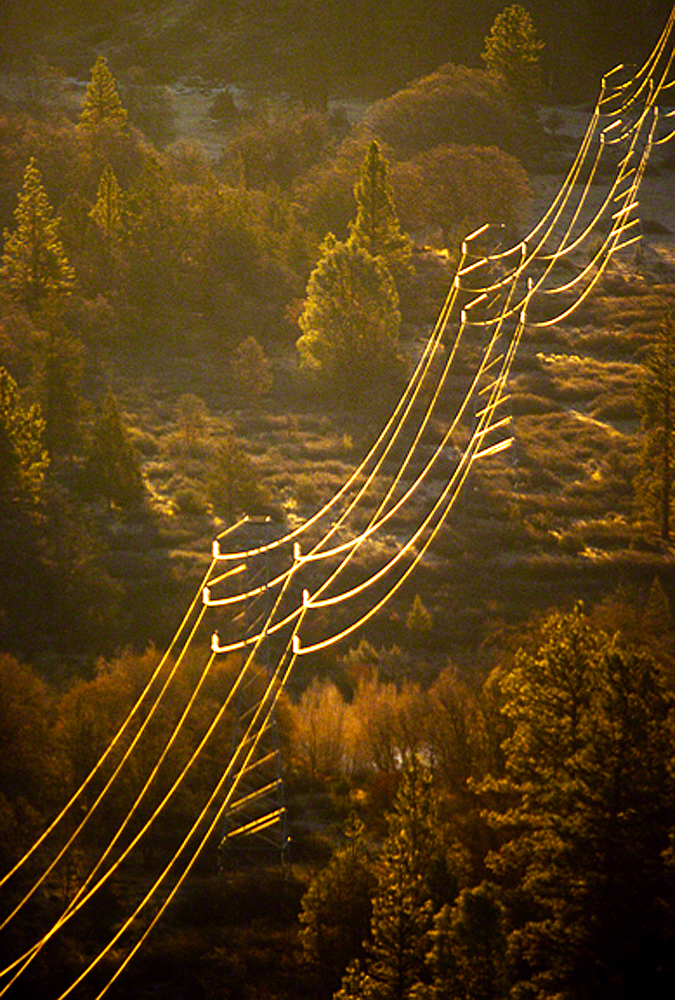
My exposures are based on what I’m feeling at the point of creation. It has solely to do with the message I want to send to the viewer. Bright and sunny, or dark and dramatic…it just all depends…doesn’t it????

Second, I’ve been shooting for forty-four years and most of that was when you bracketed and choose the best exposure. There was no other way to do it; at least when I was shooting color. HDR was the initials of a girl I went out with!!!

Ok, read my lips…YOU DON’T NEED HDR TO CREATE A CORRECT EXPOSURE. IN FACT, YOU DON’T NEED HDR AT ALL!!!

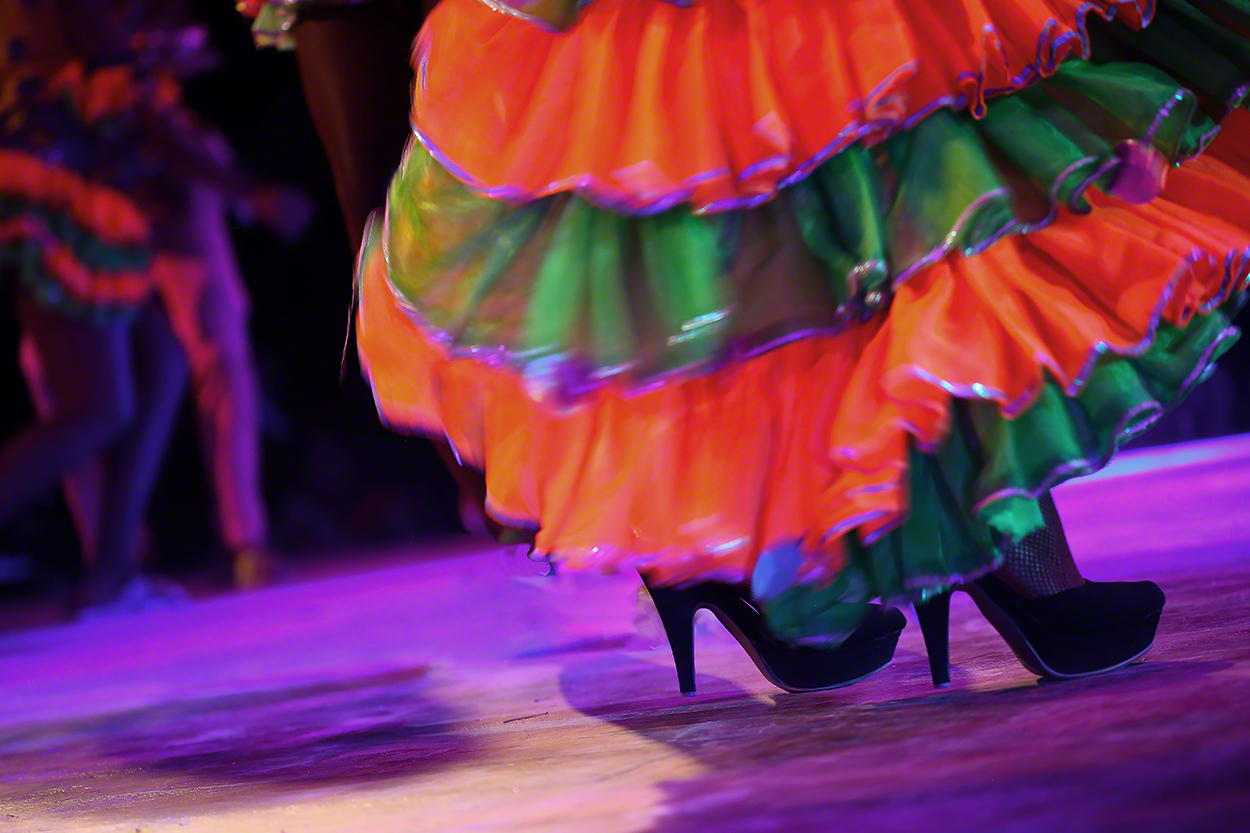
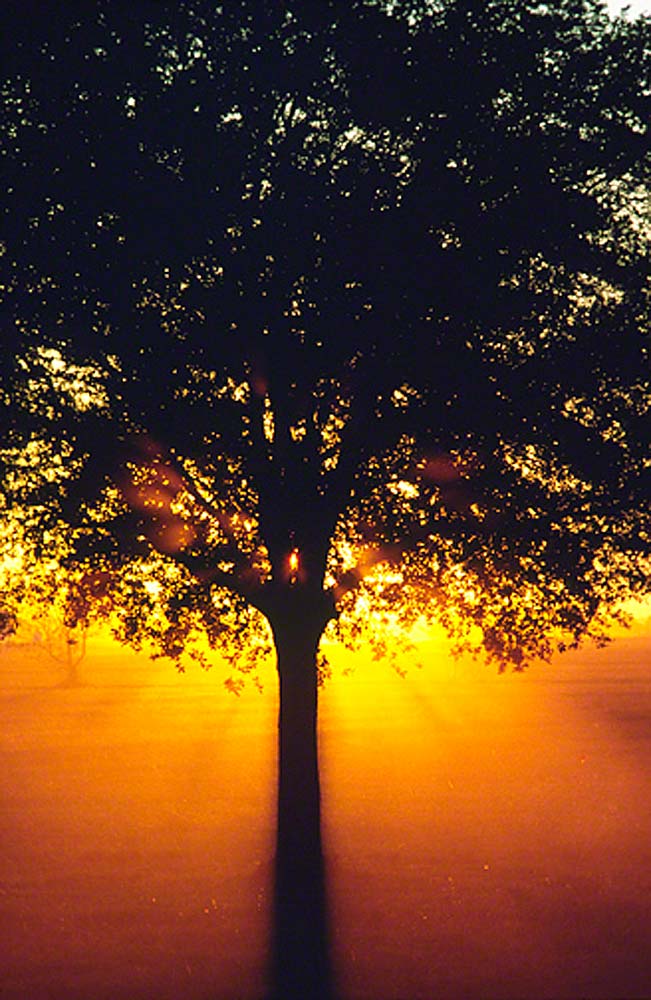
In the above photo, I was shooting a project for United Airlines. One of the toughest assignments I’ve ever had. Five weeks in Hawaii shooting pretty much whatever I wanted..oh the horror!!!

We were invited to take some photos of a popular Luau at the hotel we were staying at. My assistant was standing right next to me giving me readings from my Minolta One-Degree spot meter. Yes, it actually reads just one degree of reflected light at a time. I want to know everything about the light and when it changes. It’s why I never use the meter in my Mark III after crossing over to the digital world. It’s just not as accurate as I want it.

A new reading every few seconds.

A new reading every few seconds.

I wanted to maintain the aperture, so my assistant kept yelling out the changes in shutter speeds., until it was too dark to show the fire-eater and the environment around him, and too slow to stop the action. I was able to achieve this on one piece of film, and one exposure.

Visit my website at: www.joebaraban.com, and follow me on Instagram www.instagram.com/barabanjoe. Check out my workshop schedule at the top of this blog.  Come shoot me sometime.


JoeB

{ 4 comments }

right smack dab in the middle

Since I started my photography career right after the dinosaurs disappeared, there was no information highway to get information from. I shot the way I felt when a photo op came my way without thinking about anything but what I had (subconsciously) learned studying painting and design practically my entire life.

There weren’t any rules for photographers to follow back then, or if there were I didn’t know about them; and wouldn’t have paid attention to them anyway. After teaching an online class with the BPSOP for the past seven years and conducting my “Stretching Your Frame of Mind” workshops for the last thirty-three years, I’ve been a promoter of the idea that rules are a hindrance to creativity and the shackles of originality. There are countless rules one can read about simply by Googling up rules for Photography, but I won’t help you on that.

Who writes these rules anyway? When I click on some they’re all the same insipid articles with some changes in grammar and vocabulary. My guess is that there are photographers out there trying to become immortal and trying to stretch their fifteen minutes of fame into an eternity. I can tell you that this is one photographer’s name that you’ll never see among the others.

I’m thinking about writing an article for the internet and calling it the Anti-Rules for Proper Photography. It will contain everything you ever wanted to know about taking your own path and just letting your imagination be your guide; not some silly rules that can only lead you down a one way path to photo boredom. Or perhaps you won’t ever make it all the way to the end but wind up in some strange creative photography purgatory…YIKES that’s a sobering thought.

Here’s an example of one of my Anti-Rules: Put your subject right smack dab in the middle. How’s that for an Anti-Rule?

The first thing you’ll have to shake off is this dumb rule that’s called The Rule of Thirds, and for those of you that just can’t get it out of your mind and you need help to de-program, there’s photo therapy out there and it’s called a workshop; specifically my workshops…where you’ll see no rules attached. Actually, Ansel Adams said it best, “There are no rules for good pictures, there’s just good pictures”.

On day one we’ll work on my first anti-rule then work on all the others the internet has helped to brainwash all my fellow photographers. We’ll stand side by side in case you start to feel woozy (perfectly normal) and I’ll watch as you put your subject right smack dab in the middle of your frame. It will be hard at first, but once you realize that the difference between doing this and following the Rule of Thirds is the difference between you’re photo being remembered because of the visual interest and tension and it falling through the cracks leaving you in a state of mediocrity.

Visit my website at: www.joebaraban.com, and be sure to check out my upcoming workshops. Come shoot with me sometime.

JoeB

{ 0 comments }

In the comfort zone.

In my online class with the BPSOP, and in my “Stretching Your Frame of Mind” workshops I conduct around the planet, I tell my fellow photographers that Westerners were taught to read from left to right. As a result, we look at photographs from the left to right and we usually start in the lower left corner and work our way to the top right.

Now I realize that there are always exceptions, but for the most part, this is how we perceive. It’s our comfort zone and it’s how I usually design my composition. BTW, when we can get the viewer to look at a vertical, he’s going to take more time going from the bottom of the frame to the top.

This additional time will take more energy, and Energy=Tension. That’s why Verticals have more energy than a horizontal.This certainly doesn’t mean to shoot only verticals; just remember to always shoot both ways.

This is part of the Theory of Gestalt where we take control of what the viewer perceives and processes and lead him comfortably around our composition.

In the above photo, I’ve maintained that comfort zone by having the viewer follow the directional lines of the road, and the pipeline from the left to the right. However, when I flip the photo the other way, it feels awkward and has taken the viewer out of his zone. It doesn’t have the same flow as it did when perceived from left to right.

Flipped and out of the comfort zone.

This is not to say that it can’t be a good thing to take the viewer where he’s not comfortable. There are many times where I like to do just that. Remember what Ansel Adams once said, “There are no rules for good pictures, just good pictures. Try it next time you’re out shooting. Try one where the flow is from left to right, then flip it and see the difference.

Visit my website at: www.joebaraban.com and follow me on Instagram www.instagram.com/barabanjoe. Check out my workshop schedule at the top of this Blog. Come shoot with me sometime.

JoeB

{ 0 comments }

Life Before Photoshop: Jaguar Shoot

Look ma, no Photoshop.

Look ma, no Photoshop.

One of the hardest photos to take without the aid of post processing is that of an automobile. I’m not talking about the new car you bought and is now sitting in your driveway for all to see on Facebook, I’m talking about a photo that will become a two page consumer ad and wind up in all the top national magazines, and possible billboards across the US.

Back in the film days, Photoshop wasn’t going to be invented for another five to ten years when Photoshop 1.0 was released in 1990. Even then it was in its infant stage and not all that helpful to make the clients cars look good.

A great deal of pre-production was involved from finding the right location using my Sunpath readings in combination with my Morin 2000 Hand Bearing Compass. Having enough room to maneuver around with either artificial light, or a series of reflectors was critical. Car prep companies were hired to bring the cars to the location, get the looking pretty enough to photograph, and take them away. No one was ever allowed to move or even touch the cars besides these companies.

Small pieces of white board right outside the frame to reflect soft light, or shiny board to reflect a little harder light to small areas on the wheel rims.

Depending on the light, and knowing exactly where it would fall, I would have them move the vehicles into the position I wanted, and on several occasions these cars were prototypes and came without motors; they would be rolled into position. Budgets on these shoots would sometimes be six figures, and that was over thirty years ago. Needless to say that a lot was riding on it and whatever you did you had to create in the camera on one piece of film.

As I tell my online students with the BPSOP, and also in my “Stretching Your Frame of Mind” workshops I conduct around our planet, take the challenge and try creating memorable images without the help of post processing. I’m not saying I don’t use Photoshop, because I do…all the time. I like the idea of being a good photographer and not a good computer artist.

Visit my website at: www.joebaraban.com, and follow me on Instagram: www.instagrm.com/barabanjoe. Check out my upcoming workshops at the top of this blog. Come shoot with me sometime.

JoeB

{ 0 comments }

My Favorite Quotes: Ansel Adams

Once again, Ansel Adams pops into the spotlight. Over the years I have taught online at the BPSOP, and have conducted my workshops all over the world. During these years I have quoted this very famous photographer several times. If you’re interested you can just click on “My Favorite Quotes” and scroll through them.

Well, I have another one that really fits the bill!

Ansel once said to his assistant John Sexton, “The harder you work, the luckier you get”.

First of all, anyone can click the shutter on their camera. It’s just about the easiest thing you can do when taking pictures. The hard part is everything else, and that’s the part that takes work.

Over the years, I have walked the Medieval Streets in Europe, country roads in the US and the Malecon in Havana with students in one of my workshops. I have found that most, but not all, will walk by something interesting stop for a moment and ‘take’ a picture of it.

I can tell you from over fifty years of experience shooting on my and teaching for forty years that unless you’re street shooting and looking to stop some sort of action that’s whizzing by you, or you’re whizzing by it, or it’s stopped for just a moment, the odds of you coming home with a wall hanger are slim to none. Of course that depends on what you consider a wall hanger.

But that’s another story.

Wall Hangers rarely come from ‘taking’ pictures. They come from ‘making pictures’. Bob Marley once said, “Some people feel the rain while others just get wet” http://joebaraban.com/blog/my-favorite-quotes-bob-marley/

It takes work, and a lot of it to “feel the rain”. But once you do, you’ll be ready, and as Eddie Adams once said, “When you get lucky, be ready”.

Visit my website at  www.joebaraban.com, and follow me on Instagram www.instagram.com/barabanjoe. Check out my upcoming workshops at the top of this blog. Come shoot with me sometime,

JoeB

{ 0 comments }

Quick Photo Tips: Front and Center

Front and center.

Front and center.

I don’t remember when I first fell in love with my 20mm F/2.8 lens. I’m sure it had to do with the fact that I was shooting Kodachrome 25 (the ISO), and when I wanted a high speed film, I switched to Kodachrome 64. That was in the film days and that was the film of choice. Being that slow made me use a tripod, and it was the best thing I ever did, because now I’m as fast with it as most people are when thy hand hold.

I digress.

The 20mm lens became my all purpose lens and I shot everything with it from portraits to landscapes.  Because it was so fast, I didn’t have to stop down very much to usually get what I wanted in focus. I could also get my subjects “up close and personal” and if I kept them in the middle, or if I kept my camera level when I did put them close to the edge they wouldn’t be distorted. That also included not having their arms and legs too close to the lens or they would be weird and too large for the rest of their body.

I loved to put my subjects what I always referred to as “front and center”. In my online class with the BPSOP, and in my “Stretching Your Frame of Mind” workshops I conduct around the planet, I’m constantly getting my fellow photographers to get “up close and personal” to their subject. For one thing it generates Visual Tension and interest. For another, It anchors them in the foreground and creates layers of interest and depth. Since the camera just has one eye (the lens) it can only see in two dimensions…height and width. You can trick the camera into creating the third dimension…depth by placing your subject front and center.

Btw, I also like to put them smack dab in the middle and to hell with that silly “Rule of Thirds” thing that everyone thinks you have to follow to create good photos.

So try it next time and see if you like it. Put your subject front and center and close to the lens. Once you see how it works and you get over the hump, give it a try, you’ll see that it’s not such a bad idea after all.

Here’s some examples, and all of them were shot with a 20mm lens. Some were shot during the film days and some in the more recent digital age:

Visit my website at: www.joebaraban.com, and follow me on Instagram www.instagram.com/barabanjoe. Check out my workshop schedule at the top of this blog. come shoot with me sometime.

JoeB

{ 0 comments }
What rule says you can't center the horizon line?

What rule says you can’t center the horizon line?

Once again I want to start off by saying that there’s no set rule as to where to put that pesky horizon line; run from anyone that tells you any different.

There’s three basic choices:

Putting the horizon high in the frame will accentuate whatever you put in the foreground while at the same time intensifying the feeling of distance. When I talk about this to my online class with the BPSOP, and in my “Stretching Your Frame of Mind” workshops I conduct around the planet,   I always warn my fellow photographers that when they tilt the camera up or down the vertical lines close to the edge of the frame will bend either in or out.

One way that sometimes corrects that distortion is to switch to a wider lens so the tilting up or down is at a minimum. Switching to a wider lens will also help keep everything in focus from the foreground to the background. Another way to help with the focus is to shoot from a higher POV and then when you tilt the camera down it will extend the DOF.

Breaking through the centered horizon line.

Breaking through the centered horizon line.

Putting the horizon line low in the frame will do two things. It will bring attention to a dramatic sky, and it will create a feeling of being small in the scheme of things…as in the vastness of the world around us. I will often put my subject in the bottom right corner of my frame to give the feeling of being alone and small in relation to the infinite reaches of the sky above. Putting my subject in that right corner will also generate Visual Tension. Btw, if the sky is not dramatic and just blue, the viewer will quite possibly tire of it and move along.

Putting the horizon line in the middle of the frame is to many, breaking a cardinal rule. These are the people you want to stay away from. There are times when it will work, and it just all depends. One never knows until it’s tried, and I’m the first one to encourage trying. As I always told my kids…”Color outside the lines”.

Putting the horizon line in the middle is often used when you’re reflecting the image in some body of water. It will change the dynamics of your composition by becoming more of a graphic/symmetrical statement; showing the subject in a mirrored reflection. It will also generate Visual Tension. In my classes we work a lot of ways to create Visual Tension, and showing a subject and it’s reflection is one of the ways.

When you’re reading all the rules to becoming a good photographer, and I say this lightly, placing the horizon smack dab in the middle is high up on the list. Btw, who was the first person to tell us that was a real “no-no”????? I think he or she has dressed up in their parent’s clothes and are playing hide-in-seek!!!

A low horizon line.

A low horizon line.

I say it does have merit. Placing your horizon line in the middle can have two effects. first, it can look like someone has spliced two photos together. Second, it can leave your photo non-moving and static. Non-moving in the sense that its important to move the viewer around the frame giving him lots of things to discover. That way he’ll stick around longer.

One way to work around centering the horizon line is to use elements to break the horizon. In effect, it can tie the two parts together.

In any event, what’s important to think about is one of my favorite “personal pearls of wisdom”…consider the scene and its outcome. What message are you trying to get across? Simply put, are you emphasizing the sky or the foreground…or neither one?

There is another way to solve this dilemma, and this will resolve any nightmares you might endure from worrying about where you put that last horizon line. Don’t show the horizon at all. If the centers of interest, or the main subject is below the horizon line, then it makes life so much easier.   This is really a good idea when the sky is overcast.

Visit my website at: www.joebaraban.com, and follow me on Instagram www.instagram.com/barabanjoe. Check out my workshop schedule at the top of this blog. come shoot with me sometime.

JoeB

{ 0 comments }

my new 100mm macro

I teach an online class with the BPSOP, and I conduct workshops all over the world. I have also written a blog since 2011, and one comes out every five or six days.

I look for and find and see ideas from every corner of the globe, and under every rock…if necessary.

I happened to walk through the power tools at my local Loews and suddenly an idea hit me smack dab in the face. It was an analogy I drew from incidents that occurred along the way in my workshops.

So, my fellow photographers, imagine a carpenter with all his tools next to him or at least very close. For a specific job, he had purchased some new power tools and is about to start working. Here’s the problem, he hasn’t read the manual and doesn’t know all the functions of said tool.

Now, imagine me in my workshop I did in Prague many years ago. We were at a famous church , famous for the amazing Flying Buttress…”a buttress that stands apart from the structure that it  supports. and is connected to it by an arch.”

In any event, it was sunrise and a student came up to me with a Leica body and an assortment of lens that totaled $60,000. She had no idea how to use it and asked me if I could help. All I could do was to look at her as if she had just landed in an extraterritorial spacecraft of some kind.

In other words, I had no idea!!

It wasn’t the last time someone came to me for help with a new piece of equipment they had bought just for the workshop….which includes tripods of various sizes and shapes.

Know your gear, read the manual and practice with it BEFORE you go out in the real world to shoot those elusive ‘Wall Hangers’.

Visit my website www.joebaraban.com and follow me on Instagram: www.instagram.com/barabanjoe. Check out my workshop schedule at the top of this blog. Come shoot with me sometime.

JoeB

{ 0 comments }

If I had a dollar for every time a student of mine opened Photoshop and unnecessarily worked on one of their photos…that didn’t really need anything, I would be writing this from poolside at my summer home with a blue and frothy drink sitting on a table by my side.

It’s sad that although their are some great things about Photoshop, there are just as many unfortunate things as well. But that’s our world today.

In my online classes with the BPSOP, and in my workshops I conduct all over the place, so many of my fellow photographers started shooting while the digital age was beginning to boom.

They though and are still thinking that you need Photoshop to complete your ‘wall hanger’, as well as all those ill-considered things your camera either tells you do do, or they’re on the back of your camera beckoning you to take the one way path to mediocrity i.e., the Histogram, or those obnoxious blinking lights that are telling you that you’re about to ‘clip a highlight’…sidetracking your thought process while you’re trying to “color outside the lines” and create something worth a damn.

For those of you that sit in a camera club meting eating goldfish and washing them down with diet drinks, while looking at someone’s image that he or she worked on…and damn proud of it, do not, and I repeat, do not think you have to go down that road.

Photographers that use Photoshop or Lightroom to enhance their photos, more than likely (and I’ve seen it for years) will over process a good image. It will become garish, glitzy, and generally in bad taste, and the sad part is that there are those out there (and you know who you are), that will simply love it.

If that’s what you want, then ‘Lay on McDuff'”…(Shakespeare’s Macbeth)!!!!

If you would rather not, then study what makes a good photo as far as the composition, balance, the light, and ways to keep the viewer around longer. I can tell you that it’s a fifty-fifty proposition that you can find that in a camera club.

Visit my website at www.joebaraban.com, and follow me on Instagram: www.instagram.com/barabanjoe. Check out my workshop schedule at the top of my blog. Come shoot with me sometime.

JoeB

{ 0 comments }

Life Before Photoshop: Isuzu Campaign

Look ma, no Photoshop!

Look ma, no Photoshop!

Yes, those were the day my friend, those were the days. The days when Adobe was a type of house in the Southwest. When you had to be a good photographer and not a good computer artist. When you had to create everything created in your imagination in the camera. When you sometimes had to actually focus your own camera’s lens…can you imagine? Oh the horror!!!

Don’t get me wrong, as I always tell my online students with the BPSOP, and in my “Stretching Your Frame of Mind” workshops I conduct around our planet,  consider being a good photographer and capture as much as you can in the camera…including the best exposure.

I also tell them that I use Photoshop all the time, but to make the minor adjustments that I couldn’t achieve before clicking the shutter. For me, the challenge/fun  is doing it on location and not in my office in front of my computer.

I guess that the hardest production shots to pull off in the camera were in car photography. It was very difficult to get it right, and if you didn’t the car clients would not be happy. When the digital age really took hold, it spelled death to the car shooters that made a living just shooting cars. A great many of them had to close the door. agencies and clients were shooting the cars CGI style…in the studio against a blue or green screen. They would either go out and shoot the environment/landscape separately, or just buy one from a stock agency. The results were and still are mostly awful; the main reason is the light never matches.

Ok, now to the photo above.

This was shot for the cover of the Isuzu full line car brochure. I had a location scout find a road that would lead into the sunset and make the dirt the car kicked up glow from being backlit. I gave her the Sunpath readings and with her Morin 2000 hand bearing compass, she was able to pinpoint where the sun was going to set. I was positioned right over the road in a cherry picker so that the car would come out from right underneath me.

The dirt is actually called Fuller’s Earth. It’s a very fine powder used to accentuate dust or even explosions in cinematography. We spread it over the existing dust from the lift all the way down to the horizon. When the sun was at the degree I wanted, I had the car start driving to the sunset. I was communicating with the driver via walki-talki, to have him adjust the speed to maximize the glowing dust.

It was a lot more fun than sitting in front of a computer to achieve something similar…if I even had the skills!!!

Visit my website at: www.joebaraban.com and follow me on instagram www.instagram.com/barabanjoe. Check out my workshop schedule at the top of this blog. Come shoot with me sometime.

JoeB

{ 0 comments }

I don’t always do what I did

I get a lot of ideas for my posts from both my online students with the BPSOP, and from the many WORKSHOPS all over the world.  This post is from an online student in my part one class. FYI, my part one class, (four weeks), is all about showing my fellow photographers how to incorporate the elements of visual design and composition into their imagery.

In the second week we work on ways to create depth and also visual tension.  Let me digress for a moment and say that I want students to meet the challenge and get their composition to look the way they want before they click the shutter.

In other words, no cropping is permitted. BTW, I’ve been shooting for fifty-three years and I’ve never cropped an image…and my photos seem to come out pretty good.

I read once that when you crop, it’s a sign of sloppy technique and a lack of discipline…but that’s another story.

I also want students to try shooting on manual throughout the four weeks. This way they are in complete control and they make all the decisions…not the camera. In the long run, it will make you a much stronger photographer…if that’s what you want.

In any event, this particular student continued to shoot on a program and didn’t know how to adjust the setting while shooting. Also, even though I said that I would not critique a cropped photo, she submitted one that was cropped.

Now she took my class because she wanted to improve her skills, start seeing things with the right side of her brain…the creative side, and take advantage of the elements of visual design as well as the elements of good composition.

I said to her that in the class if you always do what you did, you’ll always get what you got…make sense?

Visit my website at www.joebaraban.com, follow me on Instagram www.instagram.com/barabanjoe. Come shoot with me sometime.

JoeB

{ 0 comments }

My Favorite Quotes: Henry David Thoreau


What else do you see besides clouds?

What else do you see besides clouds?

“It’s not what you look at, it’s what you see” This quote, written by nineteenth century author, poet, and philosopher Henry David Thoreau (you might remember him from your American Literature class as the author of Civil Disobedience) is probably one of my all time favorites and one that I’m always sharing with my online class at the BPSOP, my six-month private mentoring program, and in my “Stretching Your Frame of Mind” workshop I conduct around the planet.

My workshop and classes are all about using the six principles of Gestalt and the elements of Visual Design and composition to aid you in taking your photos what I refer to as “up a notch”. Line, Form, Shape, Texture, Pattern, Perspective, Tension, Light, Color and Negative Space are the elements we work on every day and there out there all around you. you just have to see them.

You walk up to a tree and you see a tree. But what else is it? It’s the whole made up of several parts. It’s made up of Lines, Patterns, Texture, and various Shapes. How does it relate to the environment around it? How is the Light affecting it? Does it tell a story? Does Color factor in?

What about golf cart tracks or a stream? Does the golf cart tracks converge at a point on the horizon creating a Vanishing Point, leading the viewer around the frame to that point? Does the river sparkle or glow because the light is coming from behind it? Does it lead the viewer in and out of the composition suggesting more content outside of the frame? How could power lines running along a small highway be of any interest?

 Do you ever look at an old decayed window and see the beauty in it? Can you envision how father time has transformed it into a cacophony of colors, shapes, textures, and patterns.

What about something as simple as clouds in the above photo? Do they create a design? Shapes? Do they suggest some type of colored line that divides the frame from white to gray?

The next time you go out shooting, don’t look at things the way they are, look at them the way they could be.

Visit my website at: www.joebaraban.com, and follow me on Instagram www.instagram.com/barabanjoe. check out my workshop schedule at the top of this blog. Come shoot with me sometime.

JoeB


{ 0 comments }
Light rain falling.

Light rain falling.

I teach an online class with the BPSOP, and I also conduct my “Stretching Your Frame of Mind” workshops around the planet. One of my Springtime Workshops, I conducted was in Tuscany. We were based in Sienna, and each morning and afternoon we set out for various locations that I had scouted before the start of the workshop.

For most of the week we had great weather, but one morning we set out to capture the beautiful rolling hills and rows of Cedar trees indigenous to the Tuscany landscape. As we drove farther away from Sienna, on a very narrow two-lane highway, the skies became darker and darker, and rain was imminent. Katka, the woman that produced the workshop for me knew of a small pull out where we could park the van and cars. The morning light wasn’t going to happen, and then the rain came. Not a downpour, but even the light rain falling was enough to totally bum out my group.

Raining harder now.

Raining harder now.

We had parked  about fifty feet from a major curve that had arrows pointing around it, so I immediately began thinking of a way to turn the overcast, gloomy, rainy day into something positive and fun for the workshop. That is the ones that wanted to get out into the rain, which by the end of the shoot included almost everyone.

I had Petr, the co-producer get in one of our cars with one of my walki-talkis. I had him drive slowly around the curve, directing him via the walki-talkis to keep his foot on the brakes so we could introduce some color; while the workshop shot long exposures.

After a while we hardly noticed the rain and my fellow photographers were able to create several pretty damn good photos… I’m proud to say.

A rainy critique for one of mt hearty students.

A rainy critique for one of mt hearty students.

So, as I’m often heard saying, “You gotta do what you gotta do”.

Visit my website at: www.joebaraban.com, follow me on Instagram www.instagram.com/barabanjoe and check out my workshop schedule at the top of this blog

JoeB

{ 0 comments }
Steady as she goes.

Steady as she goes.

The first workshop I was ever asked to conduct was for the then Maine Workshop (changed to the Maine Media Workshop}. The year was 1983, and I was right in the middle of my career as an advertising, corporate, and editorial photographer when I started accumulating what I began referring to as my “Personal Pearls of Wisdom”.

Since then, I have amassed a plethora of these Pearls, and always share them with my online class and in the workshops I conduct around the planet; my private workshops and those I’m asked to teach with various organizations and schools.

“Steady as she goes” is a term I often say to a fellow photographer when I see them about to take a photo too soon. Over the years I’ve noticed that a student of mine will start shooting some kind of action before it’s ready to be taken. They don’t anticipate the action as far as when the subject is in just the right space to provide either balance, or one of the important ways to generate Visual Tension…the peak of action.

I would imagine it’s all tied into this digital age where everything needs to be done in a hurry. When you can go from the freezer, to the microwave, to the dinner table just three minutes.. That’s good if you’re late to work or wanting to see your favorite TV show. It’s not necessarily a good approach to capturing that moment in time when everything is in it’s place or that captured moment that leaves the action un-completed. That’s going to take a little more time, but it’s usually well worth it.

I was shooting for Alabama Tourism, and one sunrise we were walking along a boardwalk looking for photos that reflect the Alabama coast, tourism, and water activities. I came upon these benches shown in the above photo and thought they might make a good picture if given something else I could add…another “Layer of Interest”.

As I was standing there, out of the corner of my eye I saw an object coming into my frame. It was a small sailboat, and it was right on the horizon. I set my camera on a tripod, composed the benches the way I wanted, and waited….and waited. I knew what I wanted and hoped that the person sailing would accommodate me and my idea.

As it turned out, and following Eddie Adams famous quote that said, “When you get lucky, be ready”, I was ready and got the shot.

So, the next time you’re out shooting remember to wait for the right moment. Don’t be in such a hurry to start shooting, and maybe you too will get lucky…chill out as my kids use to say!!!

Visit my website at: www.joebaraban.com, and follow me on Instagram www.Instagram.com/barabanjoe. Be sure to check out  my workshop schedule at the top of this blog.

JoeB

{ 0 comments }