≡ Menu
Taken during the beginning of the "Golden Hour".

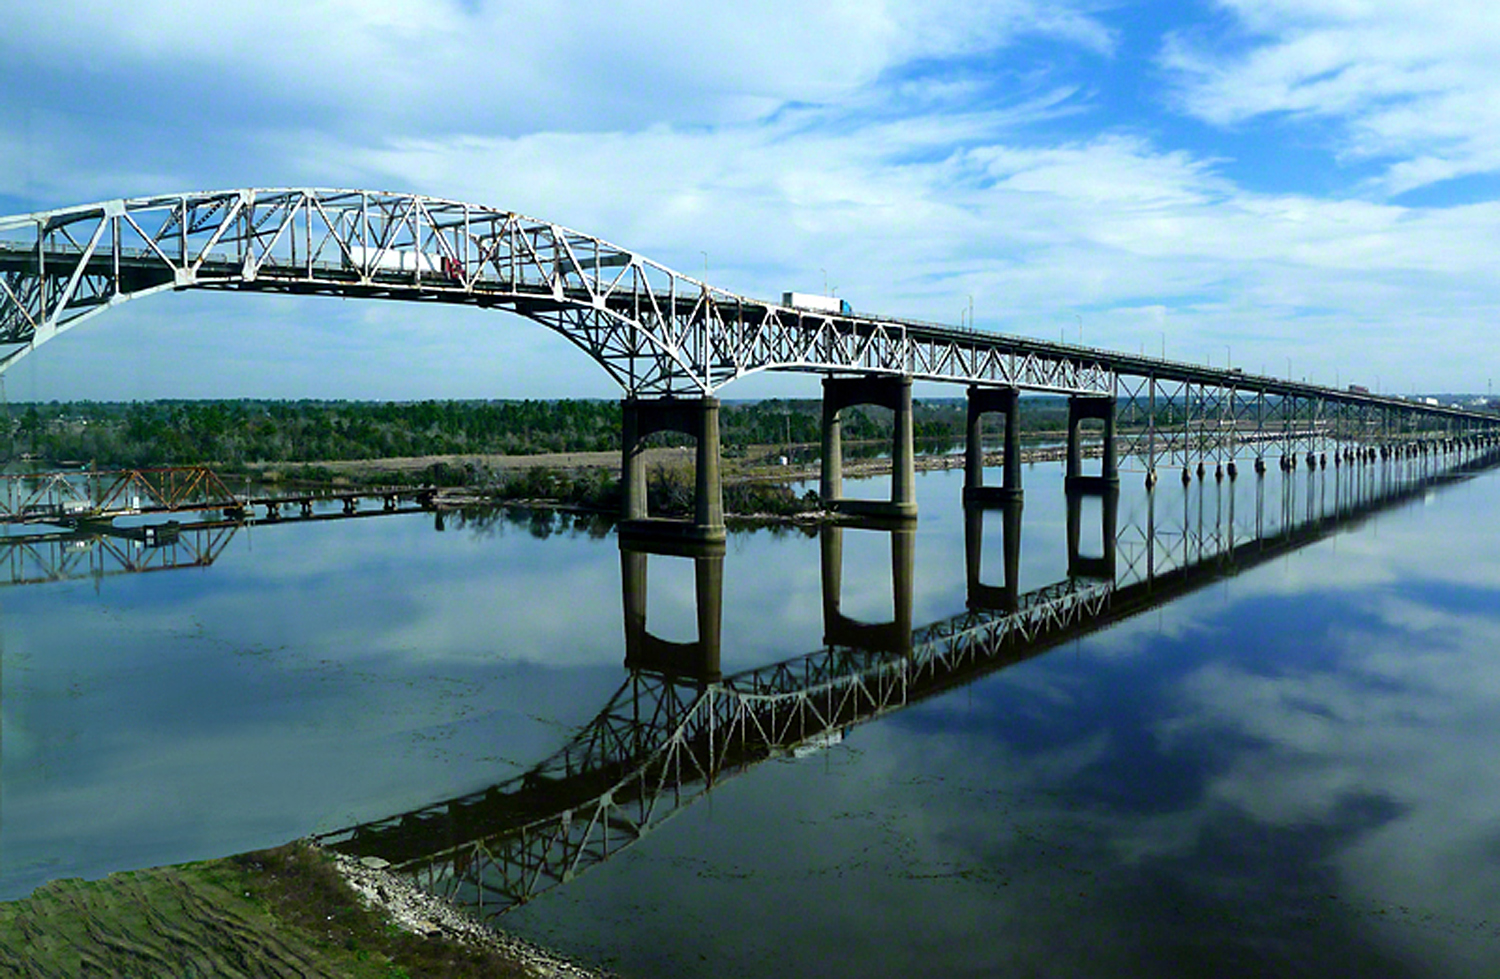
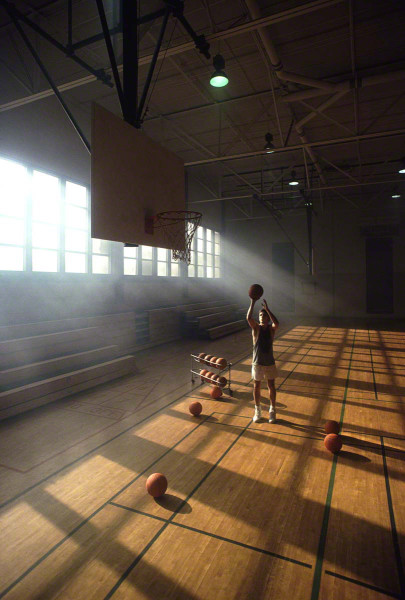
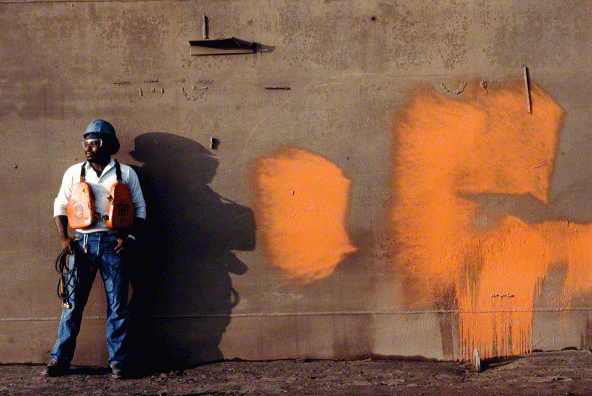
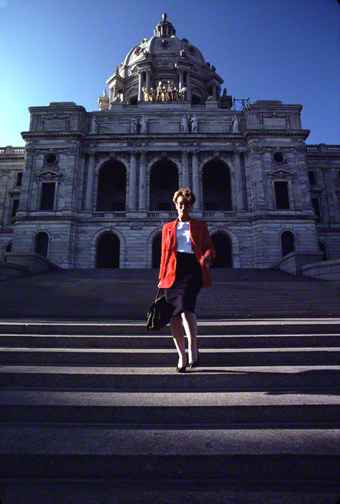
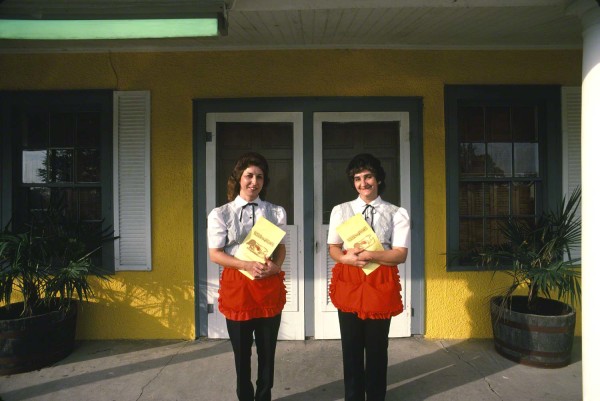
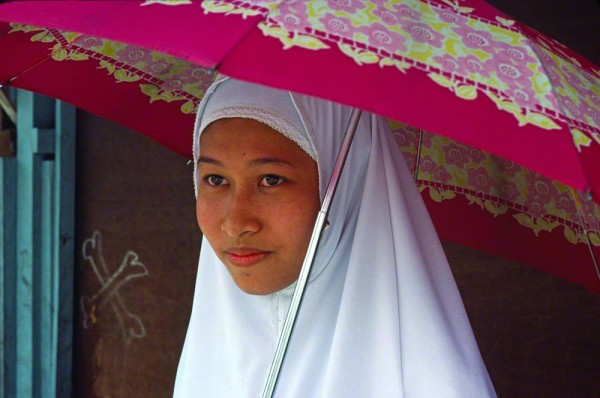
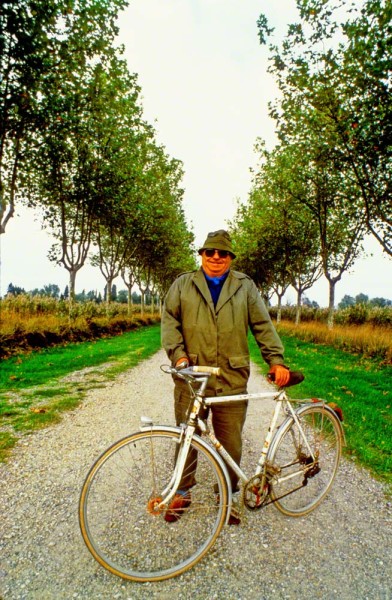
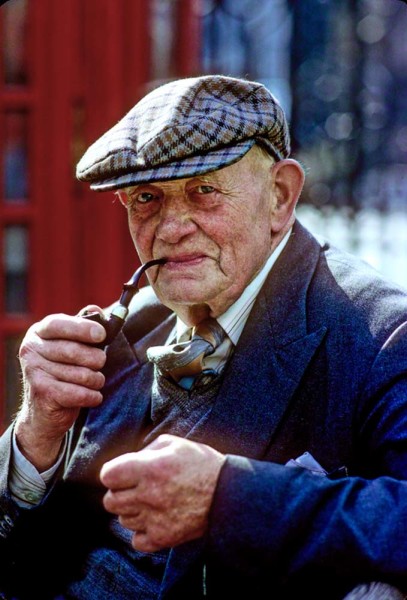
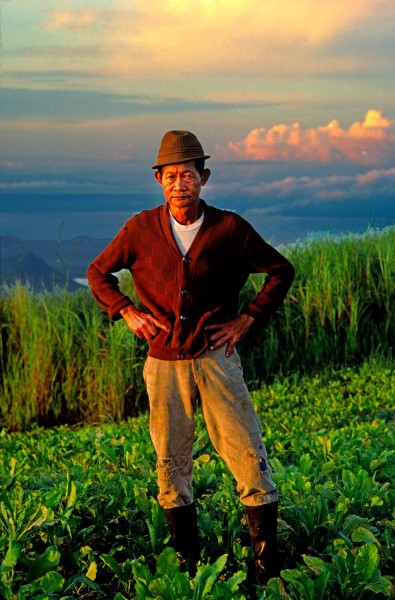
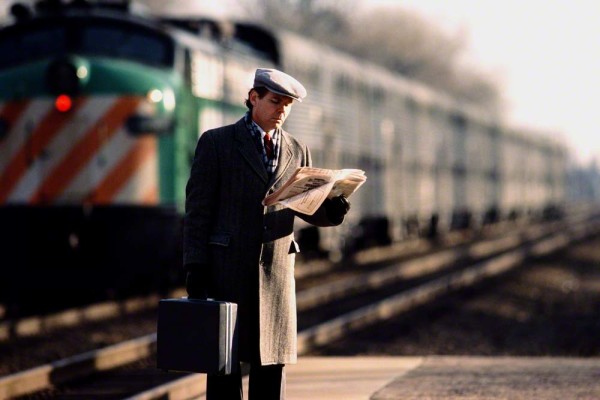
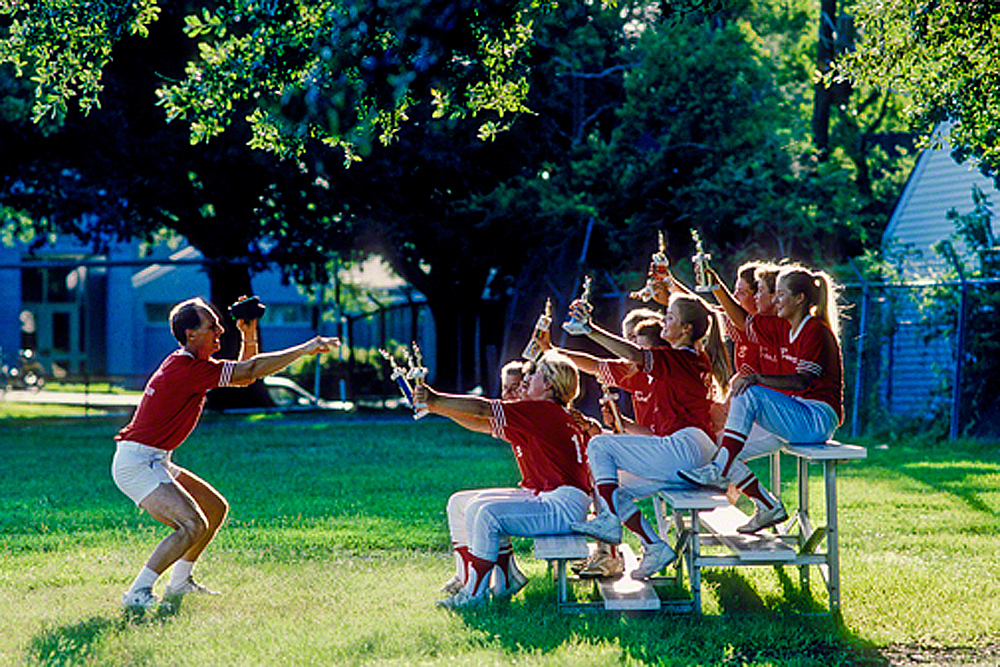
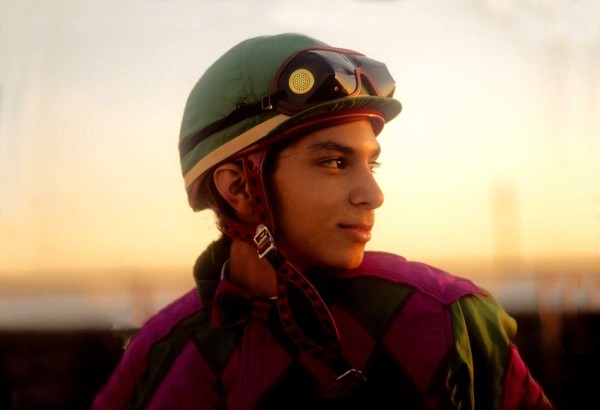
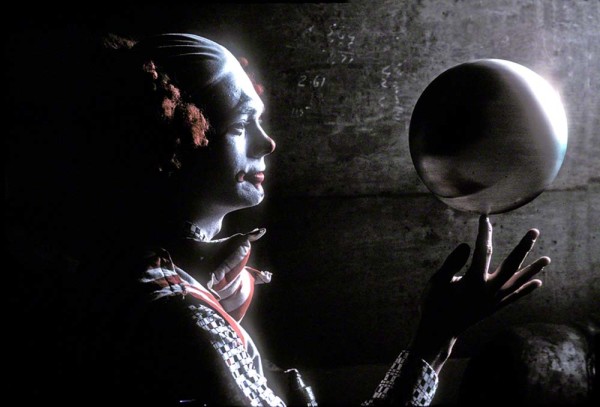
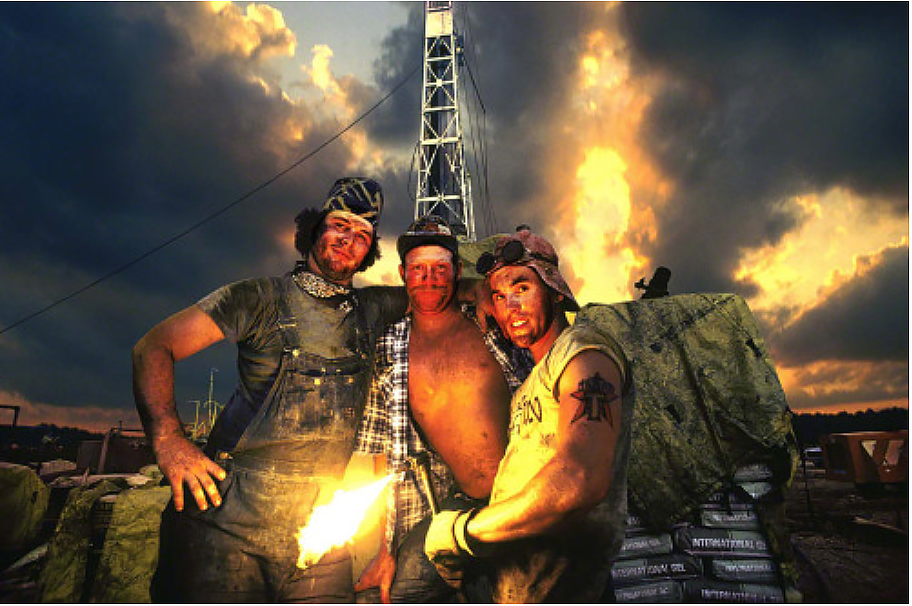
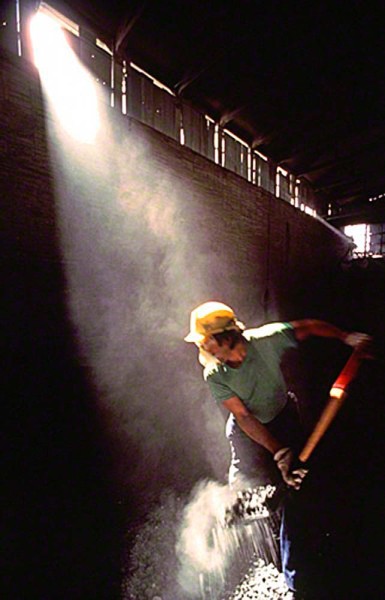
Taken during the beginning of the “Golden Hour”.

I would safely say that in my forty-five year career as an advertising and corporate photographer 90% of every photo I’ve ever taken has been during the Golden Hour. What is that some of you might ask? Here’s how I explain Golden Light  to my online students with the BPSOP, and in my “Stretching Your Frame of Mind” workshops I conduct around the planet:

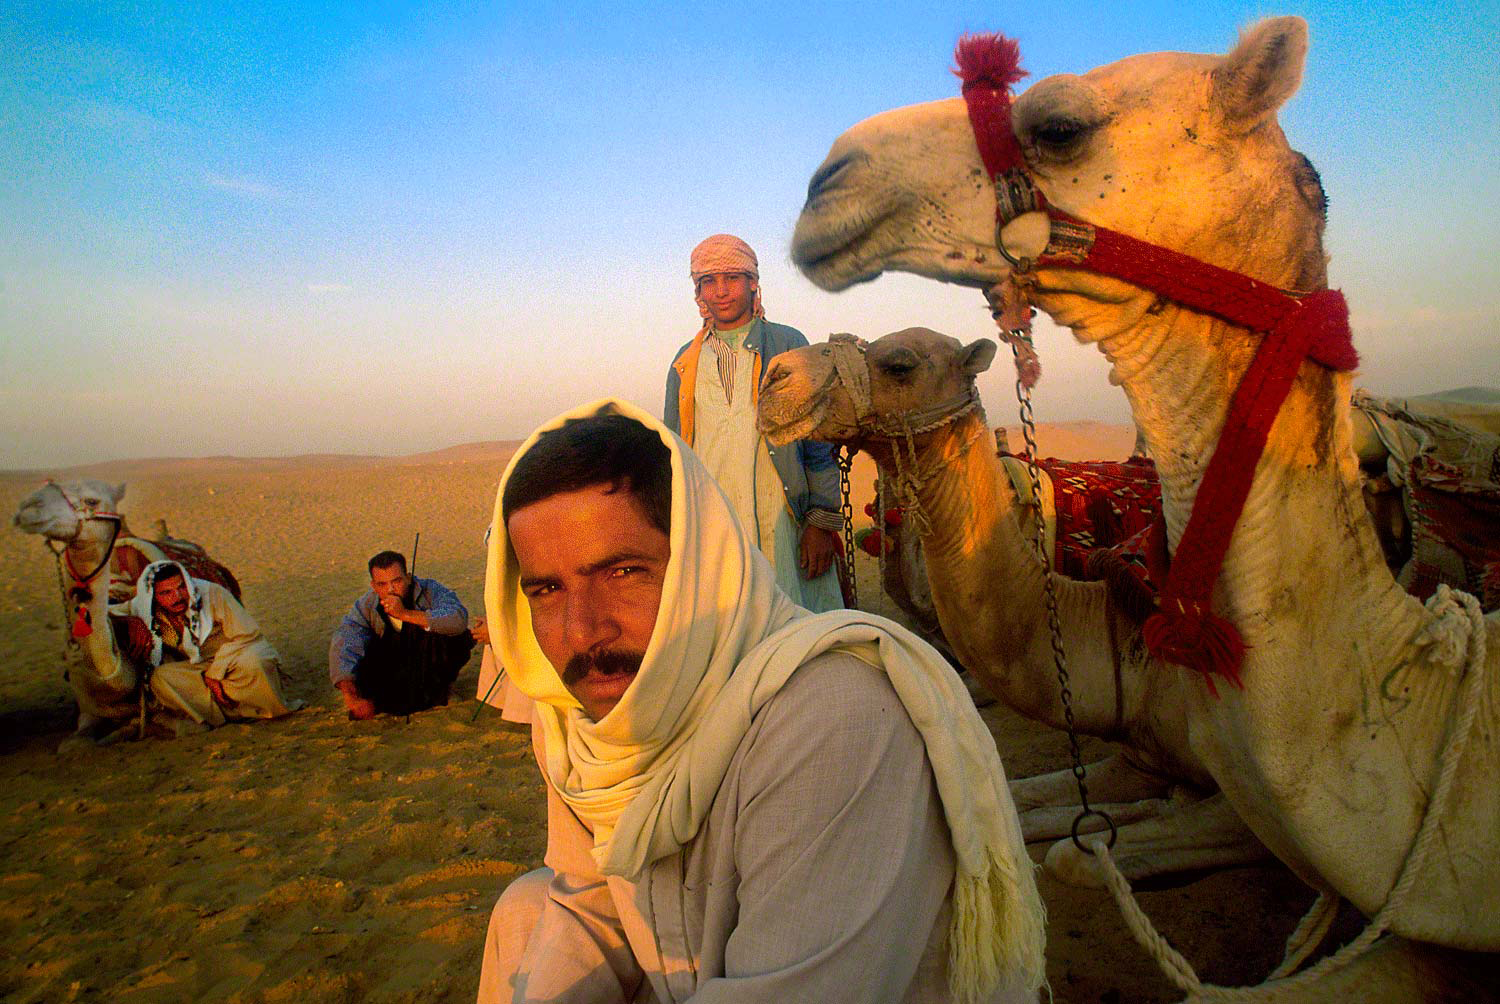
Golden Hour is usually just that. The first hour after sunrise and the last hour before sunset. I say “usually” because the time will vary depending on where you are in relation to the equator, and the time of year.

The first thing I’m going to do is find out the exact time of sunrise. Now, most people will tell you that you have about an hour of good light, but most people don’t know why that is. The reason is that during that first hour, the sun will be a little over ten degrees (optimum for Golden Hour) to fifteen degrees above the horizon.

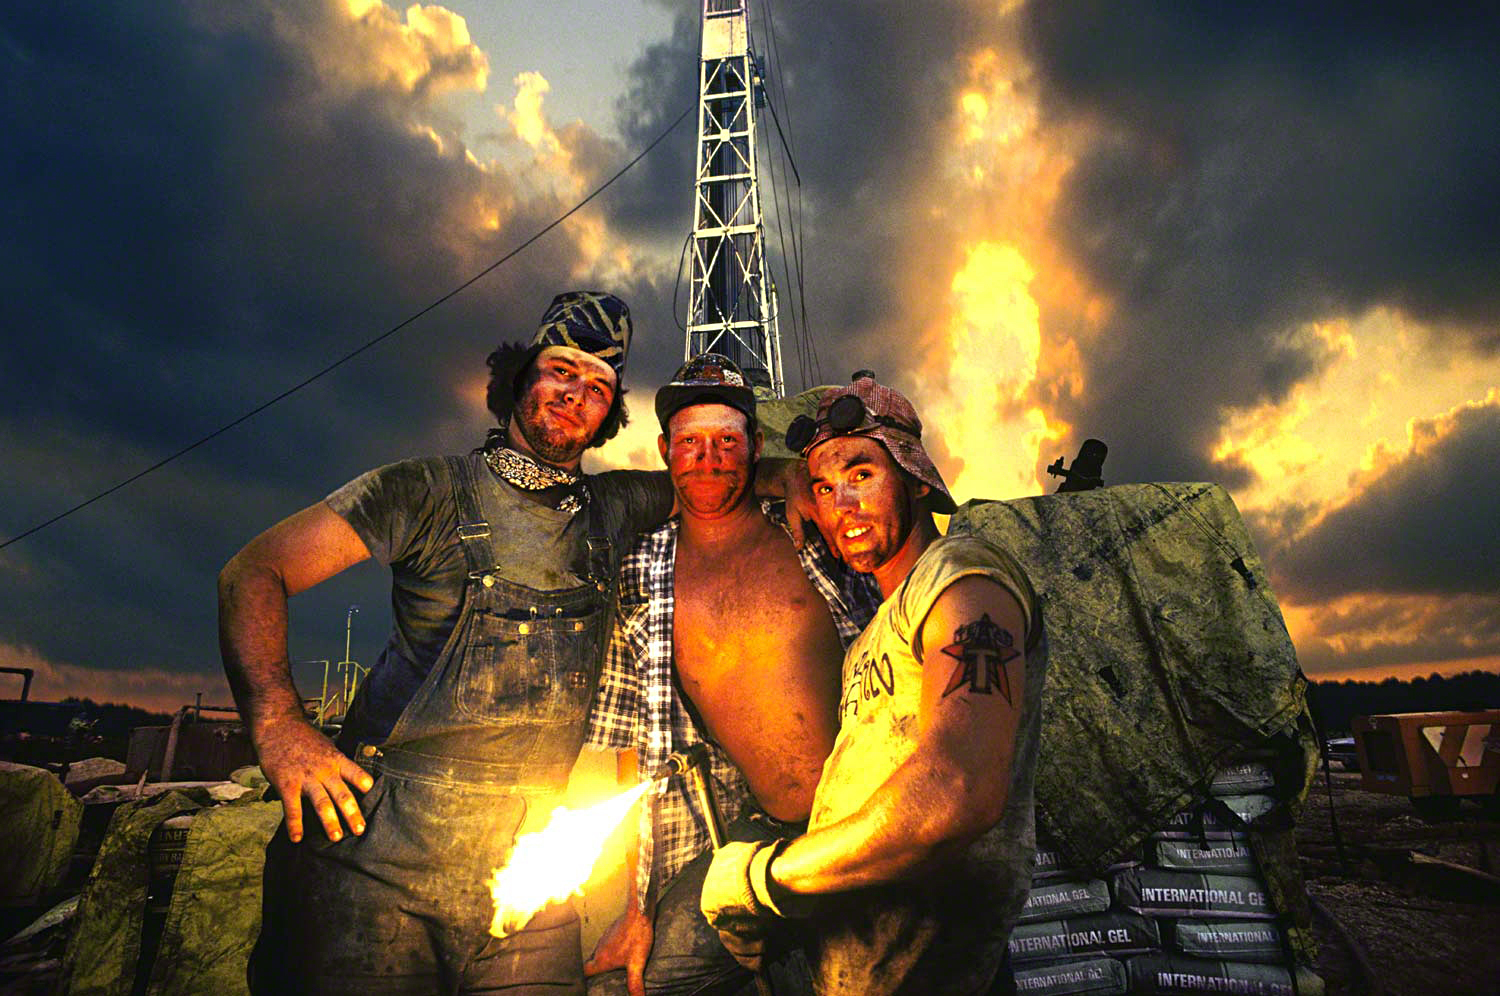
When the sun is this low (either at sunrise or sunset) it will travel through more atmosphere, the angle the light travels to the Earth is longer, and there’s more water vapor that scatters the rays of the sun. This in turn warms the different hues (colors), minimizes contrast, elongates and renders the shadows light, and also keeps the highlights from becoming too overexposed.

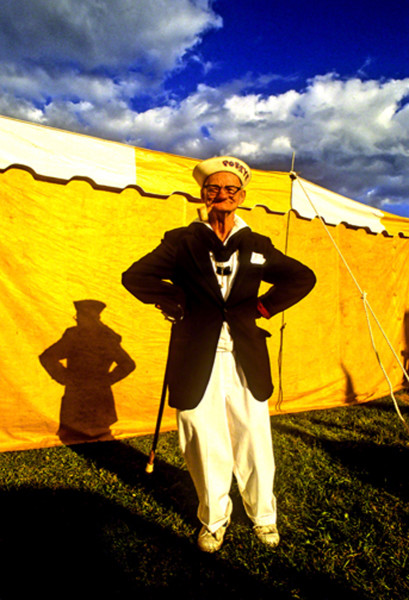
By the way, have you ever noticed that sunsets are usually more colorful? Want to know why? First of all, the same ten to fifteen degrees applies to shooting the Golden Hour at sunset and the reason the sky can be more dramatic is because of dust, debris, and pollution that’s had time to build up during the day. You and I help with both!!! Just people walking around causes the dust and debris to rise into the atmosphere and as far as pollution goes…we all know the answer to that…right???

Now for a couple of tips when you decide to finally bite the bullet and get up to shoot some of the best light of the day; and begin to take your photography a little more seriously, and what I refer to as “Up a Notch”:

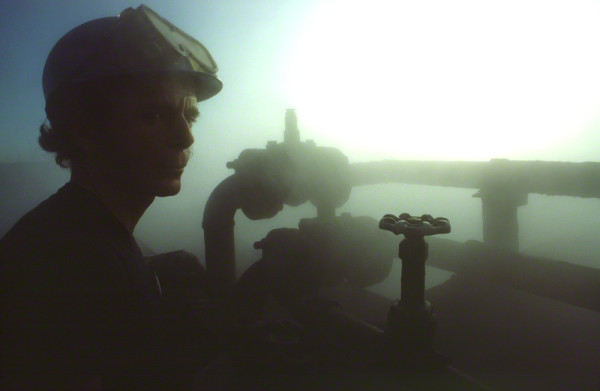
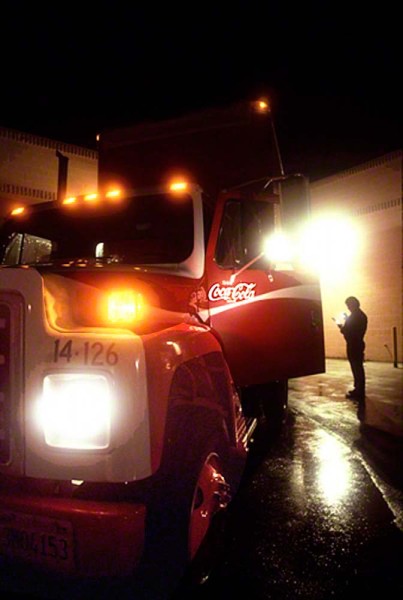
First of all, give yourself plenty of time to get to a location and set up. I’m usually there thirty minutes before the actual sunrise to shoot in the dawn light, the glow in the sky before the sun hits the horizon. When I say “hits the horizon”, I mean that literally because during this time of day it’s moving fast and when the sun moves this fast, the light changes by the second. FYI, I will have a shot list already in mind so I’m not standing there wondering what I should shoot first. I do this by scouting beforehand to determine just where the sun will come up.

Second, take a flashlight with you so you can make camera adjustments in low-light situations. I find that a small mag light held securely between my teeth works. If you don’t have any more teeth left that you can count on, get a small light that’s attached to a headband. This will also free up your hands.

Third, take warm clothing with you in the mornings, especially gloves (the kind where you can remove the tips so you can use your fingers). There’s nothing worse than standing there waiting for the light and wishing you were back in your warm bed!!! A thermos of coffee feels mighty good going down when you’re cold.

Fourth, If you don’t take a tripod, you might as well stay in bed. Depending on your subject matter and what you want to be in focus, you’ll be making long exposures.

Fifth, be sure to bracket. This is soooooo important.

If you follow my advice, you’ll come away with one of those elusive “OMG” photos we all yearn for. I can tell you from experience that’s there’s absolutely nothing that feels better than standing there knowing that what you’re taking a photo of is going to make you feel great later on. It’s just like “putting the medicine where it hurts”.

Visit my website at: www.joebaraban.com and check out my workshop schedule at the top of this blog. Come shoot the Golden Light with me sometime.

JoeB

{ 2 comments }

My Favorite Quotes: Elliott Erwitt

As some of you might know and hopefully read, I have a category I call “my favorite quotes”. These are quotes I’ve picked up over my forty-four year career as an advertising, corporate, and editorial photographer. Some I’ve stumbled on by accident or by reading, and some I’ve been sent by friends who are always looking out for me.

These are not necessarily quotes by famous photographers, but quotes by well-known artists in their own right. Painters, musicians, poets, and writers all share a common thread, the ability to think, see and feel with both the left and right side of their brains. From Marcel Proust to Bo Diddley, and from Bob Marley to Claude Monet, these artists share a common bond…basically, the ability to make people feel good through each of their individual artistic mediums.

One of these quotes was written by Elliott Erwitt, an adverting, corporate, and editorial photographer who at the age of eighty-six is still making his art. He once said,” Photography is an art of observation. It has little to do with the things you see and everything to do with the way you see them”.

In my online class with the BPSOP, and in my “Stretching Your Frame of Mind” workshop I conduct around the world, I tell my fellow photographers that once you start seeing past your first impressions, you’re pictures will take on a different, more pronounced look. A look that will keep the viewer an active participant, and as a result will stick around longer.

So many photographers just don’t spend the time looking. They all seem to be in a hurry and as a result, they miss out on the ‘good stuff’. I teach people in my online class with the PPSOP, and in my “Stretching Your Frame of Mind” workshops how to incorporate the elements of visual design and composition into their imagery, and they walk away with what I call my Artist Palette that holds these elements.

I tell my fellow photographers that there are two ways to see things: with the left side of your brain and the right side. The left side is the analytical side and that’s what Erwitt’s message means when he says photography has little to do with the things you see.

The right side of your brain is the creative side. This is where the second part of Erwitt’s quote comes into play. He finishes the quote by saying it’s everything to do with the way you see them.

I had just checked into my hotel room and as usual, the first thing I do is look out the window. What I saw is the image shown above. It was a bridge, according to the left side of my brain. However, upon closer observation, the bridge transformed into several elements of Visual Design. Here are the elements that I saw: A Vanishing Point made up of two converging lines that moved the viewer across the frame and met at a point on the horizon. I saw shapes consisting of a beautiful triangle that the converging lines created, squares made by the trestles, rectangles made by the reflections of the trestles, and lots of diamonds. There was Negative Space that defined the trestles, and patterns created by the trestles themselves. Not to be missed is the Visual Tension created by showing the bridge and its reflection…and of course an arrowhead.

This is the way I saw the bridge.

JoeB

{ 0 comments }

It’s what you don’t put in that matters

I often have a conversation with my online classes with the BPSOP, and in the daily morning reviews during my “Stretching Your Frame of Mind” workshops I conduct all over the place.

In these conversations, I stress the fact that we are artists as well as photographers. We have chosen the camera as our medium instead of a paintbrush, pastels, colored pencils, etc.

My analogy, I say, is that a camera on a tripod is just the same as a blank canvas…with one very important difference. When you start out with a blank canvas, you add content and pigment until you have a finished ‘work of art’. You either work with an image in your mind, or you stand in a three-dimensional environment. You add paint in various hues and begin blending with whatever tools and style you work with, a.k.a. palette knife or brush.

When you place a camera on a tripod you start out with everything you see in the viewfinder and begin subtracting elements/objects you don’t want until you arrive at a finished ‘work of art’.

We whittle down the subjects, the quality of the light, elements of Visual Design, and the relationship between the negative and positive space…hopefully working towards clarity, getting your message across to the viewer.

So, my fellow photographers, when you think about this analogy and you use a camera as your paintbrush, you can’t help but to “make” stronger photos; photos that will show your personal approach to your craft and passion…photography.

Above all, remember that it’s not what you put into a photo that counts, it’s what you don’t put in that matters.

Visit my website at www.joebaraban.com, and check out my workshop schedule at the top of this blog. Come shoot with me sometime.

JoeB

{ 0 comments }
Master the light, master the shadows.

Master the light, master the shadows.

As I’ve always said, Light is everything and should be considered first, even before your composition. When it interacts with shadows, the results can be incredible. It’s a sure-fire way to take our imagery “up a notch”. Light is important for sure, but equally important are the shadows. Not only is it important to know where the light is going to be, but it’s equally important to know where the shadows will fall.

In my online class with the BPSOP, and my “Stretching Your Frame of Mind” workshop I conduct around the planet, students learn beforehand exactly where shadows will fall any day of the week, anywhere in the world. Using a program called Sunpath, and coupling it with a hand bearing compass called a Morin 2000 not only do they learn where the shadows will fall, but which direction the light will be coming from, when it will be coming,  how long it will be there, and when it will leave.

Pretty important information if you ask me!

Once the interrelationship between light and shadow is established, a mood is set and the results can range from mysterious to downright scary. This is where the Theory of Gestalt comes in. Shadows can affect how the viewer perceives and is a quick way to conjure up all kinds of emotions by giving a dramatic edge to your composition.

Photographers usually don’t give shadows any consideration; in fact, to many, they can be intimidating.  Truth be told, they are leaving out a very important part of their imagery. Shadows can suggest what we can’t see in our reality. In fact, shadows help us to “celebrate the unseen”.  Also, the next time you’re out shooting, don’t think/worry about shadows falling on people’s faces.

Finally, when you master the light, be sure to master the shadows as well. We should pay tribute to the shadow, as it can help us take our imagery to “a place where no man has gone before”!!!

Here are some examples of shadows taking my photos “up a notch”

Visit my website at: www.joebaraban.com and check out my 2012 workshop schedule then come shoot with me sometime. We’ll look for shadows together!

JoeB


{ 2 comments }

I always look in all four directions, especially behind me

When I’m walking down the street with some of the photographers that are in my “Stretching Your Frame of Mind” workshops, I’ll watch someone start shooting and actually spend some time composing their shot. When they think they have the shot they intended, and click the shutter, they’re ready to move on to the next ‘photo op’.

Well, that’s great and I’m glad that they were thinking about what I’m always reminding them, as well as those that take my online classes with the BPSOP...make, don’t take pictures.

Having said that, the odds of that photo being the one that they would put on their wall is something even Vegas wouldn’t book.

I’ve been at it for almost fifty-four years, and the only time I would take just one shot of any given subject is when I’m walking down a crowded street (preferably in some medieval village in Europe) and only have time to just take a single photograph…generally to stop some kind of action or pick someone to shoot out of a sea of faces moving at warp speed in one of four possible directions.

For me, the only way I figure to take that elusive “OMG” shot is to shoot as many adjustments and variations as I can…time permitting. Even then, there’s no guarantee it will happen. Of course, that’s predicated on where someone’s at as far as what one considers a keeper; but that’s another story altogether.

So, my fellow photographers, the next time you go out shooting take your time, smell ALL the roses, feel the rain. Consider all the possibilities from every angle and always make it a steadfast rule to first consider where the light is coming from…even before you bring your camera up to your eye.

Visit my website at www.joebaraban.com, and check out my workshop schedule at the top of this blog. Come shoot with me sometime.

JoeB

{ 0 comments }
The pyramids in Cairo, Egypt.

The pyramids in Cairo, Egypt.

I don’t know about you, but when my four kids were young, I stressed upon them (just about every day) to never talk to strangers…no matter what!!! I suppose it’s good all around advice, and you certainly can’t go wrong taking this advice, but you sure can miss out on some great portraits, especially when you’re traveling out of the country you’re living in.

I know that in my online class with the BPSOP, and in my “Stretching Your Frame of Mind” workshops I conduct around the planet for a lot of my fellow photographers walking up to a complete stranger and asking to take his or her portrait is “above and beyond the call of duty”. I’ve actually written a post called “getting over the hump” where I address this common issue. I can assure you that once you can get over the hump, a brand new world can and will open up for you.

What I mean is that taking pictures of churches, monuments, parks, city streets, famous bridges, etc., or any number of photo ops a location can offer is fun, and it’s always nice to go back home with pictures of the outside of lets say Notre Dame, or The Vatican, or a famous temple in the Orient, but I’m here to tell you that you’re missing out if you don’t capture the cultural and sometimes physical differences of the people in these countries as well by showing a diversity of the people themselves. Then, and only then will your family slideshow take on a new meaning…a meaning that just might keep Uncle Jack awake until the cake and coffee comes that he was promised in the first place.

I’ve always figured that people around the world are friendly and all someone can say is no, but if you approach it the right way, more than likely they’ll say OK. So you ask, what’s the right way to approach a stranger? Well for one thing don’t walk up with a camera in your hand and point it into someone’s face. That’s just about the last thing you should do. Be discreet, keep the camera over your shoulder but behind you so as not to be intimidating.

I try to engage a person in a conversation (my camera still hidden from view). Or, I’ll be shooting something close by and ask if they would be in my photograph, making it seem as though they were not the subject. Once I’ve broken through that initial introductions, it becomes easier to make them the center of interest…as in a portrait. Btw, I always ask for their e-mail address and offer to send them a copy.

For me, traveling to different countries with a camera in my hand is just about the most exciting and rewarding thing I could ever think of doing. I personally love to talk to people and take their pictures. I enjoy the one-to-one relationship even though it lasts for only a few minutes, and when I go back home I relive that brief encounter. It will always remain a wonderful memory no matter how much time goes by. I need only to bring them up on my computer from time to time and it’s just like stepping back in time. It’s a feeling one should not miss out on.

Here’s a few portraits taken from seas to shining sea:


Visit my website at: www.joebaraban.com, and check out my workshop schedule at the top of this blog. Come shoot with me sometime.

JoeB

{ 4 comments }

Never talk to strangers???????

The pyramids in Cairo, Egypt.

The pyramids in Cairo, Egypt.

I don’t know about you, but when my four kids were young, I stressed upon them (just about every day) to never talk to strangers…no matter what!!! I suppose it’s good all-around advice, and you certainly can’t go wrong taking this advice, but you sure can miss out on some great portraits, especially when you’re traveling out of the country you’re living in.

I know that in my online class with the BPSOP, and in my “Stretching Your Frame of Mind” workshops I conduct around the planet for a lot of my fellow photographers walking up to a complete stranger and asking to take his or her portrait is “above and beyond the call of duty”. I’ve actually written a post called “getting over the hump” where I address this common issue. I can assure you that once you can get over the hump, a brand new world can and will open up for you.

What I mean is that taking pictures of churches, monuments, parks, city streets, famous bridges, etc., or any number of photo ops a location can offer is fun, and it’s always nice to go back home with pictures of the outside of let us say Notre Dame, or The Vatican, or a famous temple in the Orient, but I’m here to tell you that you’re missing out if you don’t capture the cultural and sometimes physical differences of the people in these countries as well by showing a diversity of the people themselves. Then, and only then will your family slideshow take on a new meaning…a meaning that just might keep Uncle Jack awake until the cake and coffee comes that he was promised in the first place.

I’ve always figured that people around the world are friendly and all someone can say is no, but if you approach it the right way, more than likely they’ll say OK. So you ask, what’s the right way to approach a stranger? Well for one thing don’t walk up with a camera in your hand and point it into someone’s face. That’s just about the last thing you should do. Be discreet, keep the camera over your shoulder but behind you so as not to be intimidating.

I try to engage a person in a conversation (my camera is still hidden from view). Or, I’ll be shooting something close by and ask if they would be in my photograph, making it seem as though they were not the subject. Once I’ve broken through that initial introductions, it becomes easier to make them the center of interest…as in a portrait. Btw, I always ask for their e-mail address and offer to send them a copy.

For me, traveling to different countries with a camera in my hand is just about the most exciting and rewarding thing I could ever think of doing. I personally love to talk to people and take their pictures. I enjoy the one-to-one relationship even though it lasts for only a few minutes, and when I go back home I relive that brief encounter. It will always remain a wonderful memory no matter how much time goes by. I need only to bring them up on my computer from time to time and it’s just like stepping back in time. It’s a feeling one should not miss out on.

Here are a few portraits taken from seas to shining sea:


Visit my website at: www.joebaraban.com, and check out my workshop schedule at the top of this blog. Come shoot with me sometime.

JoeB

{ 0 comments }
Kodachrome 25/20mm lens/ 1/sec@F/4

Kodachrome 25/20mm lens/ 1/sec@F/4

It always makes me wonder how in the world we were able to make photos when the film of choice was Kodachrome. I say film of choice because virtually everyone I knew shot it. Except for when I was shooting for AP and UPI in the seventies, and we rated Ektachrome up to ASA 1600, I would shoot with Kodachrome because the color was soooooo much better looking.

In my online class with the BPSOP, and in my “Stretching Your Frame of Mind” workshops I conduct around the planet, I’m always asked what ISO (ASA) I keep my camera on? Do I increase it in low light situations? How do I remind myself to change it back?

My answer is always the same. I now keep it at 800 and forget about it no matter what the situation is. Since I’m on a tripod nearly 100% of the time, I’m in complete control. I can shoot at any shutter speed/aperture combination in any low light situations, and walk away with the photo I was after.

In the Kodachrome days, I got use to and became comfortable with shooting people at very slow shutter speeds. Taking a portrait at a 1/4 sec, 1/2, or even a full second was the norm. It’s what I had to do if I wanted the rich saturated colors that came from shooting Kodachrome 25….meaning ASA or ISO of 25.

One of the many problems that came with the digital camera and the new photographers that came with it was the idea that in order to shoot good photos, you have to manipulate the many camera settings from situation to situation, and from location to location. Trust me when I tell you that YOU DON’T!!!!!

Try taking the “Baraban Challenge” sometime. Change all your setting back to their default, and put your camera back in the box it came in; then pretend that you just bought it. Open it (with great enthusiasm and excitement) and start reading the parts of the manual that shows you where the shutter release is, where you change out the card, the location of the manual setting, where you change the shutter speed, and oh yes…where you turn it on!!!

After learning all this hard stuff, go out and start shooting. You don’t even need the AF mode. After all, auto-focusing is a luxury not a necessity.

Toooooooo scary????????????? That’s OK, I understand. If you’re scared, just put all the settings back to where you’re not scared anymore!!!!

One last thing: When someone asks me what I did when I needed a faster ISO/ASA, I tell them I would switch to Kodachrome 64.

🙂

Boy do I miss my Kodachrome!!!

🙁

Visit my website at:www.joebaraban.com and check out my workshop schedule at the top of this blog. Come shoot the low light with me sometime.

JoeB

{ 2 comments }
friends taking pictures of friends in Tuscany.

friends taking pictures of friends in Tuscany.

Maybe it’s a touch of voyeurism and maybe I’m just a people watcher who likes to observe how people go about taking pictures of each other.  Either way, it offers up a great photo opportunity. Be honest, haven’t you stopped and watched people as they photograph their friends or family? It’s one of my favorite things to do, and I usually end up asking if they want me to take the picture so all the family can be in the photo…which I also love to do.

First place finish.

First place finish.

There’s something endearing about the way people take pictures of others. The way they try to direct, their body language as they compose, especially if the ones being photographed are giving them a hard time. It makes for great subject matter when families take pictures after someone has done something important, even if it’s just important to them. For example winning a trophy is a good one. Or families traveling together.

I’ve been lucky enough to catch that happening on several occasions.

A coach and his team.

A coach and his team.

As I tell my online students with the BPSOP, and in my “Stretching Your Frame of Mind” workshops I conduct around the planet you have to be an obsever of your surroundings. Pay attention all the time to what’s happening and you just might get lucky.

Visit my website at: www.joebaraban.com, and check out my workshop schedule at the top of this blog. Come shoot with me sometime.

JoeB

{ 0 comments }

Food for digital Thought: 10 and 2 Light.

The sun was at '2' on my clock.

The sun was at ‘2’ on my clock.

If you were a race driver you would immediately know what the expression ’10’ and ‘2’ meant. That’s when your left hand is at the ’10’ position on the steering wheel and your right hand is at the ‘2’ position. In the old days, this was the recommended position and all student driver classes taught you to drive this way.

In photography, there’s a term called “The Law of the light”. This is also referred to as “The Angle of Reflection”, although I’m not sure why since it doesn’t cover the full meaning? What this does means is that when light falls (incident light) on a subject it falls at a particular angle. This is called “the Angle of Incidence”. When this light bounces (reflects) off this subject, it also bounces off at a particular angle and is called the Angle of Reflection. When both the Angle of Incidence and the Angle of Reflection are the same, you are in The Law of the Light.

Have you ever driven by a tall glass office building and noticed that at a certain point the glass seems to glow, and as you pass by that point the glow fades away? That’s because at that point in time both the angle from the light falling on the building and the angle of the light reflecting off it to your eyes were the same. Well, imagine having a camera in your hand and you happen to record it…pretty dramatic, right?

I use this same law when shooting environmental portraits, as it’s my favorite way to light people. Imagine a clock in your viewfinder and placing your subject in such a way (right in the center of the clock) as to have the source of the light coming from either ’10’ or ‘2’.  What this does is to create a rim of light that runs down the person’s face and body. It adds a dramatic gesture that seems to add to whatever facial expression, or body language that the subject is communicating. In my online class with the BPSOP, and in my “Stretching Your Frame of Mind” workshops, we spend time working on this lighting concept.

In the photo above, I positioned the girl so I would have the sun not only back-lighting the water, but at ‘2’ on the clock in my viewfinder to get that wonderful rim lighting on her profile.

FYI, because of air bags installed in current model cars, the recommended position of the hands is now ‘9’ and ‘3’.

Here’s some examples of the light coming from ’10’or ‘2’ position:

Visit my website at: www.joebaraban.com, and be sure to check out my new workshop schedule at the top of this blog.Come shoot with me sometime.

JoeB

{ 6 comments }

  Besides being an advertising, corporate, and editorial photographer for the past fifty-three years that has been a lifelong dream come true, photography has not been my only love for dare I say…half a century!!

I also come from a background that started out with a BA degree in Journalism. Over the years I have done a lot of writing, some of which have been published, and two screenplays, and a novel I hope to be bought someday.

With that in mind, I have often sought to combine the two and create in a single photo a story that can be understood without actually putting anything down on paper.

I have shared this over the years with those that take my online classes with the BPSOP and those that join me in one of my “Stretching Your Frame of Mind” workshops I conduct throughout the world.

As I said, with a college education based in Journalism (with a minor in art), we were trained to answer these five questions when writing an article. Over the course of my career in photography, I have often applied these same five questions when thinking about ‘making’ a photograph.

Of course, it’s difficult if not impossible to produce one single image that includes all five. I can say that looking back at my calling, I have a pretty good job in including as many as possible.

So, my fellow photographers, you should give it a try. The next time you go out think about telling a story in a single photograph. A story that will keep the viewer around for as long as possible, and as I always say, the more we can make the viewer an active participant in our imagery the more he’ll stick around…isn’t that what we want him/her to do?

Visit my website at www.joebaraban.com, and check out my workshop schedule at the top of this blog. Come shoot with me sometime.

JoeB

{ 0 comments }

I’ll keep it

How do you decide to either keep a photo or delete it?

First and most important, stay objective. Whatever you do, don’t even think about letting sentiment enter into your thought process.

For example, when I’m shooting pictures of all my kids and grandchildren, if an image doesn’t meet the criteria I’ve long ago set for myself, I have no problem deleting it…but deleting where is the question.

There is deleting, and then there’s deleting. This is a topic that frequently comes up in either my online classes with the BPSOP or in my “Stretching Your Frame of Mind” I conduct all over the place.

If the shot really sucks, then it immediately goes in the trash bin lost forever somewhere in the digital cosmos, a.k.a. “the new gender-free intellectual cosmos”. If it represents a timeline, as in photographing them growing up, but not the yardstick that measures creativity, it goes into a folder marked ‘The family’.

That folder is saved for the day when one of my kids gets engaged and during the reception or engagement party those photos hopefully, one of them, is a shot of them naked as a small child is shown in a digital slideshow….always good for a laugh!!!!

Now, if it does meet the personal benchmark I’ve set up for myself, then it just might make it to my website, a future post on my blog, or in some teaching capacity.

Whatever standards you’ve set up for yourself, stick with it no matter what. Editing is a huge part of the process and can be as relaxing or frustrating as you make it.

Visit my website at www.joebaraban.com, and check out my workshop schedule at the top of this blog. Come shoot with me sometime.

JoeB

{ 0 comments }

Food For Digital Thought: Improvise

I improvised!

LIGHT IS EVERYTHING!!!

That’s what I keep telling my online students with the BPSOP, and my “Stretching Your Frame of Mind” workshop I conduct around the planet.

Having said that, what happens if you suddenly lose the light or needed it when it just wasn’t there in the first place? In my forty-six year career, I’ve been in situations where I wasn’t allowed to prepare for by scouting ahead of time or a photo op that was thought up by a client at the last moment and expecting me to “come through”.

I just love it when an art director or a graphic designer forgets to tell me something that was requested by the “powers that be”, and if I don’t figure something out…and quick, all of a sudden there’s a bad taste in everyone’s mouth; I become  persona non grata (not welcomed at the agency anymore)  for any chance at new work.

So, what do I do? I improvise!!!

The above photo is a good example of improvising when your forced to shot where there’s no light, and since I was shooting at a rig, bringing in lights was not an option. I was shooting for Budweiser and they wanted a portrait of some of the Roughnecks. It started out as a potential great sunset, but thirty minutes before I started shooting , a thunderstorm began to develop bringing with it some very dark ominous clouds. and before I knew it covered most of the late afternoon light.

In a matter of minutes, everything became very dark and because of some new pipe being brought in, I couldn’t stand on the other side of the rig where I would have has at least a little light. I looked around for something, anything I could use to cast light on their faces. I looked over on the ground and saw the welding equipment. I had one of the men fire it up so that it wold make as large of a flame as possible, and that’s what I used to light the men.

Here are a few more photos where I had to come up with a way to light the people. In each photo, I added light that I found nearby:

In the photo of the man behind the Coke truck, the client wanted the lettering on the truck to show up, so I took a small flashlight out of my bag and had him hold it on the truck’s door. The man about to swallow the torch was shot during a Luau in Hawaii. The man shoveling coal was actually in another part of the building. i brought him over and put him in the light. I also put the man reading off his clipboard in front of the headlight, and I used the lantern to light the grandfather reading to his granddaughter since there was no other source of light.

The next time you’re in a similar situation, look around because the answer might be right in front of you. It could be anything from a flashlight to a headlight. You just gotta use your imagination, and when you can do that, the skies the limit!!!

Visit my website at: www.joebaraban.com and watch for my new workshop schedule at the top of this blog. Come improvise with me sometime.

JoeB

{ 0 comments }
Rough-Necks-1DM

LIGHT IS EVERYTHING!!!

That’s what I keep telling my online students with the BPSOP, and my “Stretching Your Frame of Mind” workshop I conduct around the planet.

Having said that, what happens if you suddenly lose the light or needed it when it just wasn’t there in the first place? In my forty-six year career, I’ve been in situations where I wasn’t allowed to prepare for by scouting ahead of time or a photo op that was thought up by a client at the last moment and expecting me to “come through”.

I just love it when an art director or a graphic designer forgets to tell me something that was requested by the “powers that be”, and if I don’t figure something out…and quick, all of a sudden there’s a bad taste in everyone’s mouth; I become  persona non grata (not welcomed at the agency anymore)  for any chance at new work.

So, what do I do? I improvise!!!

The above photo is a good example of improvising when your forced to shot where there’s no light, and since I was shooting at a rig, bringing in lights was not an option. I was shooting for Budweiser and they wanted a portrait of some of the Roughnecks. It started out as a potential great sunset, but thirty minutes before I started shooting , a thunderstorm began to develop bringing with it some very dark ominous clouds. and before I knew it covered most of the late afternoon light.

In a matter of minutes, everything became very dark and because of some new pipe being brought in, I couldn’t stand on the other side of the rig where I would have has at least a little light. I looked around for something, anything I could use to cast light on their faces. I looked over on the ground and saw the welding equipment. I had one of the men fire it up so that it wold make as large of a flame as possible, and that’s what I used to light the men.

Here are a few more photos where I had to come up with a way to light the people. In each photo, I added light that I found nearby:

In the photo of the man behind the Coke truck, the client wanted the lettering on the truck to show up, so I took a small flashlight out of my bag and had him hold it on the truck’s door. The man about to swallow the torch was shot during a Luau in Hawaii. The man shoveling coal was actually in another part of the building. i brought him over and put him in the light. I also put the man reading off his clipboard in front of the headlight, and I used the lantern to light the grandfather reading to his granddaughter since there was no other source of light.

The next time you’re in a similar situation, look around because the answer might be right in front of you. It could be anything from a flashlight to a headlight. You just gotta use your imagination, and when you can do that, the skies the limit!!!

Visit my website at: www.joebaraban.com and watch for my new workshop schedule at the top of this blog. Come improvise with me sometime.

JoeB

{ 1 comment }