Quick Photo Tip: If it Goes Away Don’t Walk Away.

He was the fifth runner to come down the middle when the sun was out!

I see it all the time. It might be when someone submits a photo in one of my online classes with the BPSOP, or when I’m walking with one of my fellow photographers that is with me in my “Stretching Your Frame of Mind” workshops I conduct all over the place.

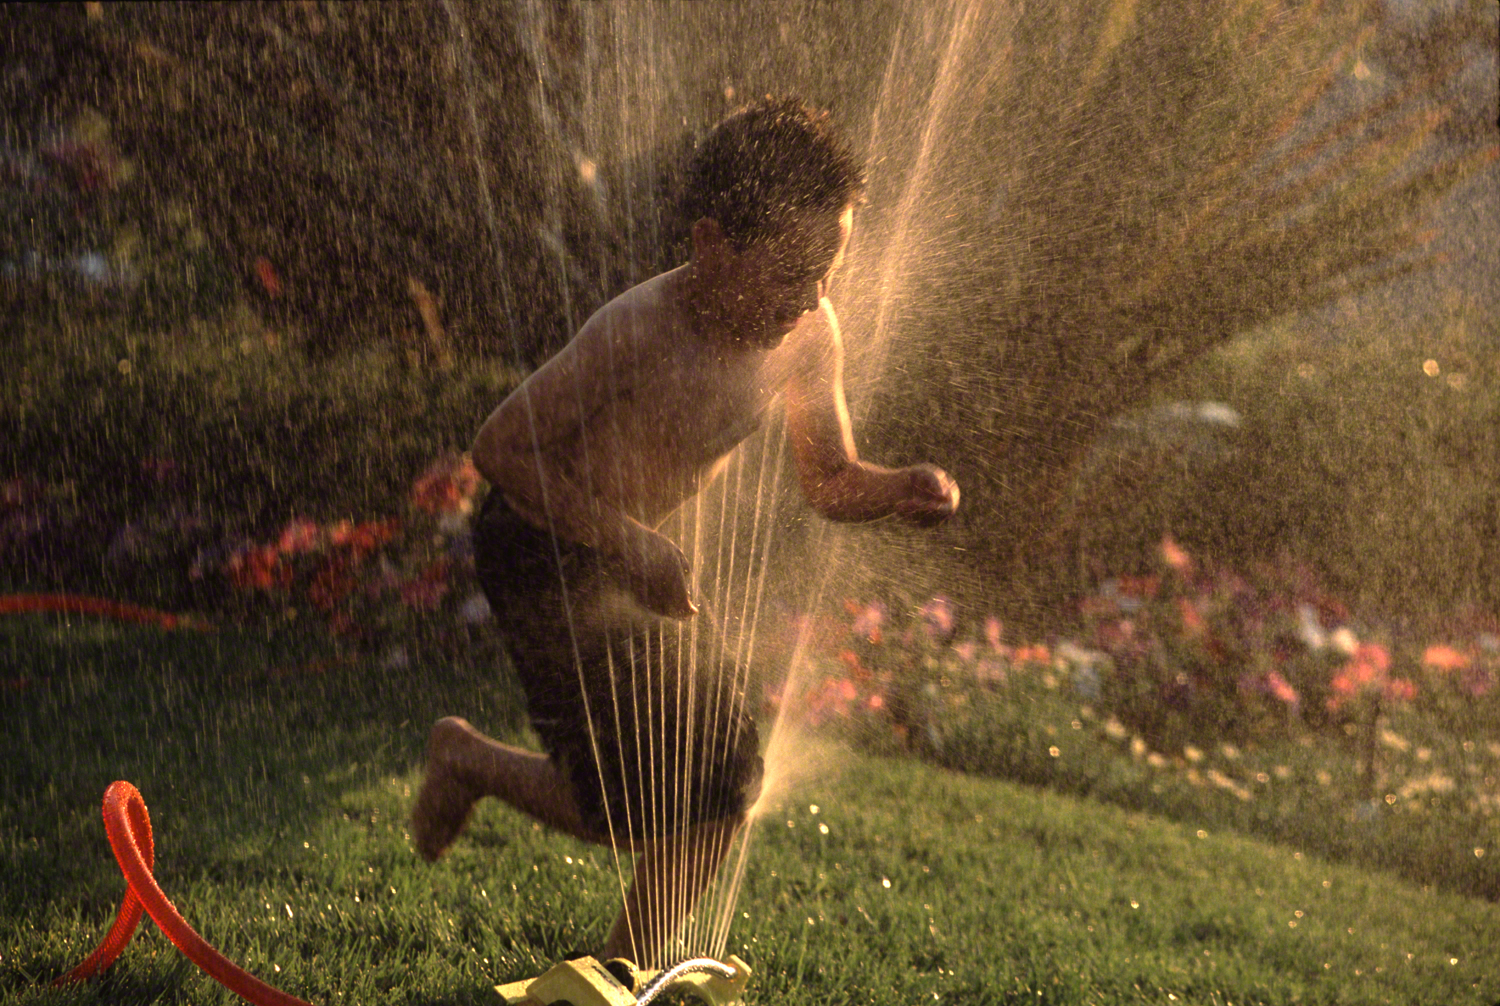
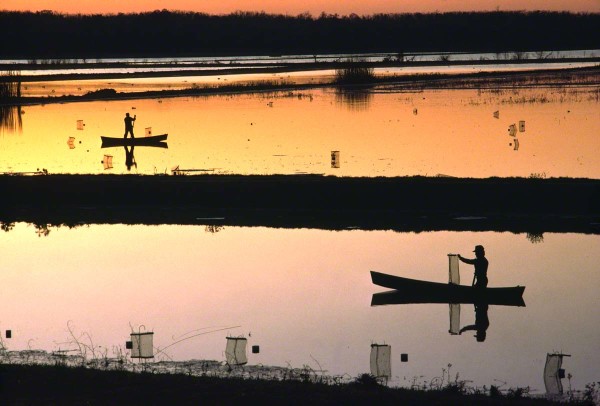
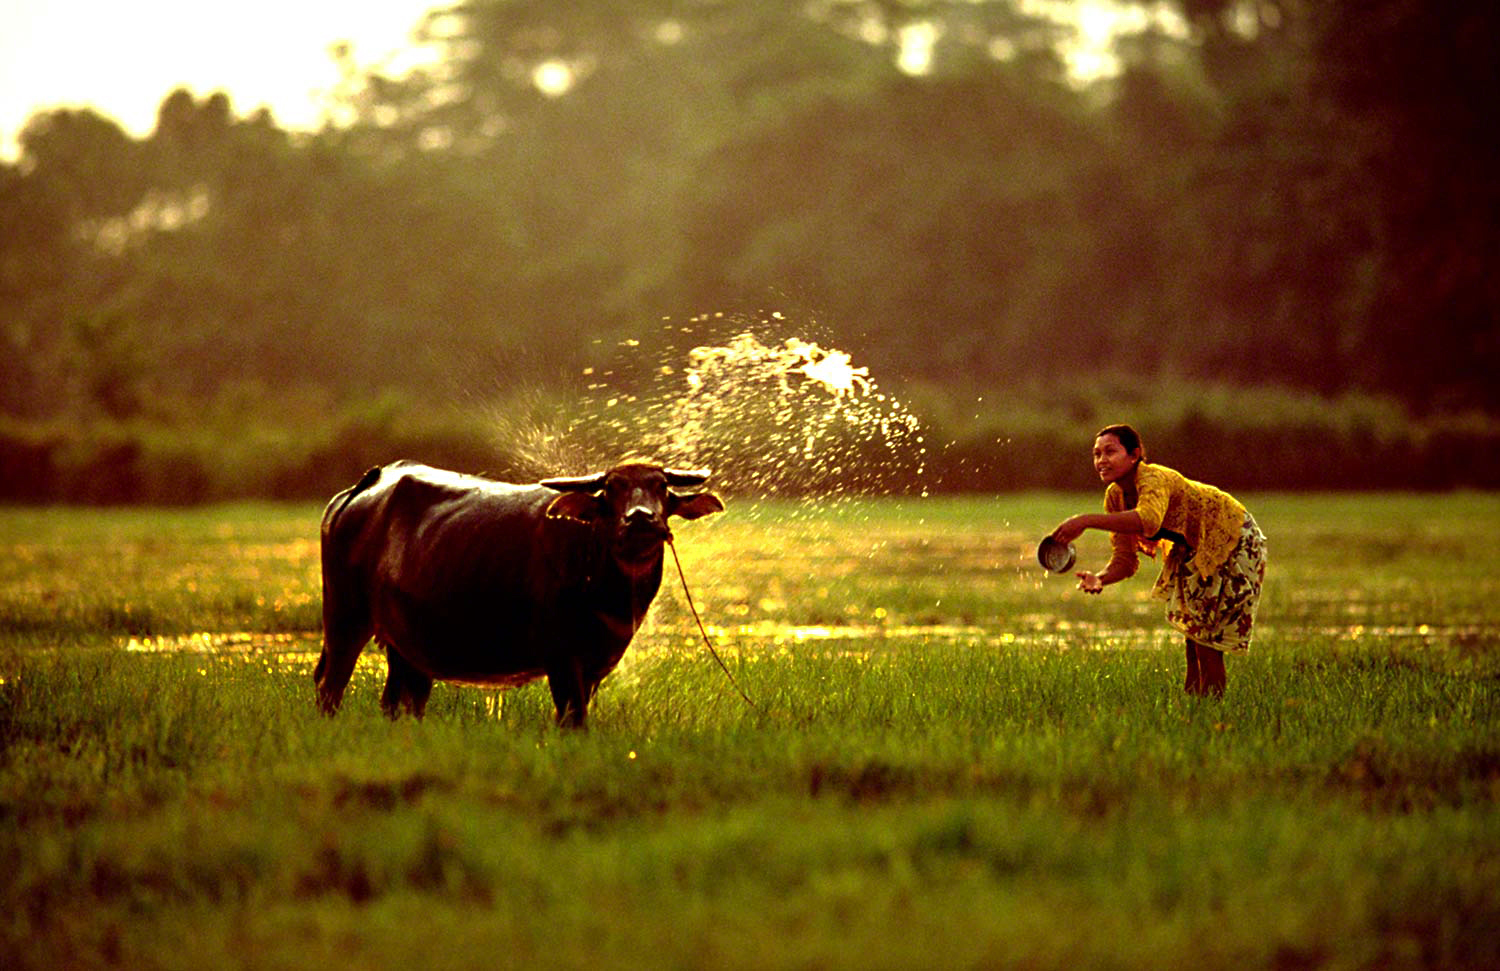
It might be the sun that has just gone behind a cloud putting everything in a less than desirable light. What will happen is that instead of the photographer looking up to see when the sun will come out they will invariably walk away from a potentially great photo op that needed light to pull it off. Of course, it is quite possible that the same photographer wouldn’t have a clue about the value of light and the way it affects the environment around him/her; that would really be a bummer!

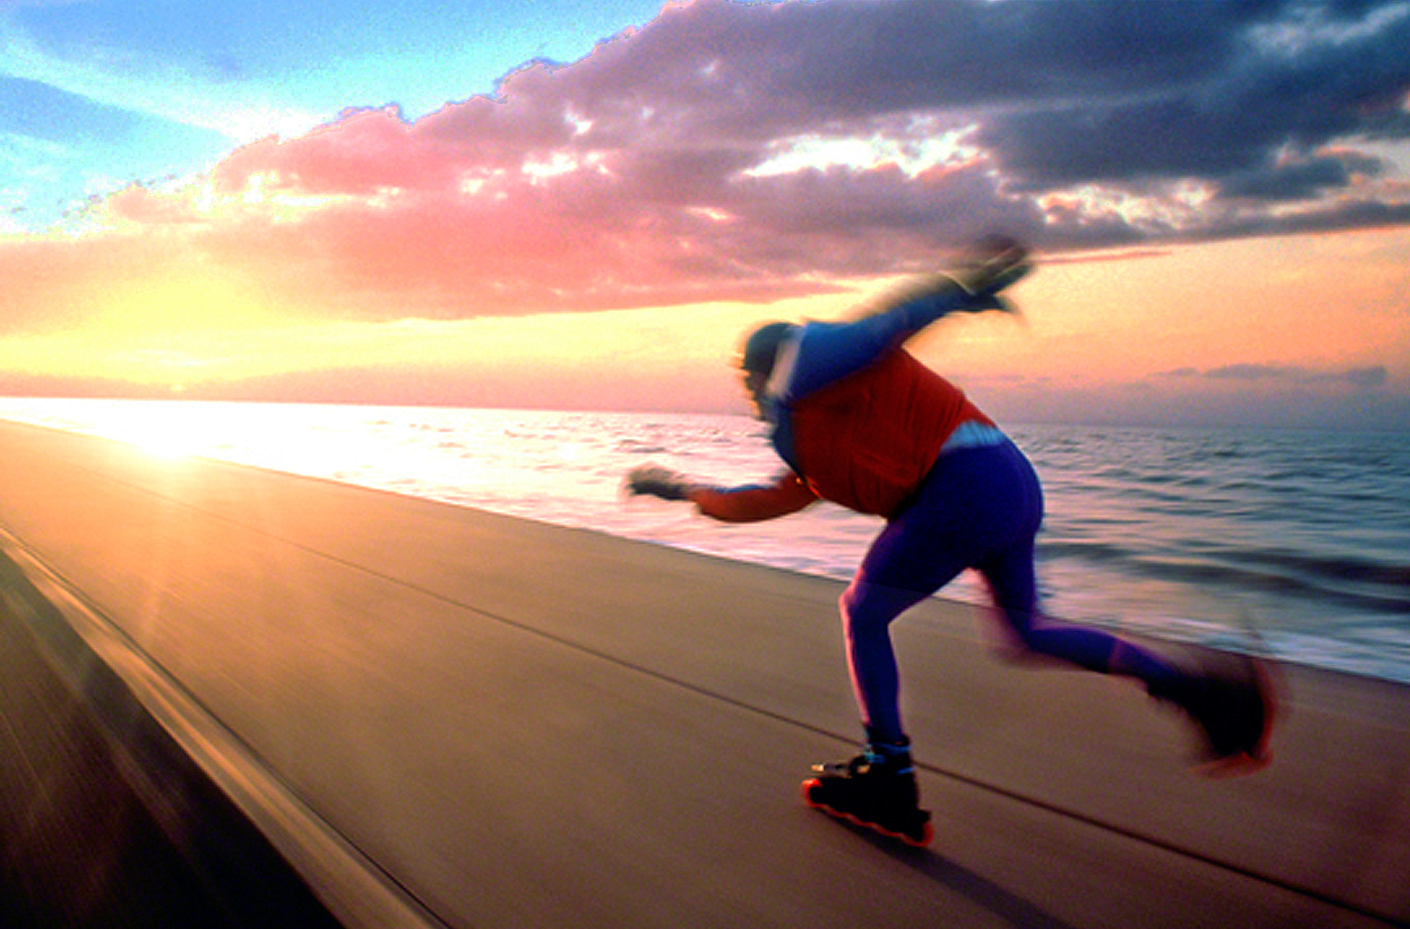
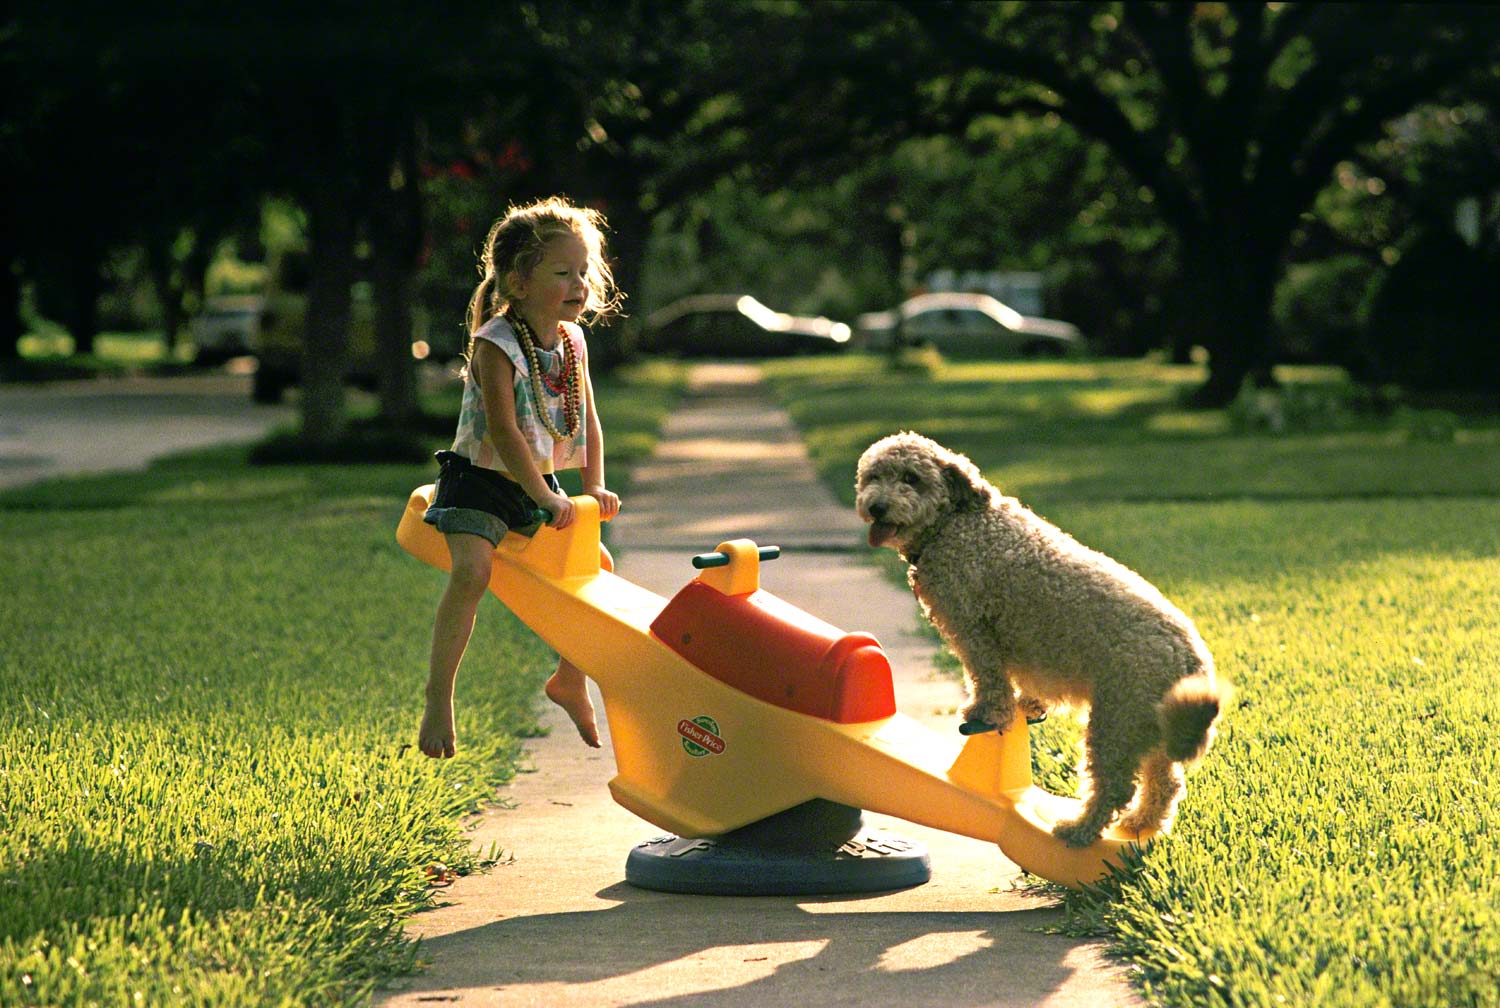
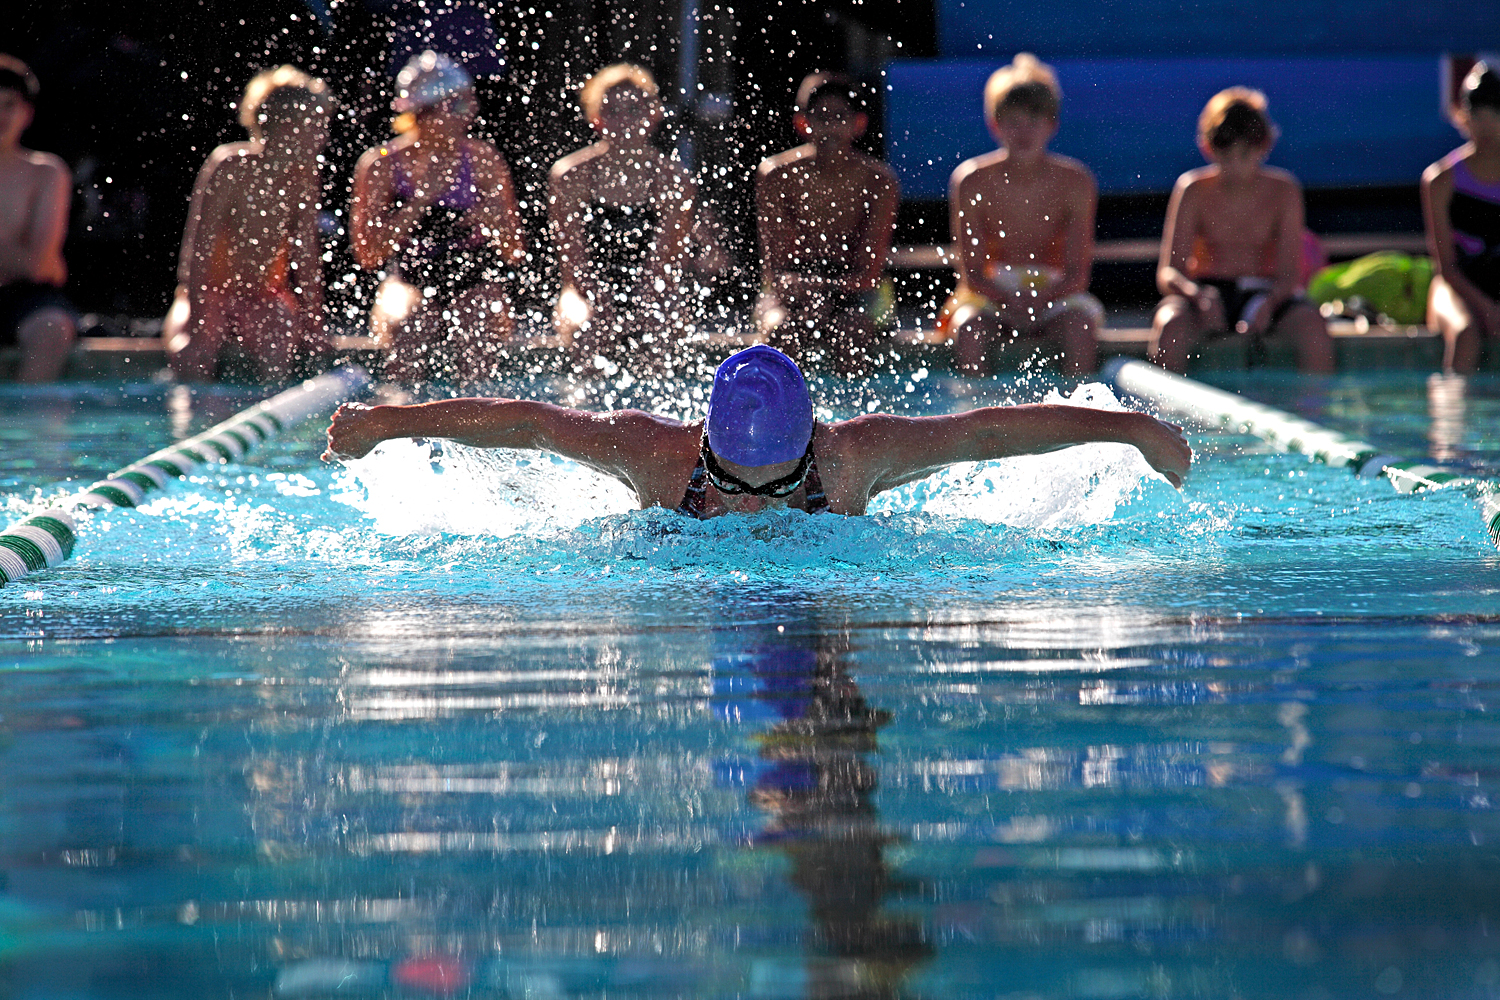
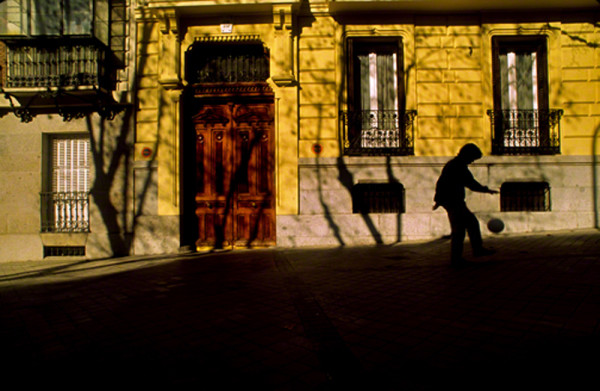
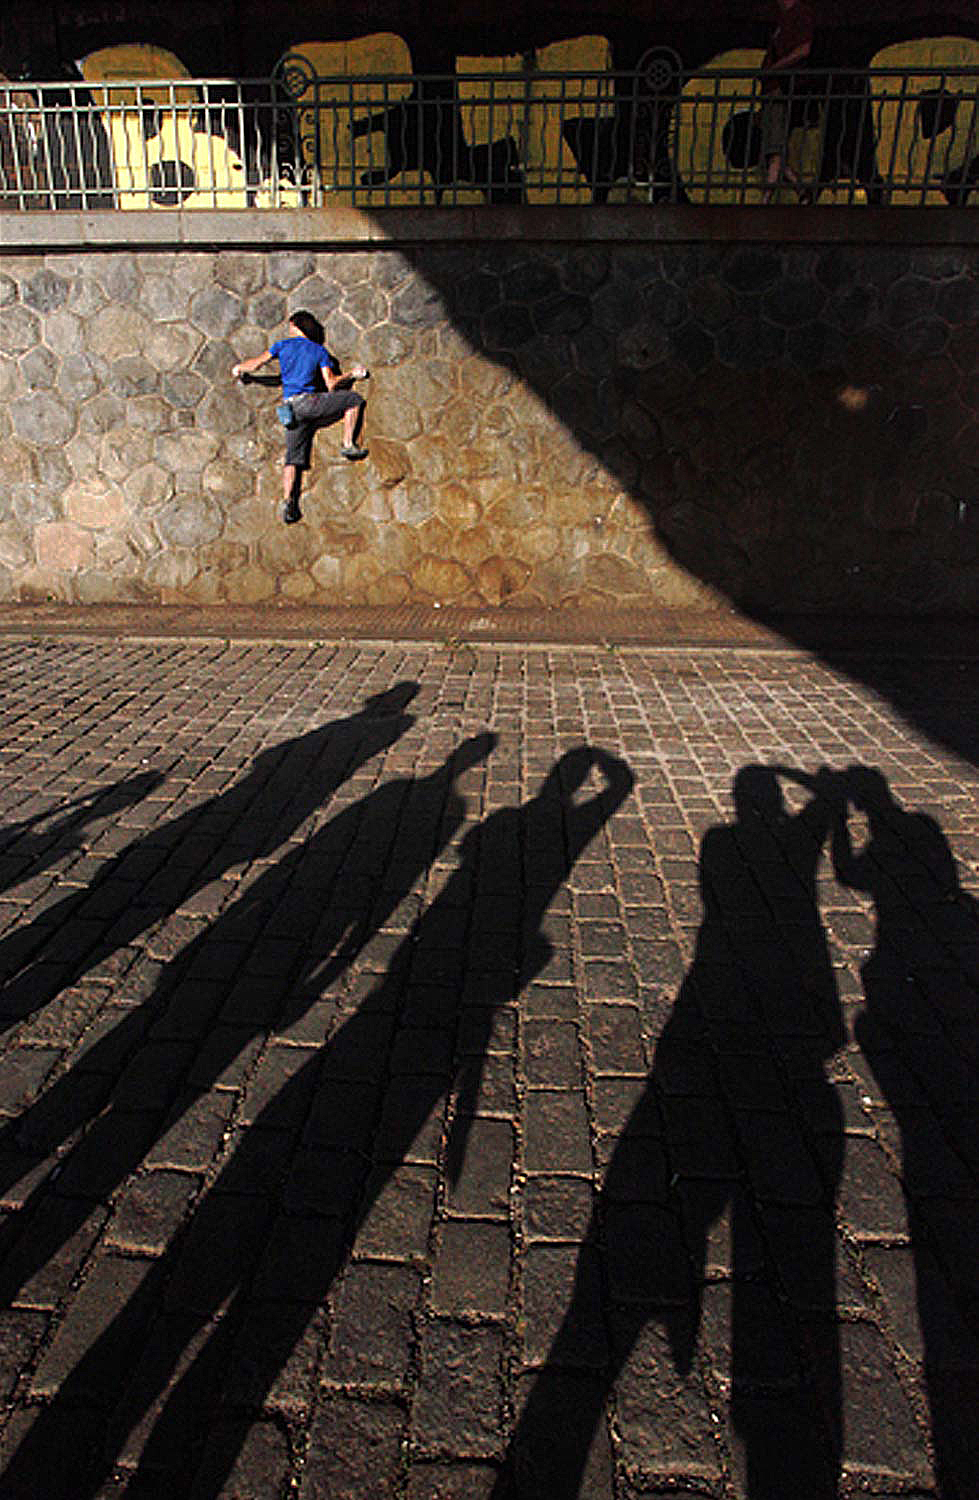
What I see the most is the photographer just missing a person walking or maybe riding a bicycle down a street, path, beach, road, and the frustration knowing that he missed it clouds the mind and then not even consider the possibility of another person coming soon after.

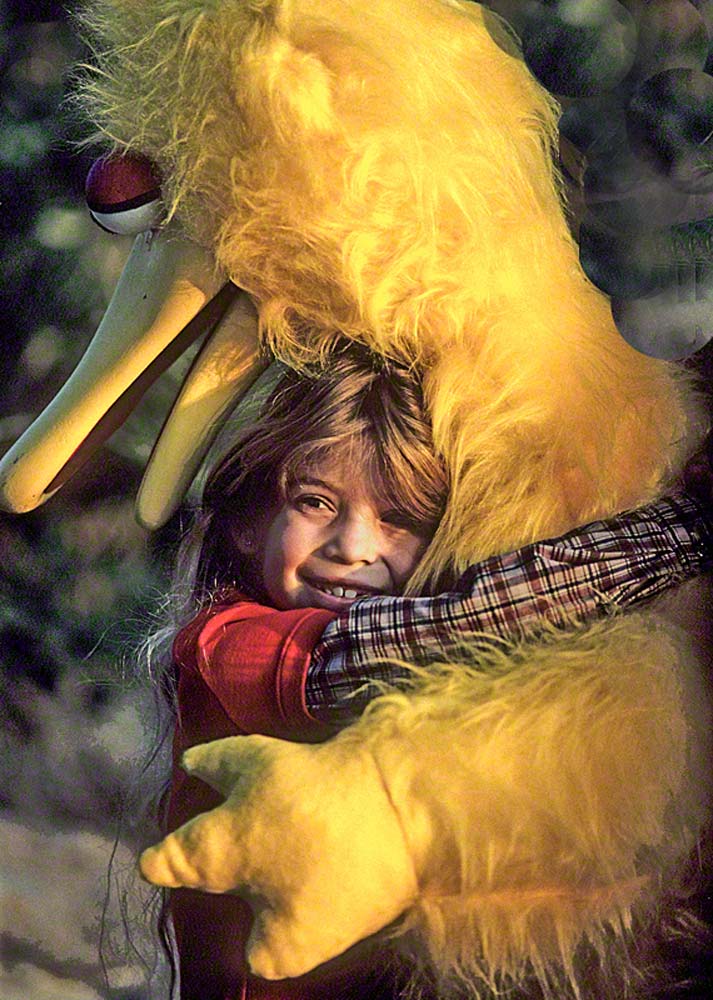
Another common scenario is when a person or persons creates a situation where a gesture or some type of body language happens too fast for someone to raise his or her camera up to their eye to capture it. Never fear, the probability of that person repeated it is on your side. I’ve been shooting for fifty-three years and I’m here to tell you to not bet the farm that it won’t happen again…only maybe this time it will even be better.

Whatever you do, do give up, do ‘t quit then walk away. Give it a chance and the chances are you won’t be sorry for spending the time. Remember that the easiest part of taking pictures is clicking the shutter. The part that leads up to it takes time, energy, and work.

Visit my website at www.joebaraban.com, and check out my workshop schedule at the top of this blog. come shoot with me sometime.

JoeB

Quick Photo Tip: The Where, When, and Why of Focusing on Manual

Coming from the days before the digital era, not only did we have to crawl three miles in the snow to get a shot, but we had to focus our own camera. Of course, those were the days before the written word, as in pre-historic times.

Now that we’re in the digital era, we have one of many marvelous innovations called auto-focus.  However, it’s important to remember that auto-focus is a luxury, not a necessity.

I keep telling that to my online students that take my online classes with the BPSOP, and to those that are with me during my “Stretching Your Frame of Mind” workshops I conduct around the perfectly round planet.

Having said all this, I generally keep my camera set on auto-focus, but in doing that I’m keenly aware of any drawbacks to it, and in an instant I can change to manual focus.

Here are some examples of when you should make the switch:

WHERE: You need to be watching where your focal points are active and place them on something that has contrast. It’s important to remember that the camera needs that contrast to focus.

If your subject has a lot of sky, your camera can’t focus there because of a lack of distinction; there has to be something of contrast below the horizon line.

WHEN: If you’re pointing your camera at a wall with nothing on it and depending on what your focal points are set on, the camera won’t see anything so it won’t click the shutter.

The most obvious one is it your lens is too close to your subject.

In the above photo, I placed my subject close to the edge of the frame to not only create depth but to generate Visual Tension as well. The camera doesn’t know that’s what I’m doing and will focus on something farther away. If I’m really lucky and have stopped down to F/22 and I have a wide-angle lens on I might get my subject in focus.

The best way to handle it is to set my camera to manual focus and focus on my subject. Then, if I want what’s behind him to be sharp, I can just stop all the way down to F/22.

WHY focus on manual? Because it will make you more aware of your surroundings, and what your camera can and can’t do. As a result, will make you a stronger photographer.

Visit my website at www.joebaraban.com and check out my workshop schedule at the top of this blog. Come shoot with me sometime.

JoeB

Quick Photo Tips: Lead It.

Lead em!!!
Lead em!!!

For those that like to smoke cigars, drink a bunch of whiskey and bird hunt, or for others that would rather kill a clay pigeon, you know what I mean by “leading it”. In other words, don’t shoot where they are, shoot where they’re going to be. Well, that same thinking applies to photography…how you say????

As I’ve demonstrated to my online class with the BPSOP, and in person with my “Stretching Your Frame of Mind” workshops I conduct around the planet, the next time you’re out shooting action or anything that moves whether it be a person or object, try aiming your camera where your subject is going to be and not where it is when you start shooting. Try giving he, she, or it a destination; someplace to wind up. That way you’ll keep the viewer interested, and the more interested the viewer is the longer he’ll stick around. I don’t know about you, but that’s exactly what I want to happen.

As I say this, Ansel Adams once said, “There are no rules for good pictures, there are just good pictures. In other words, sometimes I do this and sometimes I don’t. Sometimes I have the subject leaving the composition so it will imply ‘content’ outside the frame.

I digress:

Put your subject on the far right or far left and point your camera (a wide-angle would be the lens of choice) towards the horizon, or at the end of directional or converging lines. These types of lines are a perfect vehicle that can move the viewer around the frame.

Try different shutter speeds that will vary the amount of background blur. One of the best ways to achieve the feeling of speed is to get in a car (a convertible is best, but not mandatory) and follow along at the same rate of speed. Btw, you don’t need to go more than a few miles an hour to create this.

Visit my website at www.joebaraban.com and check out my new workshop schedule at the top of this blog.

JoeB

Quick Photo tip: Photographing Your Kids

A twenty-five cent photo.

I have four grown kids ranging from thirty to thirty-eight and four grandkids ages one month to thirteen and have been taking pictures of them most of their lives. Not so much with my three daughters and one son as they all have “flown the coop”, and leading grown-up lives!!!

There was a time when I took lots of pictures of them, and my fellow photographers that have taken my online course with the BPSOP, and my “Stretching Your Frame of Mind” workshop I conduct around the planet always are amazed when I show them some of mine in response to some of their submission they always have the same disclaimer…”It’s all they would let me take”, or “After one shot they wanted to quit”, or “This is the only pose they would give me”, or finally, “They had a complete meltdown when I asked them to smile”.

“What’s your secret”? They always ask.

It’s easy, pay them!!!!! I’ve always felt that if you were going to take them away from what they were doing, it seemed only fair to pay them for their time; and it has ALWAYS worked.

When my kids were just past the walking for the first time stage in their life, I was taking their pictures for family personal use as well as using them for some of my jobs. At first, they wouldn’t hear of being photographed. Covering their eyes and laying on the ground was their way of saying no. So, I offered to pay them twenty-five cents. It worked like a charm. Then as they got a little older, it went to fifty cents. Around the age of ten, it became a dollar, and that meant they agreed to be photographed for as long as I needed because it was mostly for my work.

By this time, they were as good looking and better all-around models that took direction better than any model their age a client could pick. This held true for all the modeling agencies in Houston.

The dollar became five, then twenty-five, fifty, and finally one hundred dollars by the time they were teenagers to young adults. You ask why? When a client wanted to look at model portfolios, I would always put in whichever of my kids would fit the profile of who they were looking for.  If one of them was picked, I would tell them it was one of my kids and the rate was one-hundred dollars for whatever use they wanted. A price my kids gladly agreed on.

The difference in price between a model registered with an agency and one of my kids could be quite a lot. One of my kids charged a hundred dollars and the modeling agency would easily charge a thousand dollars or considerably more depending on all the different places the photo would be seen. There was never an issue concerning Nepotism with the advertising agencies. It was always about the money.

So, next time you want to photograph your kids, pay them for their time. A quarter can go a long way, which is exactly what my daughter (photo shown at the top) charged to get on the teeter-totter with our dog Lucy.

A fifty cent charge by another daughter.

Visit my website at www.joeBaraban.com and check out my workshop schedule. Come shoot with me sometime.

JoeB

Quick Photo Tip: Patience Is A Virtue

I got really lucky!

When I’m walking around with some students in my “Stretching Your Frame of Mind” workshop, I see photographers in a hurry to just get the shot without taking the time to see what else they can bring to the table. In other words, failing to pre-visualize what their image could really be like. I also can tell when someone in my BPSOP online class has submitted a photo that doesn’t really say very much.

For example, in my photo, I saw how the light was playing against the street and truck. It was a good study in color and light, but it failed to keep the viewer around by creating some additional ‘layers of interest’. In other words, adding something or someone to editorialize the photo.

By editorialize I mean to have the viewer ask a question. What I was trying to say in this image is where is the man that belongs to this truck? The doors were open so he to be around somewhere delivering product. I saw in my mind this driver returning and if I was really lucky, he would cross the open doors and I could capture him perfectly framed…or so I hoped.

I decided to wait until it was actually happening; that’s where the patience comes in. I knew that if I waited long enough my idea just might come to fruition, and as Eddie Adams once said, “When you get lucky, be ready”. I was ready, and I got lucky…after waiting there twenty minutes.

If you have ever studied Henri-Cartier-Bresson and his approach to photography, he would often compose his photos in such a way as to leave room for someone to enter his frame. He would wait as long as it took and when it happened, at that moment he would snap the shutter.

So, my fellow photographers, take some time when thinking about your photo. Think about how you can make it stronger so that the viewer will stick around longer. If it takes a while so be it, more than likely it will be worth the wait…just have some patience.

View my website at www.joebaraban.com, and check out my workshop schedule at the top of this blog. Come shoot with me sometime.

JoeB

Quick Photo Tip: Setting Up An Action Shot

I set this photo up and shot it as though it was really happening in real time.
I set this photo up and shot it as though it was happening in real time.

Since I can remember, I’ve been accused of someone lacking in patience. I don’t necessarily agree with that except for when it comes to “making pictures”.

One of my all-time favorite “Pearls of Wisdom” is, “I don’t photograph what I see, because I never see what I want; so I photograph what I’d like to see”. What I mean is that I love throwing a camera over my shoulder and go out to “take pictures”.  This is usually when I’m traveling, and sometimes I get photos that I really like and sometimes I don’t.

With my online class with the BPSOP, and in my “Stretching Your Frame of Mind” workshops I conduct around the planet,  I talk a lot about the difference between taking and making pictures.

What I prefer to do is go out and “make pictures”. I like to set things up and then stand back and shoot in a repertoire fashion. In other words, I have complete control of the action, and I’m after a photo that looks real…as if I just happened to capture it. The look of being at the right place at the right time.

In all these images, I set the action up and then photographed it as though it was really happening. Give it a try sometime. It will take some pre-visualization on your part, but you’ll like the results…and you don’t have to rely on a virtue called patience for it to happen!!! 🙂

Visit my website at www.joebaraban.com, and check out my workshop schedule at the top of this blog.

JoeB

Quick Photo Tip: Using Leading Lines

Using Leading Lines to move the viewer around the frame.

I teach fellow photographers how to incorporate the elements of visual design into their photos. Both in my online class with the BPSOP, and in my “Stretching Your Frame of Mind” workshops I conduct around the planet, we work on ways to keep the viewer sticking around and becoming an active part in our photos. The theory of Gestalt is behind this idea, and it’s also a big part of the classes I teach.

The more ways we can have the viewer travel around our composition, either from one point to another or leaving and re-entering the frame the more he’ll stay involved. One of the best ways is by using Leading Lines (also referred to as directional lines).  Line is the most important of all the elements of visual design. Without Line, none of the other elements would exist. Although Line encompasses many different facets, in this post we’ll just look at those lines that have the most movement in them; the ones that do the “leading around”.

In the photo above, I’ve used the small roads to lead the viewer around the frame. Also, notice that the roads (the lines) are moving diagonally. Of the three basic lines vertical, horizontal, and diagonal, diagonal lines have the most energy. The reason is that diagonal lines are in the process of falling forward; this gives them more energy. To be sure, you don’t need actual roads to do the leading. Any strong lines will work as in the examples in the slideshow.

Next time you’re out shooting, look for Leading Lines. It’s a sure-fire way to take your photo what I refer to as “up a notch”…https://joebaraban.com/example/directional-and-leading-lines/

Visit my website at www.joebaraban.com, and check out my workshop schedule at the top of this blog. Come shoot with me sometime.

JoeB

Quick Photo Tip: “When You Get Lucky, Be Ready”

When I got lucky, I was ready

Eddie Adams was a Pulitzer Prize winning photojournalist that was known for his photo essays while being a combat photographer during the Viet Nam war.

One of my all time favorite quotes was said by Eddie, and while it refers to all the combat photographers who risked their lives, I’ve always applied it to my photography. I’ve also included it in my teachings with the BPSOP,  my online students, as well as my “Stretching Your Frame of Mind” workshops I conduct around the planet.

Eddie Adams said, “When you get lucky, be ready”. It’s easy to see how this quote can relate to war photographers, but how does it relate to civilians…like most of us for example?

I shoot predominately early in the morning and late in the evening when the light is the most dramatic and the shadows are long. As a result, it comes and goes very quick; sometimes you have seconds to see/think/compose/shoot.

After forty-two years of shooting, I’ve learned that you just never know when that extremely elusive “OMG” photo is going to materialize. It can come at any time and when it does, you better know (literally) where you stand.

So having said that, the first thing I do when I arrive at a location is to find out the direction of the sun. Since my favorite way to shoot is to side and backlight, I look for subject matter that will get that kind of light.

The next thing I do is to shoot some random exposures with nothing more in mind except to get the proper camera settings…just in case. If I have just one shot at it, I want it to be very close; close enough to work on it in post if need be. I will tell you that the challenge and sense of achievement in nailing the exposure in the camera beats sitting in front of a computer any day. To me, that’s what being a really good shooter is all about!!!

OK, there’s another part of the “OMG “ photo equation and that’s being able to anticipate the action; a good street shooter will know what I mean. I spent the early part of my career as a stringer for Blackstar, UPI then AP, so I did a lot of street shooting. By anticipating a person’s next move, whether it be as a gesture or a change in their body language, a plane, train, or automobile coming or going, or an action solely created by Mother Nature, I can now be ready for that split second I have to click the shutter. With my camera settings already in place, I stand a good chance of coming home with the bacon!!!

Here are some examples of being ready when I got lucky

Visit my website at www.joebaraban.com, and check out my 2012 workshop schedule. Come shoot with me sometime.

JoeB

Quick Photo Tip: Taking The JoeB Challenge

www.quickmeme.com

As most people that either follow my blog, or have taken one of my online classes with the BPSOP, or have attended my “Stretching Your Frame of Mind” workshop will tell you, I’m a firm believer in creating photos in the camera, and by doing so it will make you a stronger more rounded photographer. At this point I always say that I use Photoshop all the time but sparingly; I prefer the challenge of making my photos in the camera.

If I had a quarter for every time I heard someone say, “Why worry about it now, I’ll just fix it later”, I would be looking out the window of my Gulf Stream G650 right now on the way to my villa on the Island of Bali while sucking down Sea Breezes….that’s a lot of quarters!!!

So now let’s get down to the business as hand, taking the JoeB Challenge.  For the next few times, you go out shooting, return all your settings to their default, the way it came out of the box. Put your camera on manual and turn off the autofocus capability. Btw, the auto-focus feature is a luxury, not a necessity. Did you know that your camera is quite capable of taking great photos while being manually focused? You might feel naked for a few minutes, but it will pass. When you compose, remember that you won’t be able to crop or use any post-processing back at the ranch…YIKES, you say???? Do ye have little faith????

Trust me when I say it will make you a better photographer., and as my mother use to tell me when I was a kid (and as an adult), “When I tell you that a mouse can pull a house, don’t argue just hitch em’ up”.

Visit my website at www.joebaraban.com, and check out my workshop schedule at the top of this blog. Come shoot with me sometime. We’ll take the challenge together.

JoeB

Quick Photo Tip: Silhouettes Are Good For You.

Creating an abstraction from reality.

In my part II class with the BPSOP, we spend one week out of four, an entire lesson, just working on the silhouette…Why? Because they can render aid not only on a hot harsh day but while you’re waiting for the sun to come up or sticking around after it has set.

So many of my students both in my online class and my “Stretching Your Frame of mind” workshops have a difficult time thinking about this great photo aid and seem to have a tougher time creating them.

A  silhouette is simply a representation of someone or something showing the shape or outline only, typically colored in black against a lighter background. It’s an abstraction of reality and a good way to take your imagery what I refer to as “up a notch”.

For me, shooting in ‘golden light’ is easy, but when I’m occasionally forced to shoot under conditions that I ordinarily would pass on, sleep through, or spend that time scouting, I always reach into my ‘bag of solutions’, and invariably I use the same technique…I look for SILHOUETTES!!!

Midday light isn’t always the time to look for silhouettes. I’ll get to a sunrise location well in advance so I can look for silhouettes. I’ll also hang around after the sun goes down and look for interesting silhouettes at dusk. I’ll also put people in a silhouette to give scale to a landscape.

One of my favorite ways to show a silhouette is to combine it with an environment that isn’t in silhouette. Take a look at my photo of the boy sitting in the beach chair shown above. I’ve managed to create a silhouette while showing the rest of the scene as it normally appears. From the use of the silhouette, I’ve managed to create an abstraction of the boy while the chairs surrounding him are in the reality that we’re use to seeing. Try it sometime. While it’s not as easy as it looks to create, the results are well worth the time and thought that goes into it.

Enjoy some more silhouettes:

Visit my website at www.joebaraban.com and check out my workshop schedule at the top of this blog, come shoot with me sometime.

JoeB

Quick Photo Tip

 Anticipating the action
Anticipating the action

Eddie Adams was a Pulitzer Prize winning photojournalist that was known for his photo essays while being a combat photographer during the Viet Nam war.

One of my all time favorite quotes was said by Eddie, and while it refers to all the combat photographers who risked their lives, I’ve always applied it to my photography. I’ve also included it in my teachings with the BPSOP,  my online students, as well as my “Stretching Your Frame of Mind” workshops I conduct around the planet.

Eddie Adams said, “When you get lucky, be ready”. It’s easy to see how this quote can relate to war photographers, but how does it relate to civilians…like most of us for example?

I shoot predominately early in the morning and late in the evening when the light is the most dramatic and the shadows are long. As a result, it comes and goes very quickly; sometimes you have seconds to see/think/compose/shoot.

After forty-two years of shooting, I’ve learned that you just never know when that extremely elusive “OMG” photo is going to materialize. It can come at any time and when it does, you better know (literally) where you stand.

So having said that, the first thing I do when I arrive at a location is to find out the direction of the sun. Since my favorite way to shoot is to side and backlight, I look for subject matter that will get that kind of light.

The next thing I do is to shoot some random exposures with nothing more in mind except to get the proper camera settings…just in case. If I have just one shot at it, I want it to be very close; close enough to work on it in post if need be. I will tell you that the challenge and sense of achievement in nailing the exposure in the camera beats sitting in front of a computer any day. To me, that’s what being a really good shooter is all about!!!

OK, there’s another part of the “OMG “ photo equation and that’s being able to anticipate the action; a good street shooter will know what I mean. I spent the early part of my career as a stringer for Blackstar, UPI then AP, so I did a lot of street shooting. By anticipating a person’s next move, whether it be as a gesture or a change in their body language, a plane, train, or automobile coming or going, or an action solely created by Mother Nature, I can now be ready for that split second I have to click the shutter. With my camera settings already in place, I stand a good chance of coming home with the bacon!!!

Here are some examples of being ready when I got lucky

Visit my website at www.joebaraban.com, and check out my 2012 workshop schedule. Come shoot with me sometime.

JoeB

Quick Photo Tip: Matthew 7:7

Knowledge is power

First of all, I’m not a religious person; in fact far from it. But when I read something and it inadvertently has something that I can associate with photography, I can overcome my beliefs.

So, having said that, Matthew 7:7 says, “Seek and ye shall find”. Ok, what on God’s green earth does that have to do with photography?

Plenty, but it’s not in the actual picture-taking part of photography but having to do with research. Let me explain:

As most of you know, I teach an online class with the BPSOP, and I conduct my “Stretching Your Frame of Mind” workshops all around our (round) planet.

I’m constantly asked questions relating to just about every aspect of photography. After a fifty-three year career in advertising, corporate, and editorial photography, and teaching since 1983, I would say that I can answer most of them.

When I’m asked a question that I’m not sure I can answer with authority, I go to the World Wide Web, aka the Internet. Everything one would want to know is there if you just take the time to look.

I’m not sure why my fellow photographers won’t take the time to find out what they want to be answered. Perhaps they have never heard of the internet? Maybe they just don’t have the time to “mess with it”, or they don’t know what to write.

Take the time, there’s so much great information out there besides what you’re looking for; I have often stopped and read something that I wasn’t looking for.

When you do, I strongly suggest that you confirm the information. Never rely on just one opinion or definition…why? Because there’s a lot of bad BS out there and people who claim to be experts, are just looking for their fifteen minutes of fame. When you get the same or similar answers, then more than likely you can trust the information.

If you’re looking for equipment from cameras and lens, to tripods and filters be sure to read all the comments/reviews both positive and negative. How many stars does it have?

Take it from me, knowledge is power.

Visit my website at www.joebaraban.com, and check out my workshop schedule at the top of this blog. Come shoot with me sometime.

JoeB

Quick Photo Tip: Shadows as the Center of Interest

Shadows as part of the subject.

In the past year, I’ve written a couple of posts on the importance of using shadows to create drama in our imagery, and as a result, leave the viewer with a memorable experience.

In my online class with the BPSOP, and in my “Stretching Your Frame of mind” workshops I conduct around the planet, I’m always stressing the use of shadows in their photos. Shadows are our best friend, and the sooner my fellow photographers embrace them the sooner their photos will go what I always refer to as “up a notch”. I’ll occasionally be writing some additional posts about the use of different kinds of shadows, starting with this one.

This first post has to do with the type of shadow that’s the center of interest and it can often tell a story on its own. In the above photo, the shadows are from a group of photographers that were taking one of my workshops. We were down next to the Charles River at sunset and there were several young kids that were climbing up the wall of rocks. As I walked up to them, I immediately noticed their shadows on the ground and the fact that they led my eye to the kid climbing on the wall.

To me, the story is obvious as it clearly shows the shadows as the center of interest, and they also become directional lines leading the viewer to the kid.

Visit my website at www.joebaraban.com and check my workshop schedule at the top of this blog. Come shoots some shadows with me sometime.

JoeB

Quick Photo Tip: Take a Step Back

One step back

Besides teaching an online class with the BPSOP, and conducting my “Stretching Your Frame of Mind” workshops I conduct around the planet, I also do a six-month mentoring program where I work one-on-one with photographers.

Recently, I have the same issue come a couple of times which has led me to write a post on it. It’s when I’m talking about one of their photos, and there’s something that has been cut off on one of the edges of the frame.

There are several reasons why this happens. Either they’re in too much of a hurry to get to the next shot, or lunch, or that glass of wine, etc., they’re so focused on the subject that they miss everything else going on.

At best, when there is a subject worth shooting, they’re so focused on placing the subject in the best light and the best positioning in the frame, that they forget about the rest of the environment. That is, the balance between the Negative or Positive Space that’s surrounding the subject/main center of interest, or the contrast between the light and dark areas, or whether the colors complement one another…and so on.

I see it so often that if I had a dollar for every time I talk about it, I would be writing this post next to a pool at some villa I’ve rented for the year…with a blue and frothy drink (with an umbrella in it) next to me.

There’s a very easy and quick solution (although I dare tell the world as to perhaps lose my villa), and that is to just take a step back and make an adjustment. Sometimes it’s just one step that will do the trick, but you have to be paying attention.

In the above photo, I had a 17mm lens on and it just took one step back to include all the wonderful black and white tiled floor that I had cut off in my first shot.

Visit my website at www.joebaraban.com, and check out my workshop schedule at the top of this blog. Come shoot with me sometime.

JoeB