Since my background is not in photography rather in painting and design, I studied the elements of visual design. The day I picked up a camera and looked through the viewfinder was the day I changed the medium from a brush and colored pencils to a camera. Years and years later I still consider myself an artist, only now I photograph what I actually see instead of painting what I saw or only see in my mind.
Since this is the way I approach picture taking, I now enlighten those that sign up for my online class with the BPSOP, and my fellow photographers that sign up for my “Stretching Your Frame of Mind” workshops I conduct all over the place. The ones that first take my online class walk away with I refer to as my Artist Palette.
This particular palette no longer has different pigments on it, but instead has: Texture, Pattern, Form, Shape, Line, Balance, and Color; if you click on the aforementioned link you can get an idea of how to use the palette.
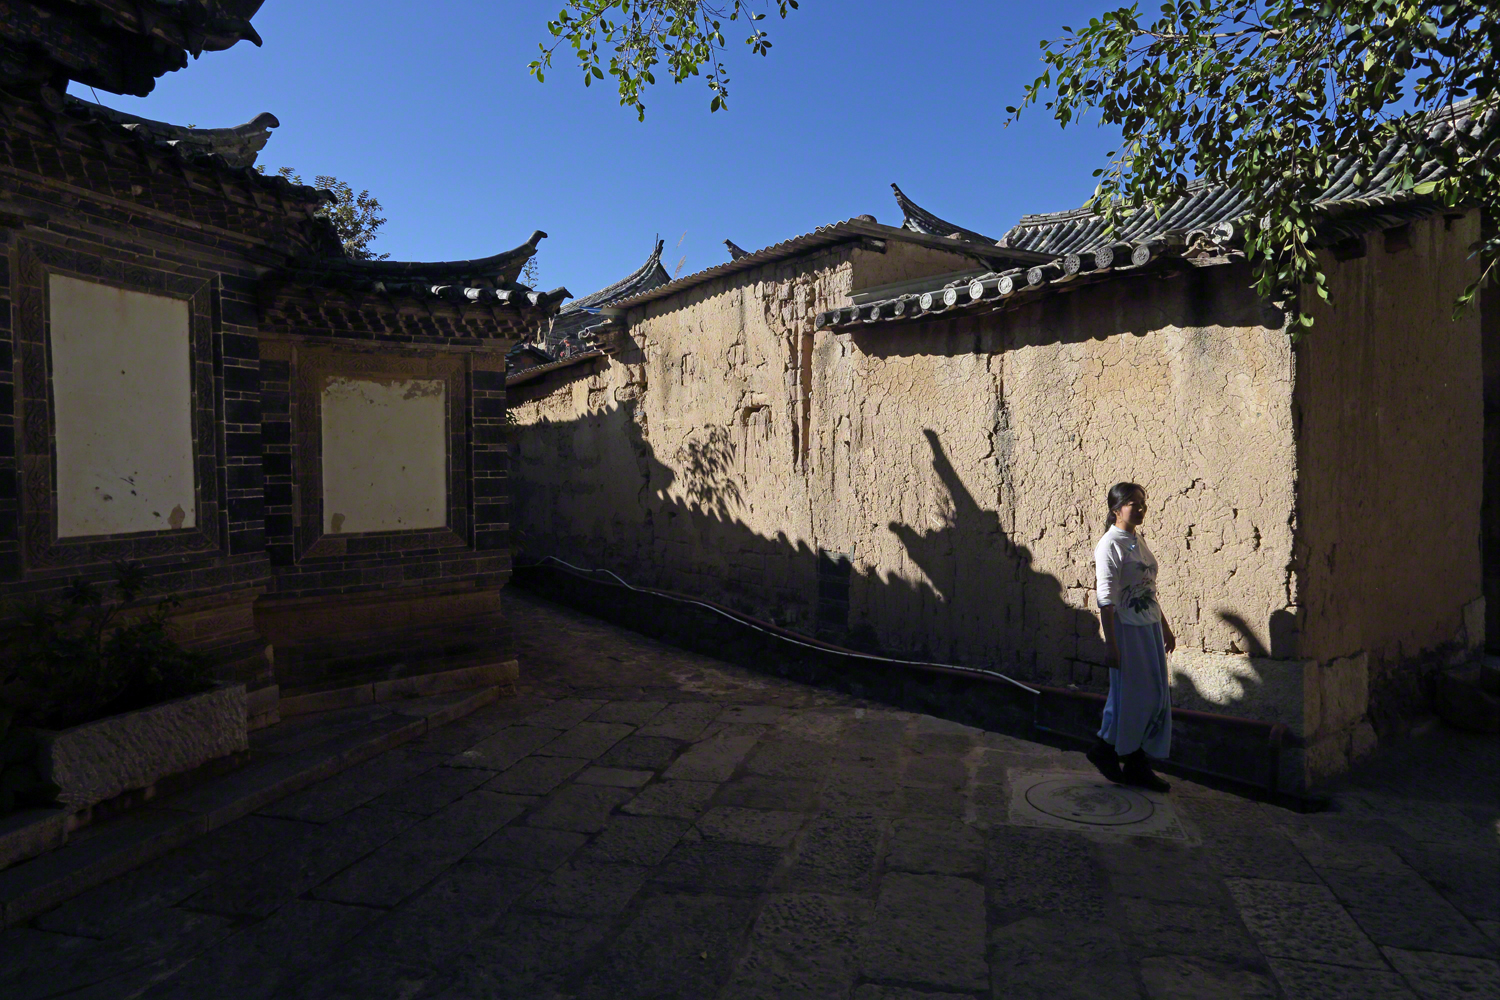
In my online class I devote an entire lesson on Line. Line is the most important of all the elements of Visual Design, and without line none of the other elements I teach would exist. In fact without line, planes, trains, automobiles, and even people wouldn’t exist as well. Why? Because we all have an outLINE.
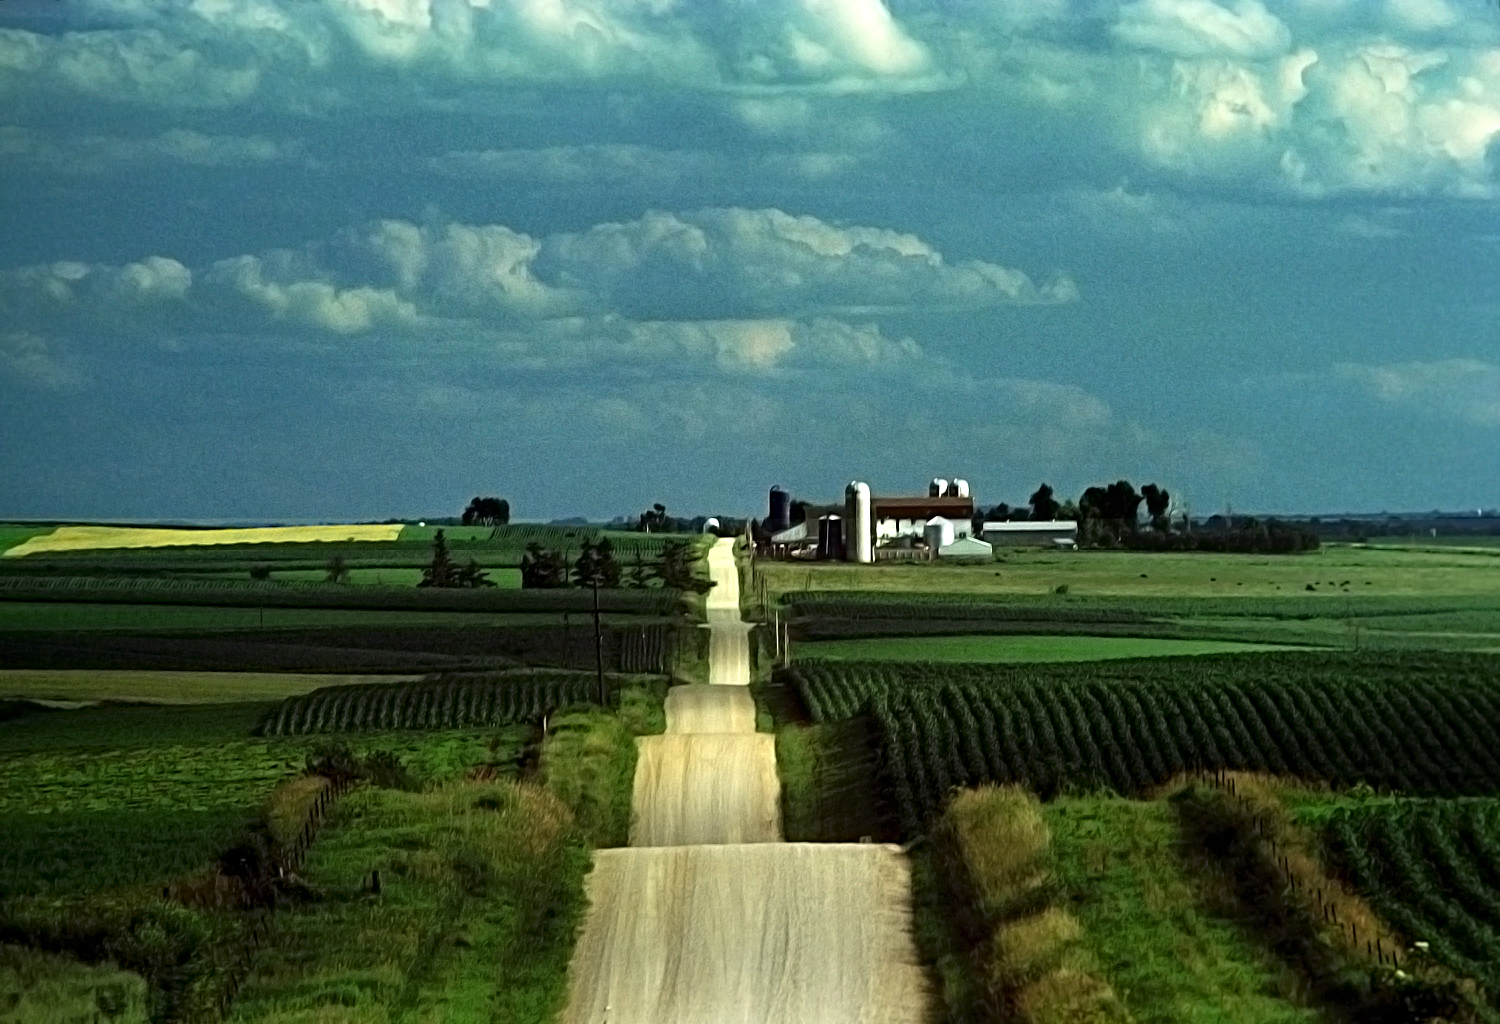
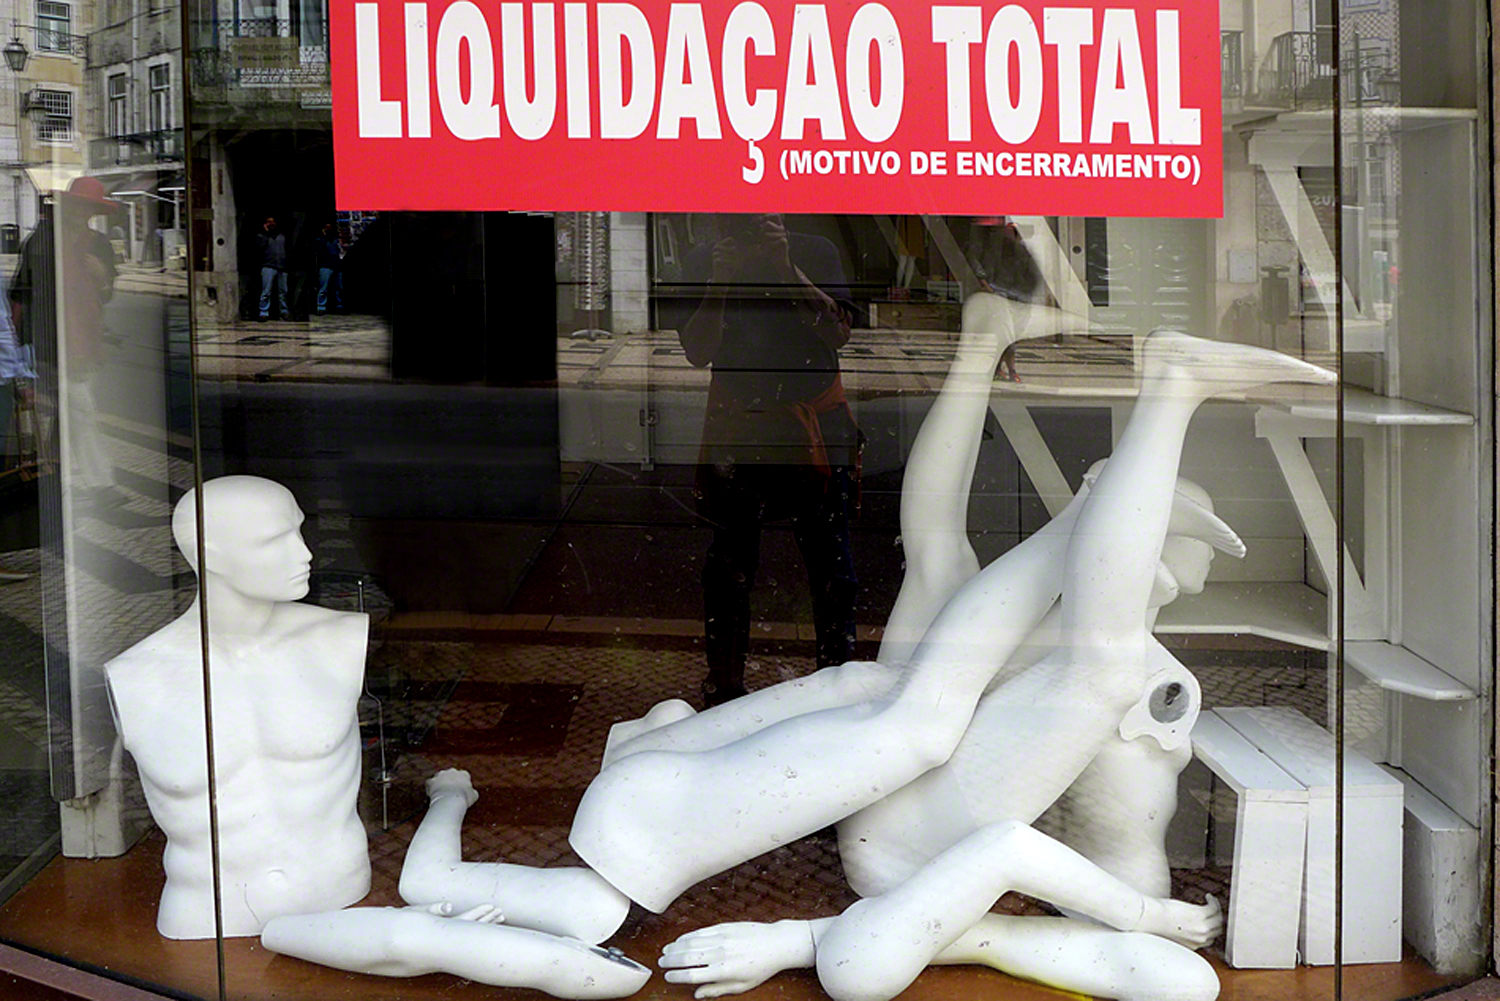
That said, the most important line is the horizon line, and when I see a horizon line that’s not straight it’s a sure sign that a novice took the picture. Don’t get me wrong, It’s not a judgment, merely an observation. In my opinion, the only time the horizon line wouldn’t appear straight is if you were in the Space Shuttle.
You would think that it’s an easy fix, and you would be partially right. If you’re on a tripod, like I am a lot of the time, you simply straighten the horizon right away and then forget about it. It will continue to be straight right up to and including the part when you actually take the photo.
However, most people don’t like being in complete control so they always hand hold their camera. The inherent problem is in the fact that you have to look at the horizon line while you’re composing, and then again right before you take the photo. That’s going to make it hard to concentrate on a host of things like: capturing the moment, human and non-human gesture, body language, the peak of any action, balance, etc.
I’ve been shooting for fifty years and I often have a tough time remembering to take a final look at the horizon line. If you can do it, and do it successfully then you’re way above my pay grade…and I take my hat off to you.
The next time you go out shooting, look at the horizon line and remember these words. It will take your photos “up a notch”. Oh and one last piece of advice: Try getting it straight “in the camera”, and not later in front of a computer. It will make you a better photographer, if that’s what your thing is.
Visit my website at: www.joebaraban.com, and check out my 2018 workshop schedule at the top of this blog. Come shoot with me sometime.
According to the German philosopher and psychologist Karl Albert Schener, our minds whether we’re awake or asleep will transform things symbolically.
Visual input is a part of everyday life, and when we go about the world we’re not just taking in what we see, we’re relying on the perception of the environment that surrounds us.
A part of ourselves is out there and as photographers, it’s our prime objective to present visual information in a way as to take control of what the viewer feels and sees when we present information in the form of a photograph.
When I talk about what the viewer feels when looking at our photos, I’m talking about visual empathy. A brief definition of empathy is the ability to understand and share the feelings of others. The question is how do we create visual empathy in a photograph?
I can remember on numerous occasions during one of my “Stretching Your Frame of Mind” when I mentioned this concept to one of my fellow photographers. I’ve also talked about it at great lengths to my online classes with the BPSOP.
Here’s one of the easiest ways to create visual empathy:
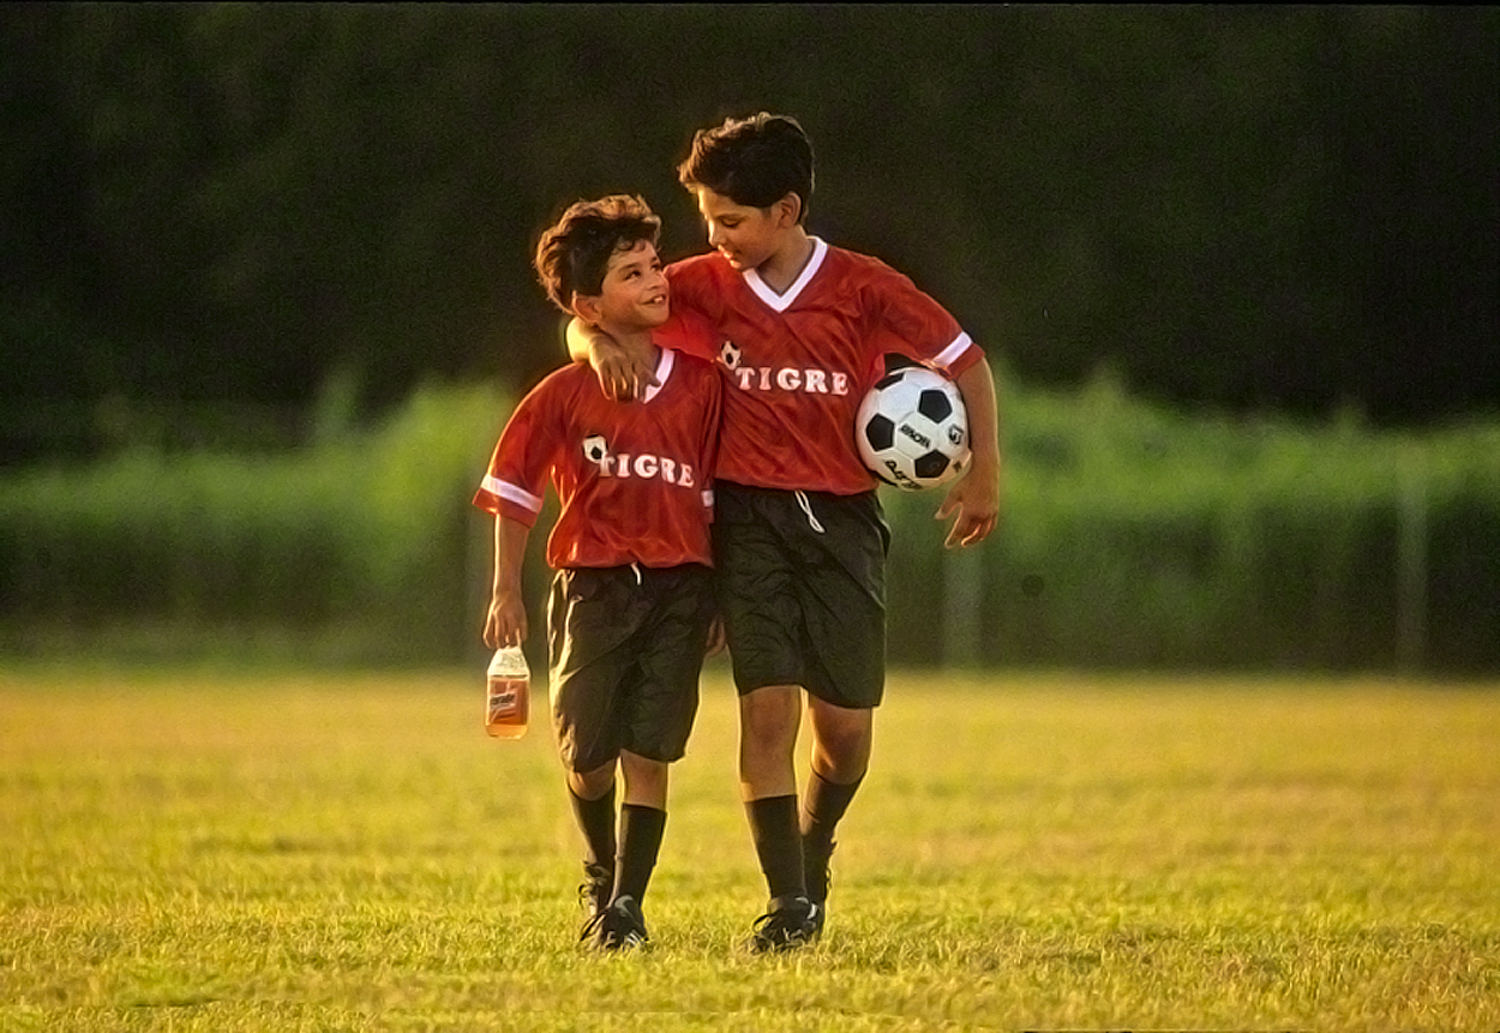
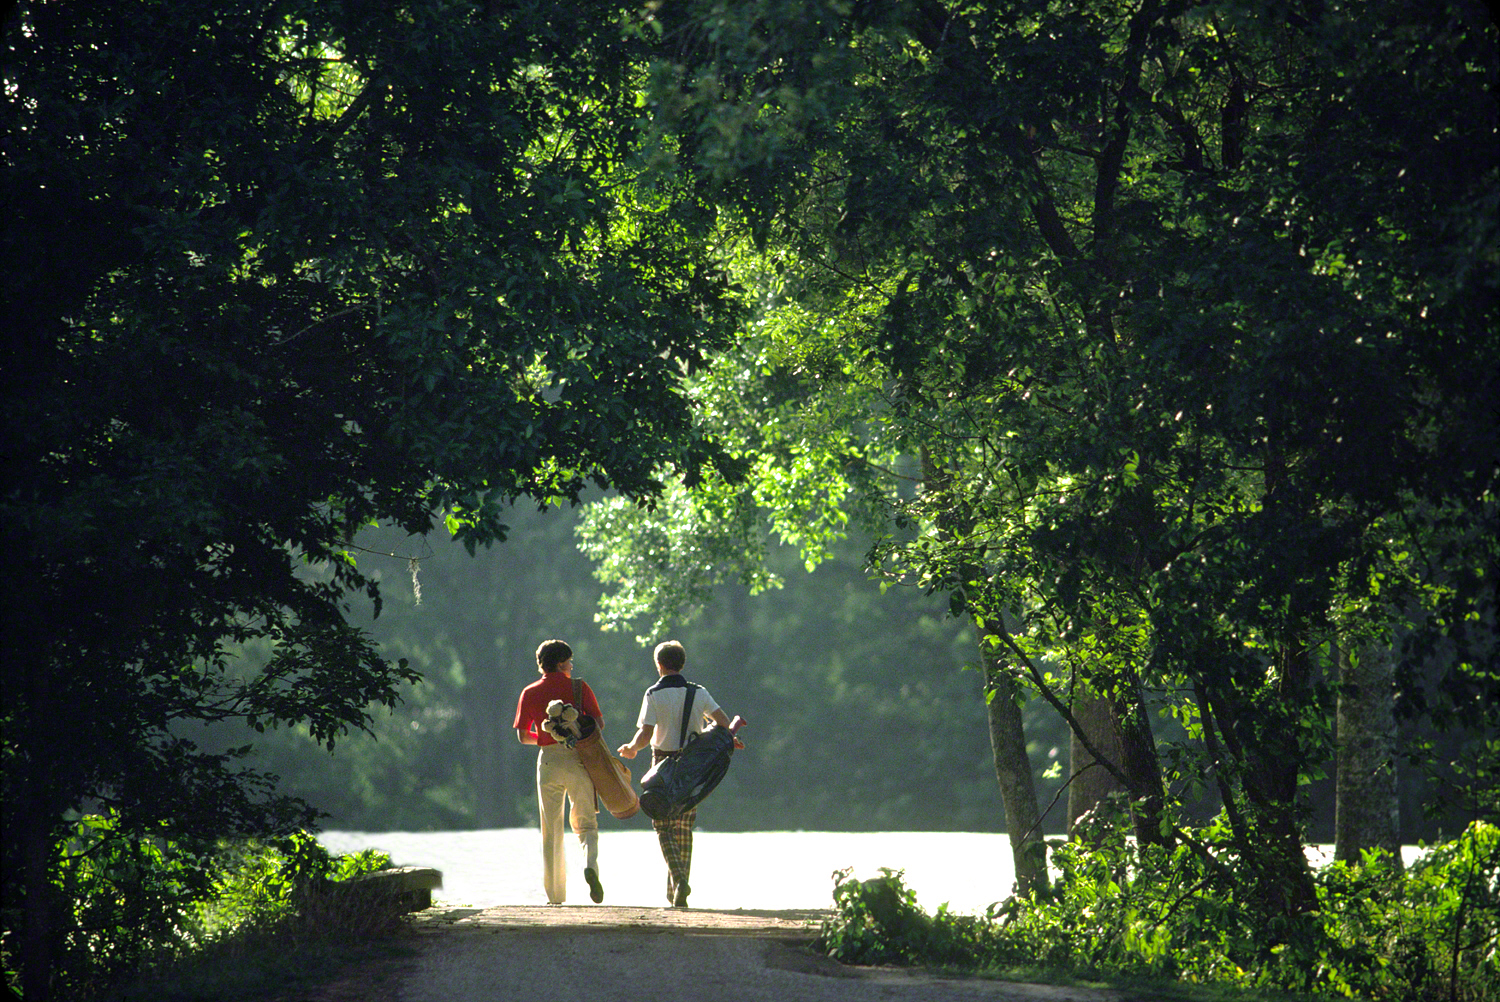
Imagine two people walking side by side, either down a street, on a beach, hiking, etc. If they’re talking to one another (of course the viewer won’t know what they’re saying) the viewer won’t necessarily know if they like one another or not; even though he’ll realize that they know one another…but that’s about all. This is one measure of empathy. Btw, if you play golf you’ll know that they wouldn’t necessarily know one another.
A measure of Visual Empathy
Now, imagine those same two people walking side by side, and either they’re holding hands or one person has his hand around the other. This is the true definition of visual empathy and will make the viewer think; making him think is a good way to keep him around longer, and that’s precisely what I like to do.
There are other ways to create visual empathy: the use of color and light, and I’ll be talking about these in future posts.
Visit my website at: www.joebaraban.com, and be sure to check out my workshop schedule at the top of this blog. Come shoot with me sometime.
I think I’ve written more posts where the light is the main theme than any other subject matter, and I’ve had a post come out every five days for nine years; that’s a lot of posts!
In my online classes with the BPSOP, and in my “Stretching Your Frame of Mind” workshops I conduct around the planet, I’m constantly talking about the importance of light and the fact that it’s so fleeting you need to be ready for it when it comes and then when it goes…be ready if and when it comes back; sometimes in mere seconds.
I can’t tell you how many times I’ve seen one of my fellow photographers start shooting without any regard as to what’s happening with the light. In my opinion, this is definitely not in their best interest, and the consequence comes in the form of a dull, gray, and flat photo; the exception is if that’s what was important in creating some kind of mood.
In conjunction with the Santa Fe Workshops I was conducting a workshop in Bayamo, Cuba. We were sitting around the bar in the pool area enjoying a Mojito; we were sitting there because it had been raining and we were just waiting for it to stop. While we were waiting I noticed the sun break out for a few seconds then go back behind the dark clouds. I immediately grabbed my camera and thought about a great post I could write (once again) about the light and how relevant it is in creating visually interesting images.
Having said that, I have submitted two photos that were taken in the space of about a minute. You won’t find these on my website, in a gallery, or in a museum but that was not the intent.
The intent is to demonstrate how powerful the addition of light can be in your composition, and the possibility of making just about anything in the way of subject matter look good.
I shot the pool first with really bad light as the man in the middle swam (btw, the pool is not as big as it looks since I had on a 17-40mm lens) away from me. He turned and began swimming towards me and I shot again when the sun broke out.
Pull the slider from left to right so you can see the diference. As you can see, if one picture really is worth a thousand words, then what’s two pictures worth?
So my fellow photographers, the next time you’re shooting and the light isn’t great, look around you to see if the conditions will be changing anytime soon. If you see that they might, stick around!!!
Visit my website at: www.joebaraban.com, and check out my 2018 workshop schedule at the top of this blog. Come shoot with me sometime.
In conjunction with The Santa Fe Workshops, on October 2nd I’ll be leading a group in San Miguel de Allende. A beautiful oasis and artist colony, and the entire city is a UNESCO site.
Come join me for a week of fun and photography…what could be better?
For those that have ever shot at a clay pigeon, you know you have to lead it. In other words don’t shoot where they are, shoot where they’re going to be. If you shoot where they are, you’ll miss every time.
A similar analogy can be applied to photography…how you say?
First of all let me explain what Skeet shooting is all about. Simply, it’s a recreational and competitive activity where participants, using shotguns, attempt to break clay targets mechanically flung into the air; and since I love to shoot at these little fellows I can compare it to street shooting.
As I’ve demonstrated to my online class with the BPSOP, and in person with my “Stretching Your Frame of Mind” workshops I conduct around the planet, the next time you’re out shooting action or anything that moves whether it be a person or object, try aiming your camera where your subject is going to be and not where it is when you start shooting.
Try giving he, she, or it a destination; someplace to wind up. As I’m writing this post I think of Henri Cartier-Bresson and how he would shoot his photos. Although he was a master at capturing the moment, he would also ocasionally arrange his composition keeping in mind geometric shapes; much like I tell my students after filling their ‘artist Palette’ with all the elements of visual design; shape and pattern to name a couple.
Cartier-Breson would design his composition and then wait for some action. For example a person walking into it and at a pre-chosen spot in the frame he would click the shutter.
Although this concept is always in the back of my mind, I also look for and follow the action, i.e., a person walking down the street or that person about to do something worth taking a picture of. Hopefully my peripheral vision will allow me to see the movement coming out of the corner of my eye and while I’m following it I’m also looking ahead to see where he’s going (or doing) and wait for the right moment to click the shutter; having your camera set on continuous is a good idea in this instance.
Then you can get really lucky, as in the top photo.
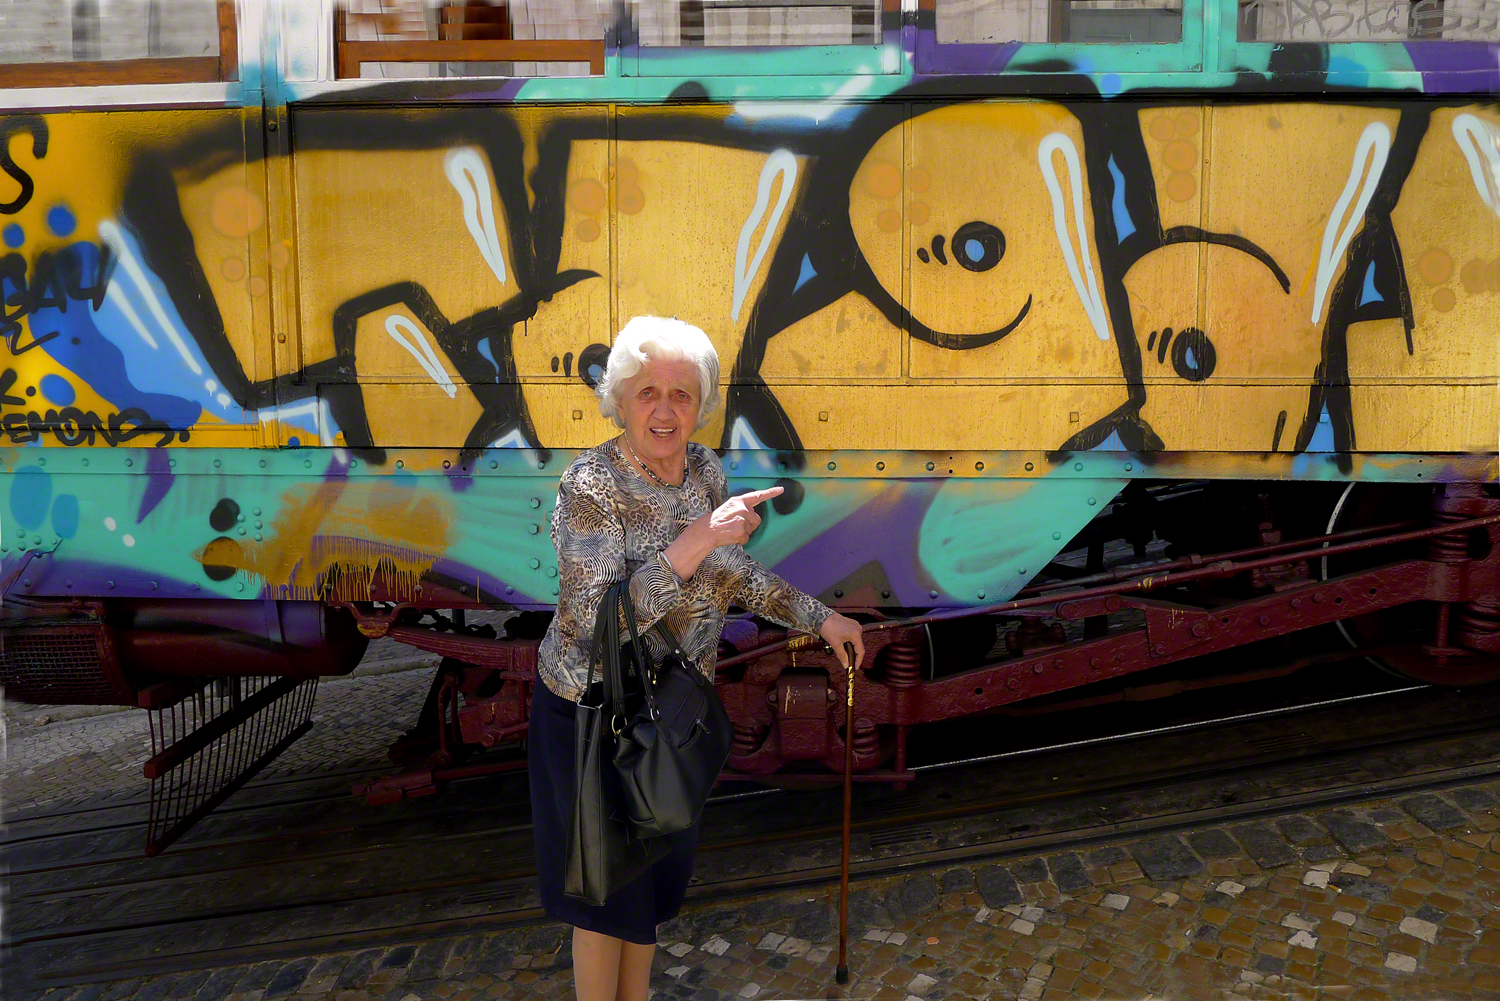
I was leading my workshop in Lisbon and as usual we were walking aound the “City of Seven Hills”. I came upon this graffiti covered streetcar and because of the color and all the people walking up the hill, I decided to wait.
Out of the corner of my eye I saw this woman coming up the street and I quickly aimed my camera and decided on this composition and where I wanted her to be; one reason was to have control of the placement because of all the graffiti that would be distracting if it were coming out of her head!!!
Will as Eddie Adams once said, “When you get lucky, be ready”. She saw me and stopped to ask a question…unfortunately I don’t speak Portuguese. I shrugged my shoulders and she walked off. Where she went after the brief encounter was irrevelent since I had got it!!!
Leading the action.
In the bottom image, whike leading a group to photograph the flooded rice paddies in southern rural China, I saw the woman coming and as she was walking I was following her with my camera, but I was leading her by several feet and waited until she was in an area that clearly defined her and placed her close to the edge of the frame to create Visual Tension.
Visit my website at: www.joebaraban.com, and check out my 2018 workshop schedule at the top of this blog. Come shoot with me sometime.
This coming July 29th will be my 30th anniversary teaching at the Maine Media Workshop. I’ve always picked this time as it’s the week of the Lobster Festival down the road in Rockland. This ofers a unique set of photo ops, different from the Maine Coast, fishing villages and lighthouses. The Lobster Festival is all about color, design, light, energy, people watchng and environmental portraits everywhere you look; some people are there in costumes and loved to be photographed.
In conjunction with The Santa Fe Workshops, on October 2nd I’ll be leading a group in San Miguel de Allende. A beautiful oasis and artist colony, and the entire city is a UNESCO site.
Come join me for a week of fun and photography…what could be better?
Closing in on fifty years of being a advertising and corporate photographer, one of my favorite assignments is to shoot a portrait in an environment; the main reason is that I’m a location photographer.
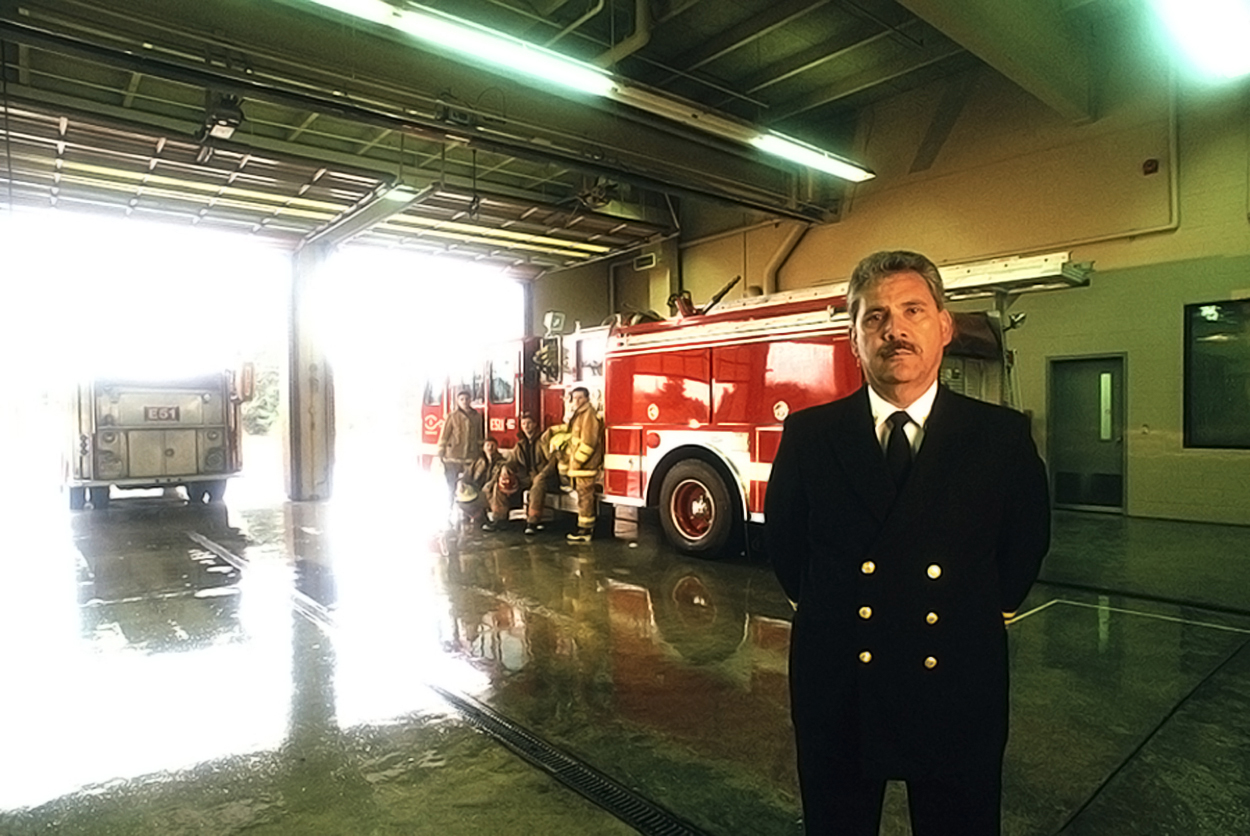
Fire Chief in Portland
First of all, let’s define the environmental portrait: It’s a portrait of someone in a situation that they either work, live, or it could be a place where they spend a lot of comfortable time, as on a boat or in a park, etc. In any event, it’s a location that says who they are, and the finished photo should be able to tell a story.
In my online class with the BPSOP, and in my “Stretching Your Frame of Mind” workshops I conduct around the planet, I’m always telling my fellow photographers to “get up close and personal”. That could be anything from an object to a person. In this context, I’m referring to people. When you’re up close to your subject there’s more of a connection between the two of you and as a result your image will be stronger; besides the fact that it will be easier to direct them.
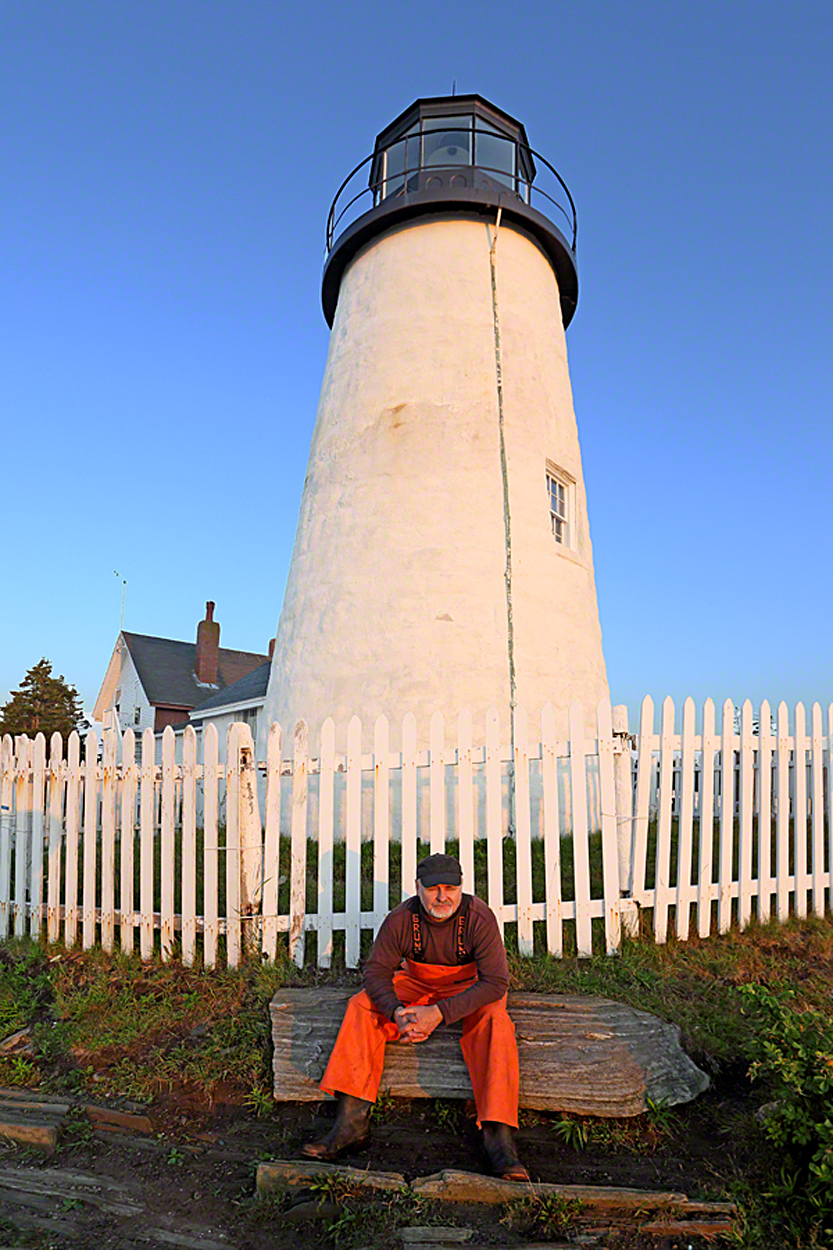
Pemaquid Lighthouse
An environmental portrait can be very important in explaining where your subject is, and that usually means to think about and show as much of the background as you can; I wrote a post on this idea that I call the “Whole Enchilada”. The key here is to be up close and personal, but at the same time show the environment the subject is in.
Of course the best way to achieve this is to shoot with a wide angle lens. Remember that this is not a regular portrait where you’ll often shoot with a shallow depth of field. You want to show as much as you can, and get it all sharp. Again, that can easily be handled with a wide angle.
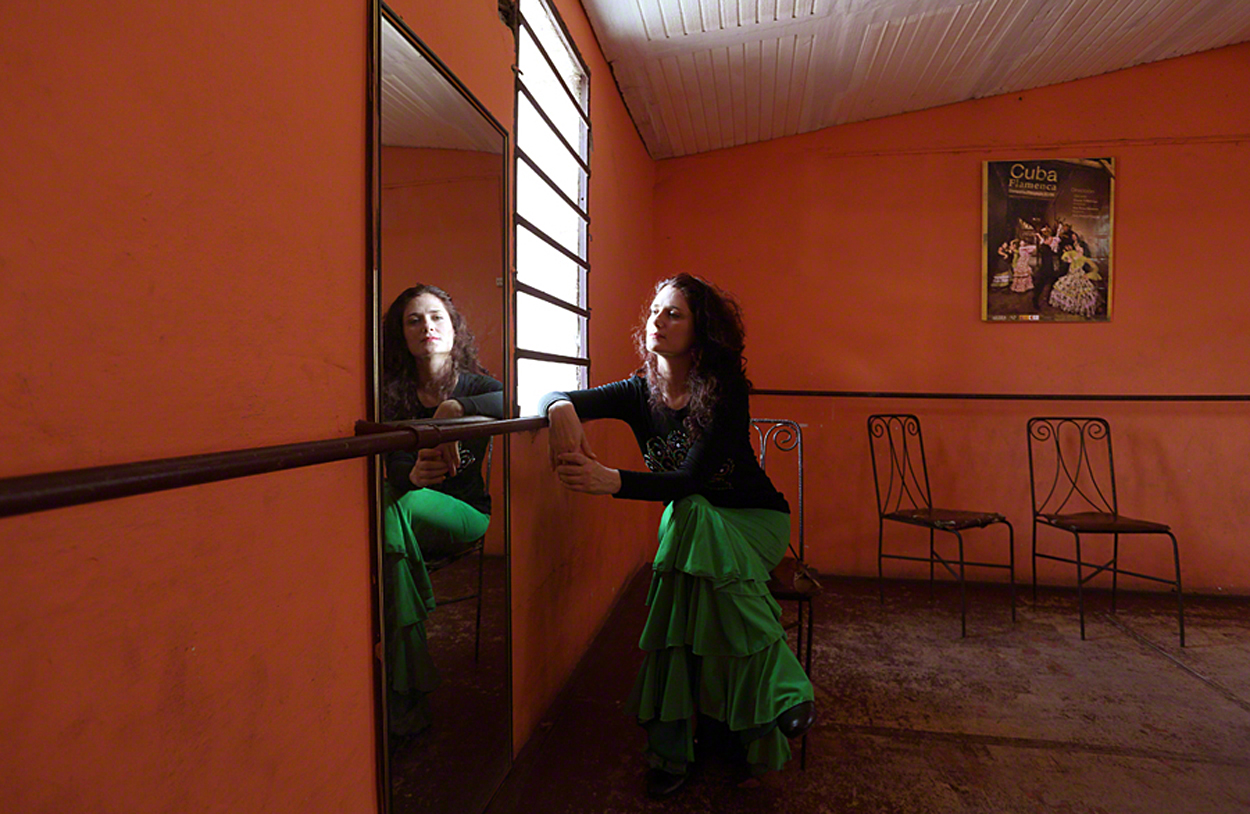
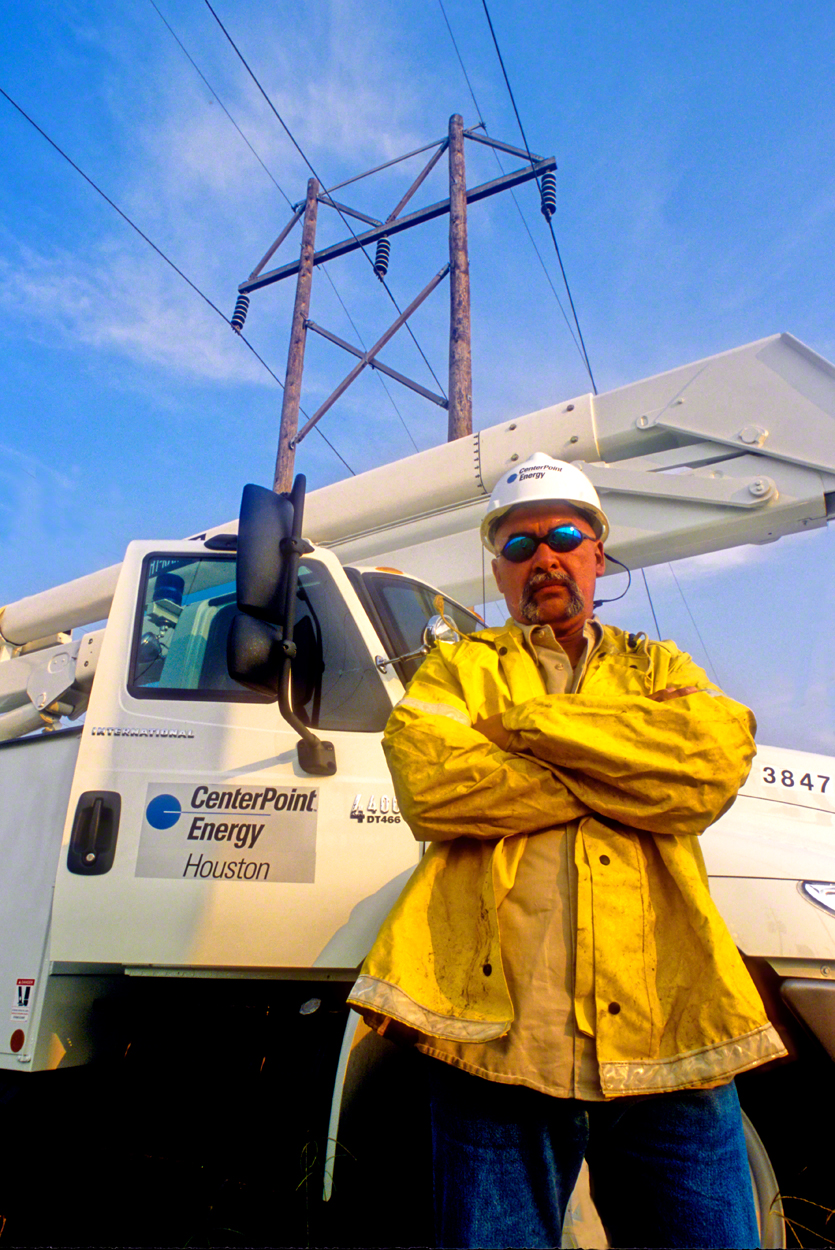
Flamenco instructor in Cuba
Ok, so why do I like shooting environmental portraits? For one, it shows the subject in relation to the world around him, and can make him relax. I also like it because it gives the viewer something else to look at.
Make your viewer want to stick around longer by giving him more things to look at and discover. Personally, I’m really not interested in looking at someone I don’t know, bur I might be interested in what’s around him.
Lineman supervisor
If at all possible choose the location ahead of time; yes, that would take some pre-production. When I’m scouting a location, I take the readings from my Sunpath program, and my Morin2000 hand bearing compass. I want to know exactly where the sun is going to be so I can place him according to the way I want the light to fall.
Since I usually don’t have more than a few minutes either because that’s all the person gave me, or because of the loss of light, I want to be prepared with a shot list. If I have five minutes, that’s usually enough to get several poses in various places within the location.
Visit my website at: www.joebaraban.com, and check out my 2018 workshop schedule at the top of this blog. Come shoot with me sometime.
This coming July 29th will be my 30th anniversary teaching at the Maine Media Workshop. I’ve always picked this time as it’s the week of the Lobster Festival down the road in Rockland. This ofers a unique set of photo ops, different from the Maine Coast, fishing villages and lighthouses. The Lobster Festival is all about color, design, light, energy, people watchng and environmental portraits everywhere you look; some people are there in costumes and loved to be photographed.
In conjunction with The Santa Fe Workshops, on October 2nd I’ll be leading a group in San Miguel de Allende. A beautiful oasis and artist colony, and the entire city is a UNESCO site.
Come join me for a week of fun and photography…what could be better?
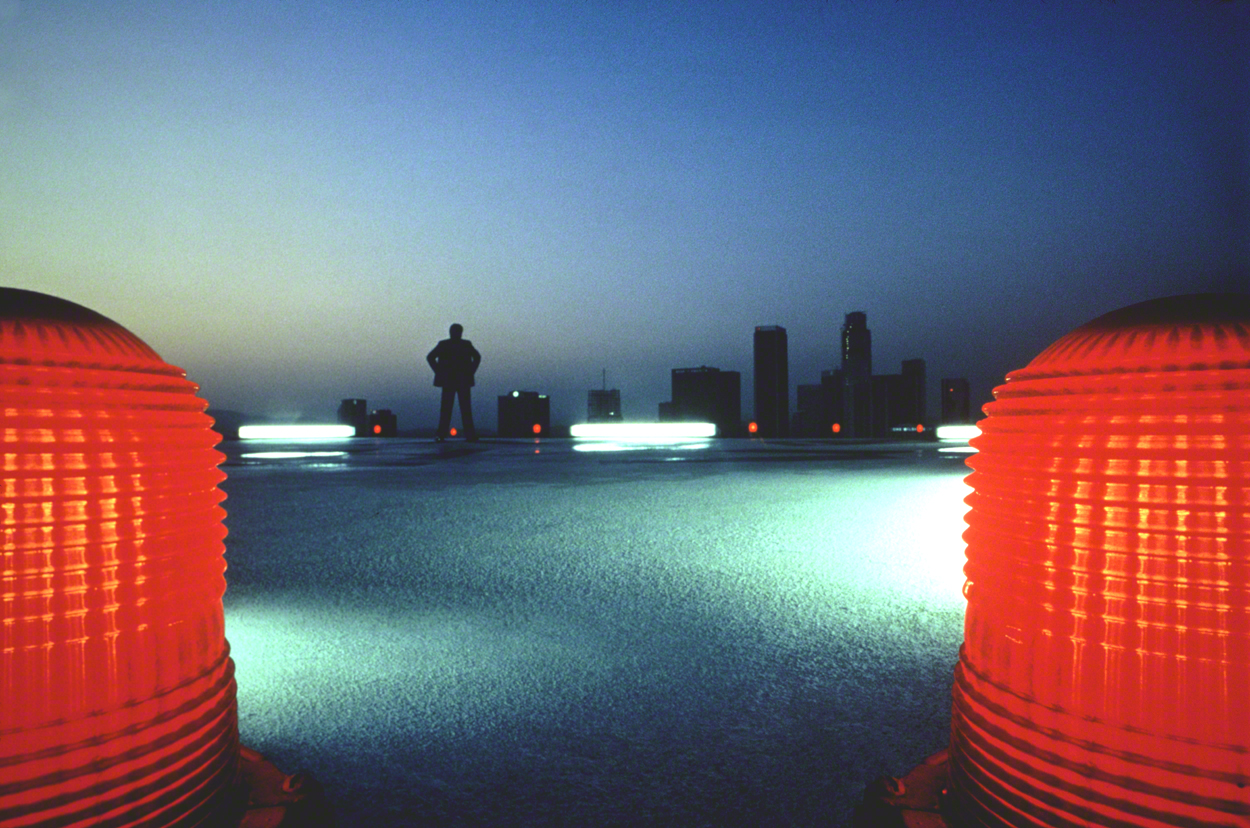
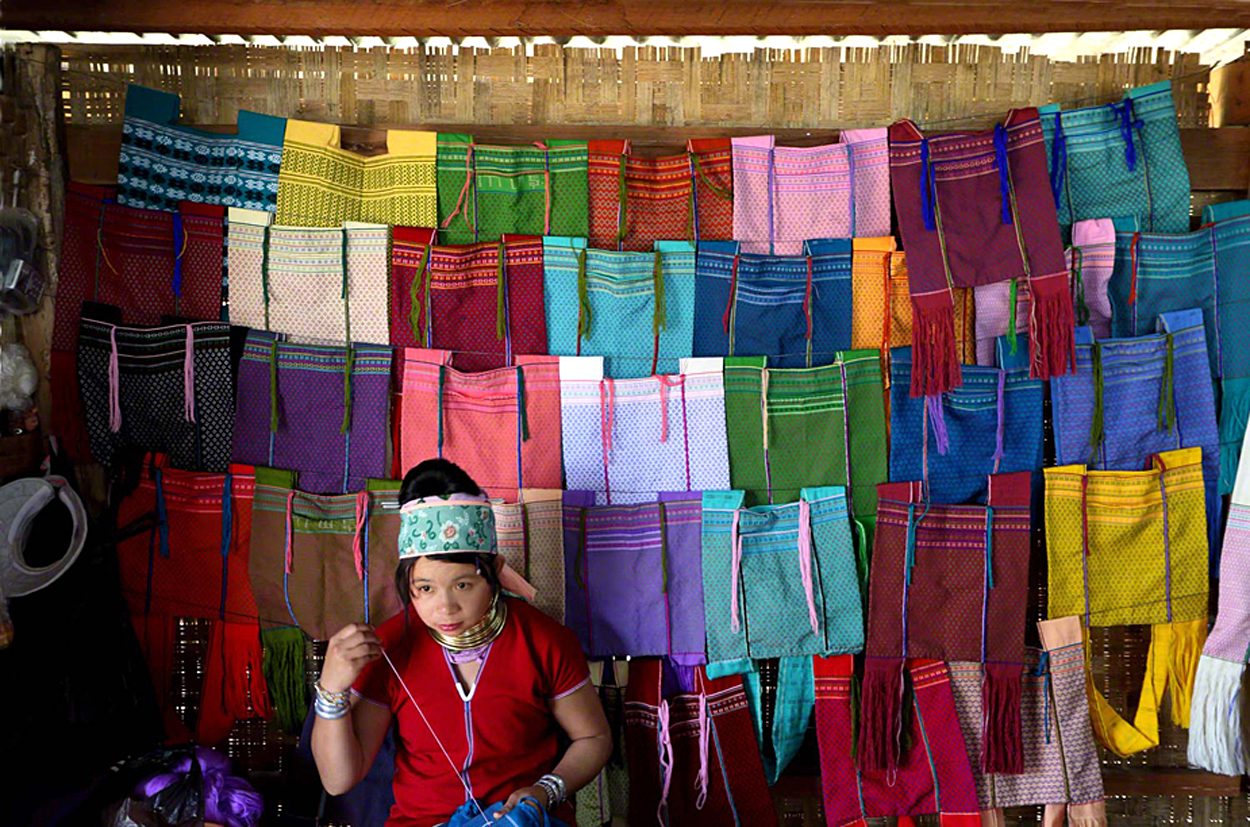
One of the basic elements of visual design is color, and spanning a fifty year career as an advertising, corporate, and editorial photographer I have put great emphasis on making it a big part of my photos. I have over the years trained my eye to look for color being that it’s a stimulant for our eyes and can often tie the elements of a photograph together.
A heliport in Los Angeles
Color affects every moment of our lives, and has an enormous impact on our photography. Knowing color is one of the first steps in taking consistently good photographs. Color can give you a sense of mood as well as a sense of place, and time. It can also be used to move the viewer’s eye around your composition.
I have often pointed out to my online students with the BPSOP and my fellow photographers that have taken one of my “Stretching Your Frame of Mind” workshops I conduct around our planet that different cultures and societies react to color in contrasting ways. For example in western societies black is the color of mourning but in Japan it’s a symbol of honor.
The color red (the longest wavelength) can be associated with danger, love, purity, good luck, and in parts of Africa it’s the color that represents mourning. Blue is intellectual and calming, but can also be cold, distant, and lack emotion.
Sewing for the tourist trade.
Yellow is generally positive, emotional and creative, green stands for balance and peace. Purple is majestic, orange is associated with warmth and passion, and gray is…well we all know what a gray sky means when we’re out chasing the light!!!
Although I think it’s important to know as much about the different colors as possible, it’s not always possible to consciously use these to your advantage while out and about taking photos; certainly something to recognize and act accordingly to improve visual interest.
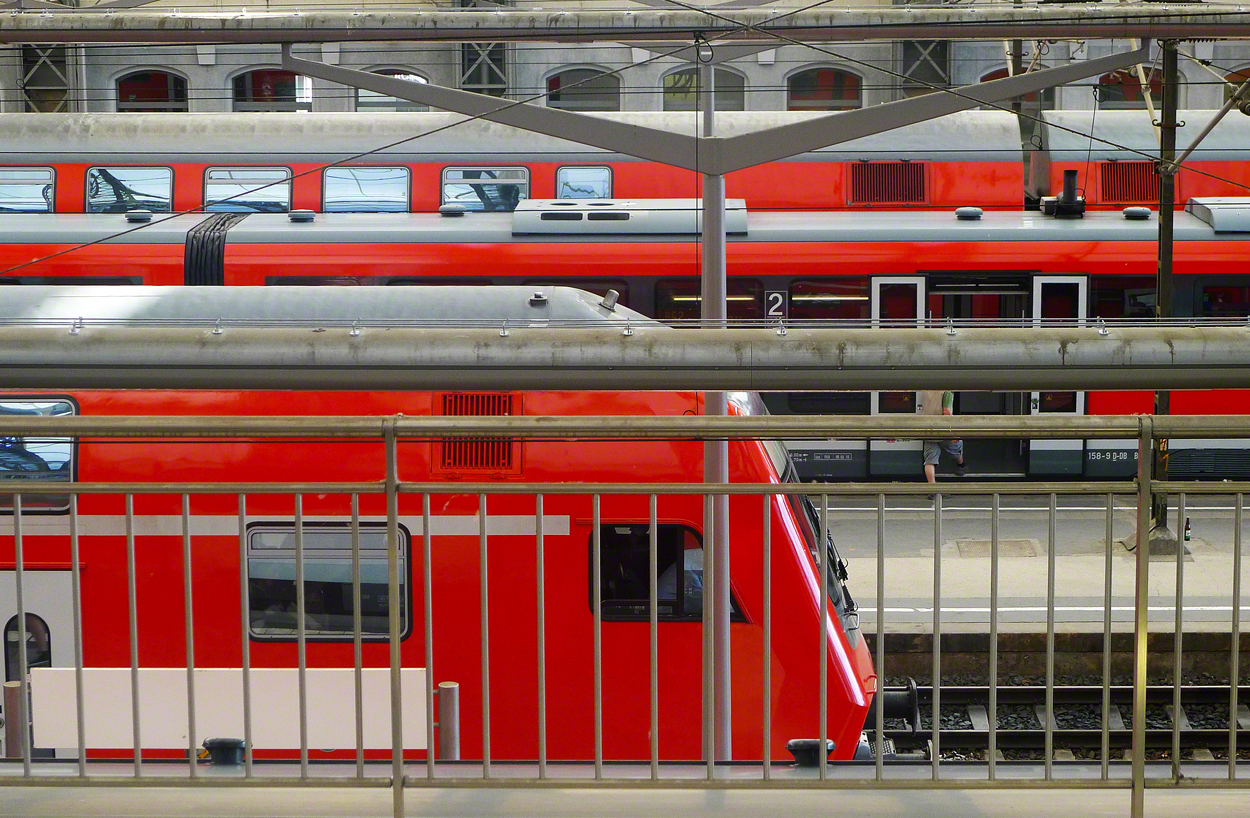
Same train line in Europe.
Having said this, what you can control to some degree is the story-telling aspect of colors in general, and using it to communicate ideas and therefore keeping the viewer around longer by making him an active participant in your thought process…how you might ask?
By controlling what the viewer perceives and then tries to process will do that for you. For example, showing a group of people all dressed the same will have the viewer asking himself what club, organization, team, etc., they represent; asking questions is a good thing and in your best interest. Remember that similar colors in inanimate objects will also provide much the same info for the viewer to assimilate.
So the next time your out shooting look for color that is communicating an idea to you because if it makes you ask a question, the viewer just might ask a similar one.
Visit my website at: www.joebaraban.com, and check out my 2018 workshop schedule at the top of this blog. Come shoot with me sometime. For those new to my blog I still have two openings for my Springtime in Berlin workshop; a beautiful and vibrant city.
In conjunction with The Santa Fe Workshops, October 2nd I’ll be leading a group in San Miguel de Allende. A beautiful oasis and artist colony, and the entire city is a UNESCO site.
Come join me for a week of fun and photography…what could be better?
In lesson one Part I of my four week online classes with the BPSOP, we work on the negative and positive space aspects of a composition. From this online class many of my fellow photographers have signed up for one of my “Stretching Your Frame of Mind” workshops I conduct around our planet.
As part of the daily reviews I will invariably talk about achieving the balance between both the negative and positive space and continuing to plant this concept in their minds; because it’s that important.
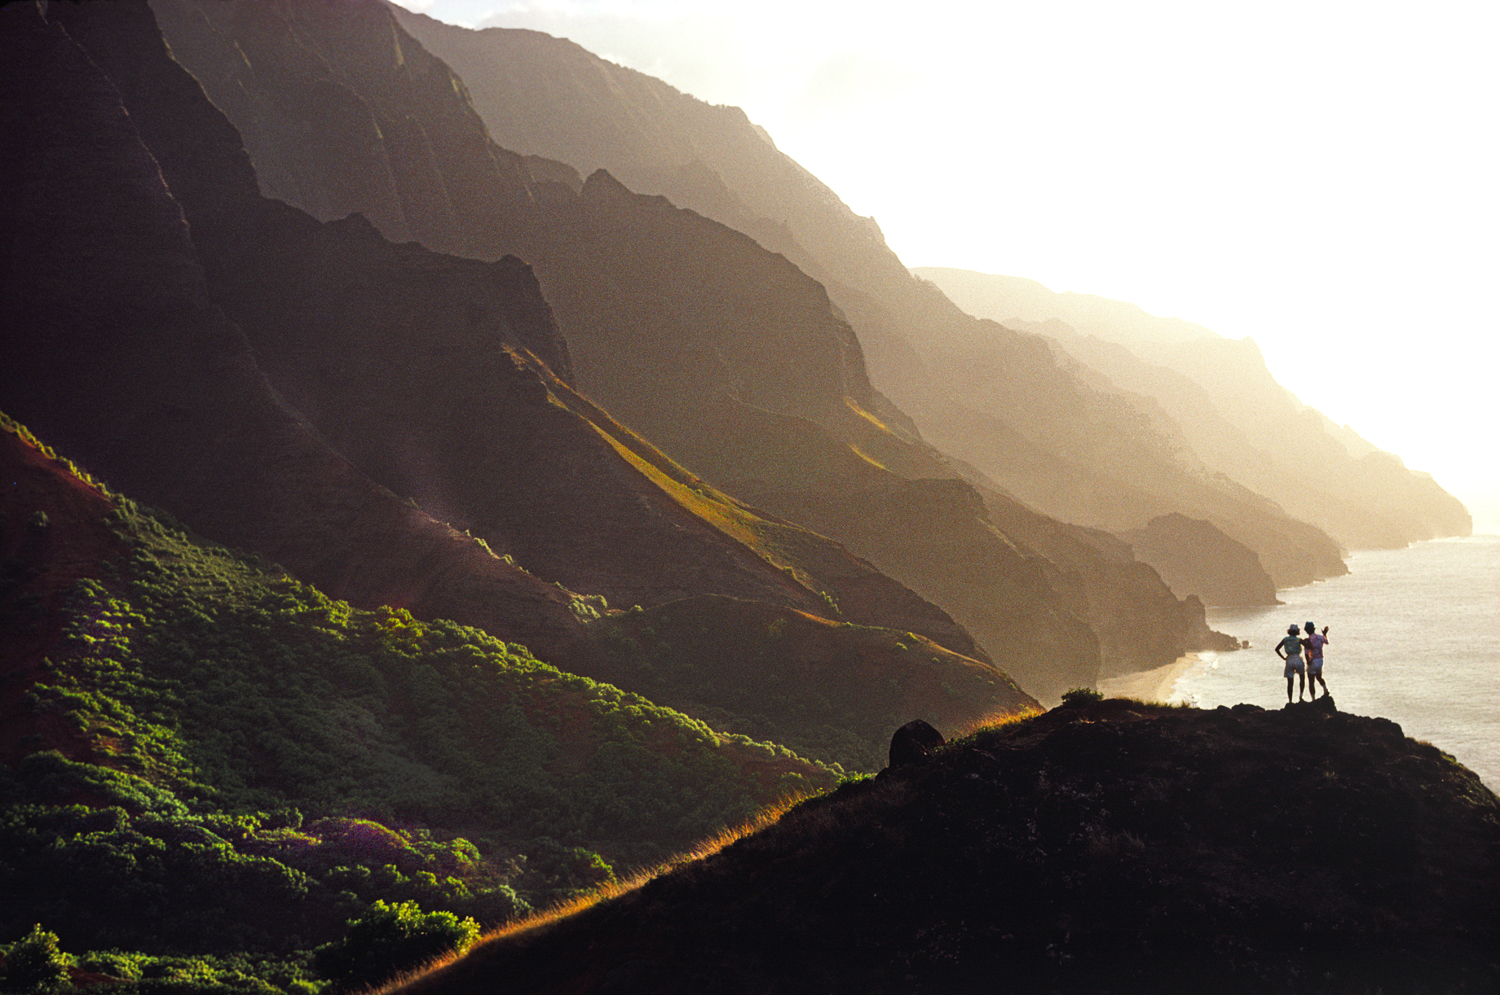
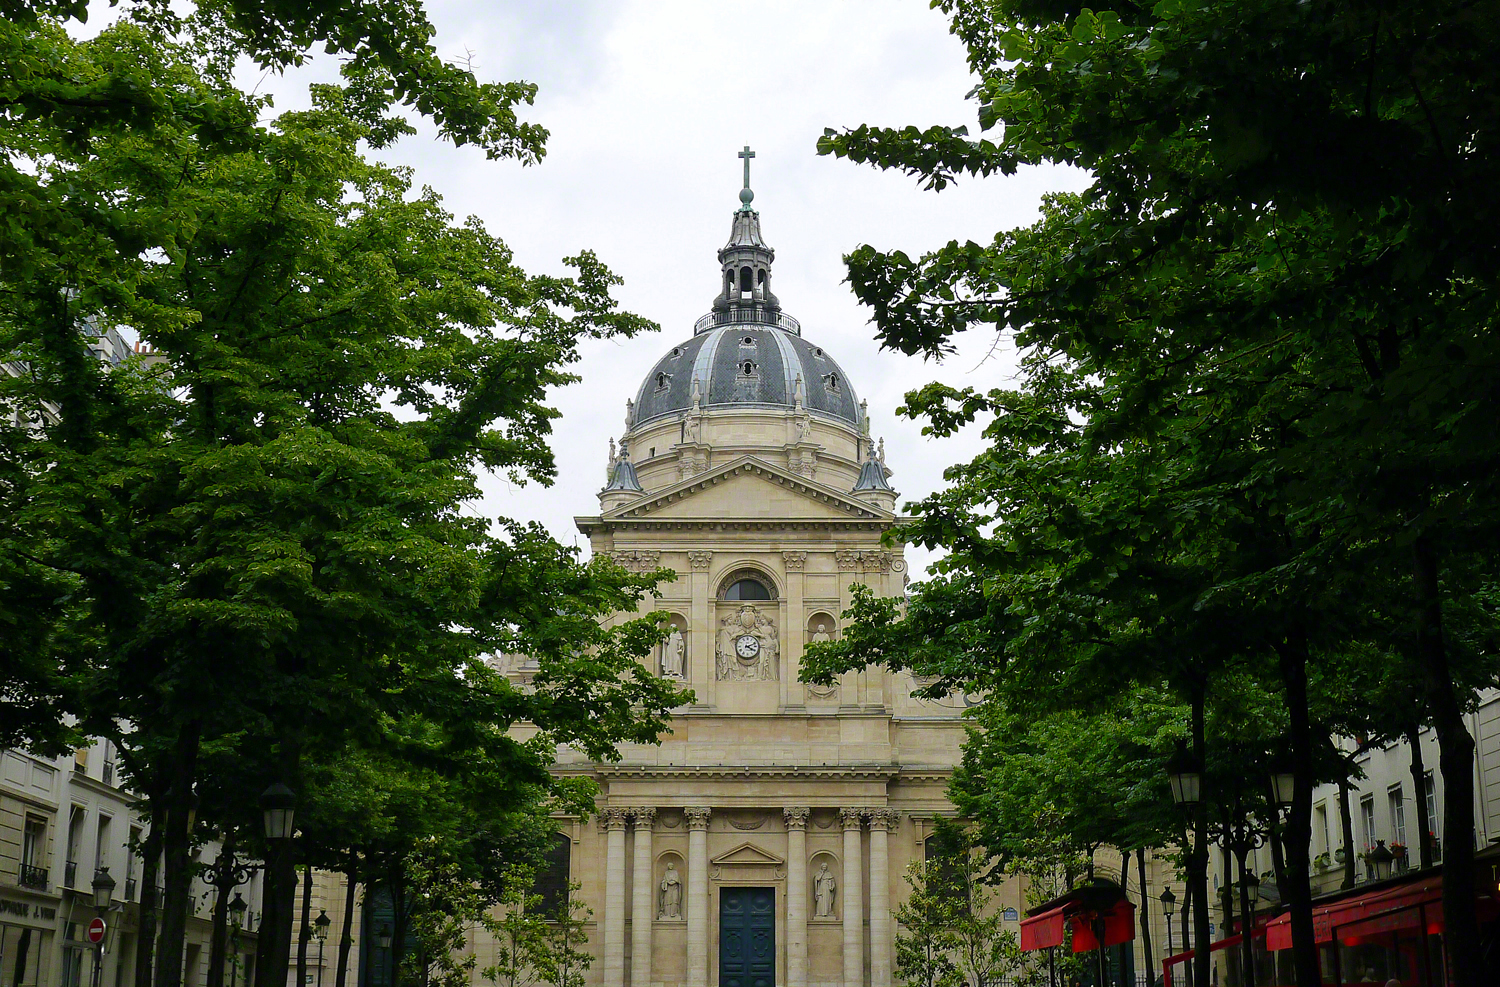
There are two kinds of space, positive space and negative space. Positive space has mass and is usually the main subject or object, and negative space is everything else…specifically the area bordering the positive space defining it but not a part of it. Since negative space carries its own visual weight, we must be careful not to let it distract in any way from the main subject, although there’s one exception: when the negative space is the subject.
By the way, negative space is not negative. A good photograph will have a good balance (one of the basic elements of visual design) between the positive and negative space. As photographers (artists), it’s easy to think only of the positive space. So easy, we sometimes forget about the part that’s just as important…the negative space in our composition. Training your ‘eye’ to see around the subject will make the practice a powerful compositional tool that can, and will strengthen your photographs.
To some, this concept can be difficult to understand, yet it is one of the easiest once you can overcome the need to only focus on the positive space (your subject). One way is to concentrate on the space between the subjects and around them. This will put the impetus on giving the viewer a place to rest his eyes; as well as seeing the shapes that are caused by the negative space.
In the above photo, I was sent to D.C. to take environmental portraits of all the partners in a law firm. They wanted these partners in close proximity to one of the monuments. I positioned this man with a keen eye as to keeping some negative space between the Washington monument and the cherry blossoms; while being cognizant of the balance between the three subjects.
In the photo of the church dome in France, once again I moved around until I could get some negative space between the leaves and the top of the dome….so the viewer could rest his eyes.
In the photo of the couple standing on a small hill in Hawaii, I was hovering in a helicopter and was communicating with them by way of a walki-talki in the chopper and one on the man’s belt on the right. The object was to create negative space so all of their arms and legs would be well defined; by directing them with the walki-talkis.
So the next time you’re out shooting pay as much attention to the negative space as you do with the positive space; usually the subject.
Visit my website at: www.joebaraban.com, and check out my 2018 workshop schedule at the top of this blog. Come shoot with me sometime.
This coming July 29th will be my 30th anniversary teaching at the Maine Media Workshop. I’ve always picked this time as it’s the week of the Lobster Festival down the road in Rockland. This ofers a unique set of photo ops, different from the Maine Coast, fishing villages and lighthouses. The Lobster Festival is all about color, design, light, energy, people watchng and environmental portraits everywhere you look; some people are there in costumes and loved to be photographed.
In conjunction with The Santa Fe Workshops, October 2nd I’ll be leading a group in San Miguel de Allende. A beautiful oasis and artist colony, and the entire city is a UNESCO site.
Come join me for a week of fun and photography…what could be better?
I recently had a blog follower ask me to post one of his all time favorite posts that I wrote almost eight years ago. WOW! That’s a long time to remember something, especially when I can’t remember what I was doing last week.
It was on the 101 things I think all photographers should know about photography and the art of taking pictures.
I was “surfing the world wide web”, and I came across an interesting post on things to know about photography. It listed things I’ve been teaching, thinking and talking about for over twenty-five years in my “Stretching Your Frame of Mind” workshops I conduct around the planet, and in the past two years with my online class with the BPSOP.
While a few were on my list, there were several I didn’t agree with or were left out. In any event, it inspired me to share not only the link to the post, but to reveal my own personal 101 list as well.
Here’s my list, enjoy:
101 things to know about photography:
1. It’s not the camera; it’s the ten inches behind it that’s important.
2. Never photograph a child without asking permission from a parent first.
3. “When you get lucky, be ready”…Eddie Adams.
4. Be sure to always have a tripod with you.
5. Light is everything.
6. Remove the Histogram from your camera; it’s not what you want to be looking at when you have seconds of light left.
7. Get up close and personal to your subject.
8. Always have a roll of duct tape and WD-40 with you.
9. Crop in the camera so you’ll know where the edges of your frame and the four corners are.
10. Shadows are your best friend.
11. Clip the highlights.
12. See past first impressions.
13. Always consider the scene and its outcome.
14. It’s not what you put into a picture that counts, it’s what you don’t put in that matters.
15. Always carry a camera with you.
16. Marry someone whose father owns a big camera store.
17. Bracketing in the camera will make you a better photographer.
18. It’s ok to get dirt on the front of your shirt when you’re composing a photo.
19. Always shoot in RAW.
20. Lens shades help.
21. Pick up the trash in your composition before shooting.
22. Sometimes a pretty sunset to you is just another pretty sunset to someone else.
23. Challenge yourself. Try shooting with your least favorite lens.
24. Only show your best photographs.
25. Study the ‘Masters’, they were here before you.
26. Pre-visualize. Try to see it in your mind first.
27. Use the elements of visual design and composition when taking pictures.
28. Shoot on manual, don’t ever let the camera tell you what to do.
29. Take an online class or a workshop to hone your skills.
30. Break all the rules you can, but first I suggest you find out what they are.
31. Have your camera body facing down when changing lens to keep the dust out.
32. In photography, bigger (cameras) is not better.
33. Take along a big golf umbrella and shoot in the rain.
34. Pictures make great Christmas gifts.
35. Golden light is the prettiest light.
36. Don’t let your camera fall into a Lava Pool.
37. Manufacturing excuses for your photos is not in your best interest.
38. Underexposing looks better than overexposing.
39. Make pictures, don’t take them.
40. Martinis and photography don’t mix very well.
41. Taking art classes will improve your photography.
42. The Rule of Thirds is boring.
43. The Horizon Line is the most important line.
44. You need not go any farther than your bathroom to take good photos.
45. Sometimes asking forgiveness is better than asking permission.
46. A copyright stamp won’t protect you unless your photo is registered with the library of Congress.
47. Taking a great photograph is a lot like scoring a touchdown. Never tell anyone it was your first one.
48. A camera on a tripod is like a canvas on an easel.
49. Make the viewer an active participant in your imagery so he’ll stick around longer.
50. Let someone that knows what they’re doing clean your sensor.
51. “ You can’t depend on your eyes if your imagination is out of focus”…Mark Twain.
52. You find the Light, and you’ll find the shot.
53. When you buy a new camera, read the manual.
54. Good pictures are like good jokes. If you have to explain them, they’re not so good.
55. Shoot to live, live to shoot.
56. Stick with one ISO, and you’ll never have to worry about switching back and forth.
57. Back up all your images all the time.
58. Controlled distortion can work.
59. Always brake for photographs.
60. “The voyage of discovery is not in seeking new landscapes, but having new eyes”…Marcel Proust.
61. We perceive in a 2X3 ratio (a rectangle).
62. An active imagination is the Fountain of Youth.
63. See, feel and sense the ever-changing Light.
64. The background is just as important.
65. Have your subject walking or looking out of the frame.
66. Don’t show the sky in bad light.
67. Vertical formats have more energy than horizontals.
68. Make sure that when you format your card, you really wanted to.
69. Sometimes when more’s better, too much is just right.
70. Always know the direction of the light.
71. Make your life simpler. Set your camera on AWB and ‘Fuhgetaboutit’.
72. Never leave any of your equipment in your photographs.
73. Including Patterns in our photos is a good thing; breaking the rhythm of the pattern is even better.
74. Shooting in the Blue Hour is a lot of fun.
75. A triple colored mat won’t make a bad photograph look better.
76. A glass of wine after a great sunset shoot is intoxicating.
77. Balance the Negative Space and Positive Space.
78. “Been there shot that” is not a good thing to say.
79. Create ‘energy’ in your photographs.
80. Try to lead the viewer around your composition.
81. Photoshop is a good thing, used sparingly.
82. If you really want to be a better photographer, shoot on manual.
83. Buy your kid a toy camera on his first birthday, then start upgrading.
84. Be objective not subjective when editing your pictures.
85. There’s nothing like seeing the world through a viewfinder.
86. 1/60th of a second at F/8 is the same exposure as 1/125th of a second at F/5.6.
87. Color communicates ideas.
88. If you had to choose between Lightroom and Photoshop, pick Lightroom.
89. Follow Photography Blogs.
90. Don’t loan equipment to friends without including the phrase, “you break it, and it’s yours.”
91. Take portraits with wide-angle lens.
92. Learn “The Decisive Moment” by studying Henri Cartier-Bresson.
93. Give the viewer several ways to enter and leave the frame.
94. Don’t forget about silhouettes.
95. Setting your WB to cloudy on an overcast day won’t necessarily make your picture look better.
96. More shots per hour.
97. HDR prints sell like hotcakes on the sale table in the decorative center of your local Wal-Mart.
98. The early bird always catches the best light as well as the worm.
99. Use gesture to communicate an emotional response.
100. When you have a gray day, be funny. Humor conquers all.
101. Never come home with an empty flash card.
Visit my website at: www.joebaraban.com and check out my 2018 workshop schedule at the top of this blog. Come shoot with me sometime. I’ve a couple of openings in my Springtime in Berlin workshop next May 23rd. A fantastic city with so many great locations we’re going to be shooting.
This coming July 29th will be my 30th anniversary teaching at the Maine Media Workshop. I’ve always picked this time as it’s the week of the Lobster Festival down the road in Rockland. This ofers a unique set of photo ops, different from the Maine Coast, fishing villages and lighthouses. The Lobster Festival is all about color, design, light, energy, people watchng and environmental portraits everywhere you look; some people are there in costumes and loved to be photographed.
In conjunction with The Santa Fe Workshops, October 2nd I’ll be leading a group in San Miguel de Allende. A beautiful oasis and artist colony, and the entire city is a UNESCO site.
Come join me for a week of fun and photography…what could be better?
I don’t know about you but I like to have people stick around spending time looking at my photos. Now, I suppose there are photographers out there that shoot solely for their own gratification and never share their images for whatever reason. However, if we go on the assumption that photographers are artists that have chosen the camera as the medium, then it stands to reason that said photographers like to have people admire their work; I for one as an example.
Having said that, we can’t expect the viewer to spend very much time looking (unless they are wives, mothers, aunts, and sometimes even siblings) unless we give him something that makes it worthwhile; people just don’t have the time anymore.
One of the best ways is to add an editorial slant to your composition, and I talk about this a lot both in my online class with the BPSOP and in my “Stretching Your Frame of Mind” workshops I conduct all over the place.
Ok, so what do I mean by editorial? The word editorialize means to express or form an opinion; to ask the viewer to pose a question.
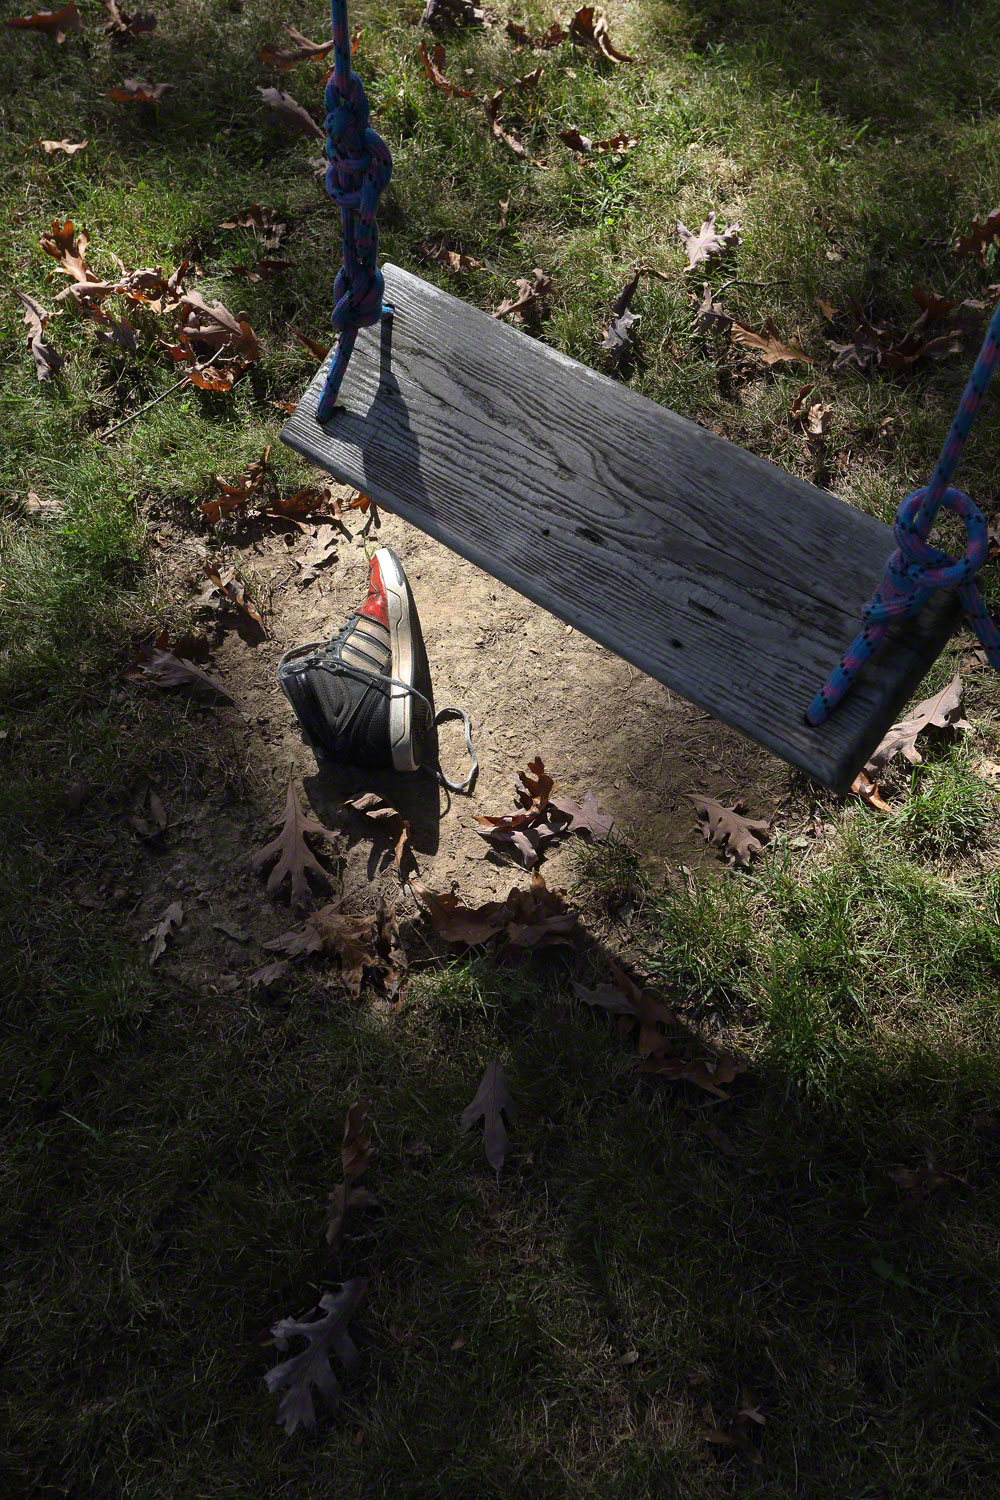
In the photos above I have added a slide bar so you can go from one photographic thought to another. I shot the swing first by itself, then added one of my grandkid’s shoes. This concept is predicated on the idea of making the viewer an active participant. In other words, keeping him involved will keep him around longer. This is about taking control of how the viewer perceives and processes information we give to him in the form of a photograph.
When you look at the swing by itself, you’re looking at a fairly interesting image mostly as a result of the dramatic way it’s backlit, the texture of the grass, the leaves, and the shadow.
When you use your cursor to move the slide from left to right, it reveals an entirely different photograph. Simply by adding a red sneaker, I ask the viewer to raise a question. What question do you think it conjures up?
To me, it asks: Why is that one shoe there? Why just one? Who does it belong to? What happened to make him forget or lose one shoe? Was he hurt? Is he going to get into trouble? Etc., etc. It’s the Who What Where When, and Why” of photography.
So next time you’re out shooting take some props with you and try to add an editorial element. Remember that you’re an artist whose camera on a tripod is not unlike a blank canvas on an easel; you’re a painter, so paint.
Visit my website at www.joebaraban.com, and check out my 2018 workshop schedule at the top of this blog. Come shoot with me some time and we’ll editorialize together.
In conjunction with The Santa Fe Workshops, October 2nd I’ll be leading a group in San Miguel de Allende. A beautiful oasis and artist colony and the entire city is a UNESCO site.
Come join me for a week of fun and photography…what could be better?
Here’s a very interesting concept I created that I want to share with all of you. Something to think about when you’re shooting:
There are two men swimming in the ocean, and while doing so one of the men sees a gray spot against a calm blue horizon. That man decides to swim to shore, the other man doesn’t and is eaten by a huge shark. By reacting to something different, the man that swam to shore survived. He saw something different!!!
Creativity is the gray spot. It was that which was the most different. As photographers we want the viewer to react (and will always react) to that, which is the most different.
Imagination keeps us young. It’s the gas and oil that keeps our mind running smoothly. Hopefully, the kinds of people that will look at our work do have some semblance of being creative…or they wouldn’t be bothered…so who cares about them??? That goes for ourselves as well. Let everyone else be predictable in his or her approach to shooting pictures. Remember that good photographers follow the more traditional ways and adhere to all the rules. The great photographers “follow the beat of a different drummer”, and break the rules.
Most people put a high value on creativity, but since it’s an intangible commodity it’s also misunderstood. It takes a somewhat flexible mind to even get close to realizing its importance in our society. I’ve had students in my workshops tell me that in order to be really creative you have to be original, and they also say that there aren’t any photos left that haven’t already been taken. While it’s true that there aren’t very many if any original ideas left, the creative part comes in when you take those existing ideas and show them in a new way. Marcel Proust, a French novelist said, “The voyage of discovery is not in seeking new landscapes, but having new eyes”.
One way to see new landscapes is to what I call “Seeing past first impressions”. The great photographs that you aspire to take will come with seeing new ways to look at old ideas. Go out and be prepared for the unexpected. Eddie Adams, a Pulitzer Prize-winning photographer once said, “When you get lucky be ready”.
In my opinion, one of the best inventions to ever come around, hell-bent on stifling creativity is the Histogram and those pesky blinking areas in the back of your camera that tells you that in a certain part of your frame the highlights were clipped (see my post on this subject). DANGER-COMBUSTIBLE-DO NOT MIX THESE WITH CREATIVITY-HARMFUL IF SWALLOWED!!! Truth be told, they actually slow the process down and no doubt were put there because that’s our world now. If you free yourself of those things your photos will have a much better chance of moving “up a notch”.
To my way of thinking it’s going to do more harm than good, and wind up complicating those creative juices. Learn to feel/see/ find the light, then be creative with it. It’s so important to be able to sense when it’s changing all around you and make immediate corrections without looking at your Histogram because make no mistake, light is so fleeting that just a few seconds can make the difference in going home empty handed or excited because you just took the best photo of your photographic life.
Spark those creative juices. Shoot photos without looking through the viewfinder. Stand on top of something, lay on your stomach, shoot with the lens you like the least, etc. I tell people to take art classes as a way to expand your current thought process; as a way to get new ‘creative juices into your veins. This is what I always tell my online students I teach with the BPSOP, and my “Stretching Your Frame of Mind” workshop I conduct around the planet when they ask what else they can do to take stronger photos.
If you really want to enjoy the power of creativity in it’s purest form, KNOW YOUR CAMERA, UNDERSTAND WHAT GOOD COMPOSITION IS, MASTER THE ELEMENTS OF VISUAL DESIGN, HOW EXPOSURE WORKS, and FOLLOW THE LIGHT. In my opinion, you could forget everything else. I did and my photos still come out pretty good.
Be creative, stay thirsty, and survive my fellow photographers.
Visit my website at www.joebaraban.com and check out my 2018 workshop schedule at the top of this blog. Come shoot with me sometime. I have a couple of openings in my Springtime in Berlin workshop next May 23rd. A fantastic city with so many great locations we’re going to be shooting.
This coming July 29th will be my 30th anniversary teaching at the Maine Media Workshop. I’ve always picked this time as it’s the week of the Lobster Festival down the road in Rockland. This offers a unique set of photo ops, different from the Maine Coast, fishing villages, and lighthouses. The Lobster Festival is all about color, design, light, energy, people watching and environmental portraits everywhere you look; some people are there in costumes and loved to be photographed.
In conjunction with The Santa Fe Workshops, October 2nd I’ll be leading a group in San Miguel de Allende. A beautiful oasis and artist colony and the entire city is a UNESCO site.
Come join me for a week of fun and photography…what could be better?
The beginning of August, 2017, I was conducting my latest Maine Media Workshop (also known as my “Stretching Your Frame of Mind” workshop”) for the twenty-ninth time. I always go up a day early to look around for possible ideas to add to the way I’ve already structured the week long class.
Among other discussions I always work on getting people to see with the right side of their brain, the creative side, instead of the left side, the analytical side; this is also a big part of my online class with the BPSOP.
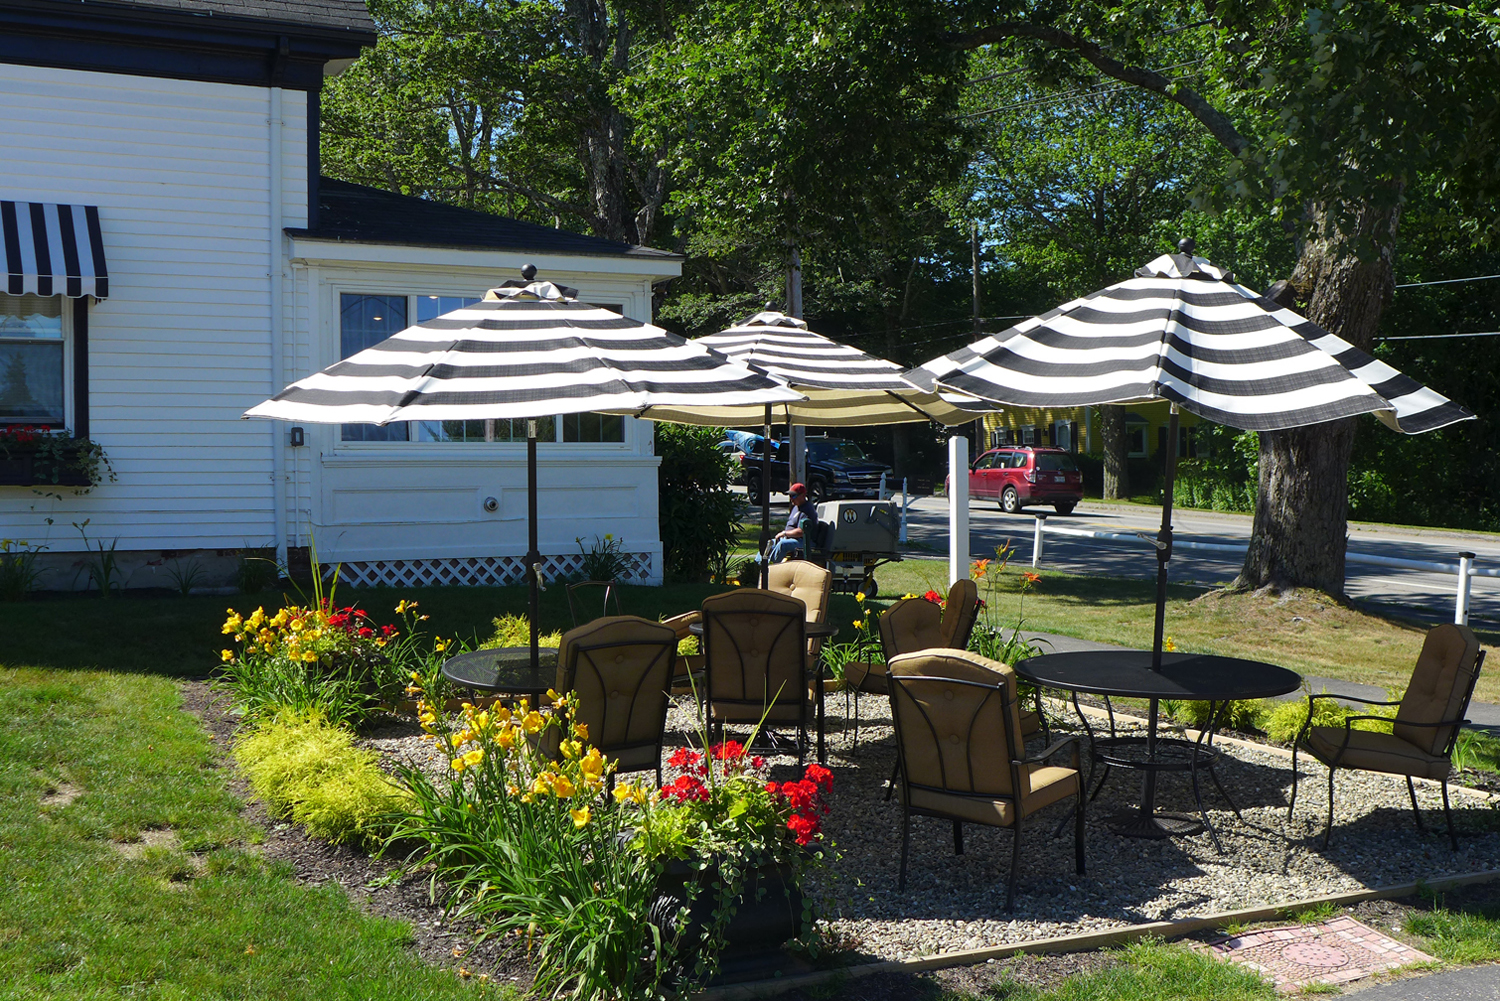
I was driving from Rockport where the workshop campus is located down to Rockland where the Lobster Festival was slated to start a few days later. As I passed one of many motels along scenic Route 1, I noticed several striped umbrellas grouped together that offered shade to the residents wanting to sit around and enjoy the fabulous weather.
I kept driving but after a few miles I had an epiphany, and when I have one of those while driving around with a camera next to me I immediately make a U-turn; people driving with me are usually not as excited as I am!!
the left side of my brain.
As I passed these umbrellas I first saw them with the left side of my brain, the side that only saw a group of umbrellas. It didn’t take me long to switch off the left side of my brain and imagine those umbrellas with the right side. The side that saw something entirely different.
In my mind I envisioned several of the basic elements of visual design: color, shape, line, and pattern. I saw them no longer as umbrellas, but an arrangement of elements in a way that became an abstraction of a group of ordinary objects.
I knew that what I was originally looking at was not what I was going to get, which was why I made the decision to go back and take a closer look.
To my fellow photographers my point here is to look at the world around you not with the left side of your brain, the analytical side, but with the right side, the creative side. When you can start doing that, a whole new world will open up and you be able to see things not as they are, but what they could be.
Visit my website at: www.joebaraban.com and check out my 2018 workshop schedule at the top of this blog. Come shoot with me sometime. I’ve a couple of openings in my Springtime in Berlin workshop next May 23rd. A fantastic city with so many great locations we’re going to be shooting.
This coming July 29th will be my 30th anniversary teaching at the Maine Media Workshop. I’ve always picked this time as it’s the week of the Lobster Festival down the road in Rockland. This ofers a unique set of photo ops, different from the Maine Coast, fishing villages and lighthouses. The Lobster Festival is all about color, design, light, energy, people watchng and environmental portraits everywhere you look; some people are there in costumes and loved to be photographed.
In conjunction with The Santa Fe Workshops, October 2nd I’ll be leading a group in San Miguel de Allende. A beautiful oasis and artist colony, and the entire city is a UNESCO site.
Come join me for a week of fun and photography…what could be better
I often refer to photography as the art of taking, making, or creating pictures. In fact, these three concepts can determine the strength of your composition. They will decide on how long the viewer will look at your images and if they will even be remembered.
First let’s look at the approach my fellow photographers take when they either submit their photos in my online class with the BPSOP or during the daily critiques in my “Stretching Your Frame of Mind” workshops I conduct.
For the most part, when I see their photos the one thing that usually stands out is that I find these photographers takingpictures. In other words they stand there and bring their camera up to their eye and start shooting without thinking about how to keep the viewer around; because of the visual interest and tension needed to do just that.
I have found a common thread between these types of pictures and it stems from always shooting at the same height, the same POV, the same F/stop, the same direction of the light, the same lens, and letting the camera decide on the exposure…which is usually the wrong advice.
My desire as a teacher is to show photographers the difference between taking and making pictures, and try to get them to stop the practice of taking pictures and move them forward to making them.
Making pictures is all about looking a your subject differently. Putting the light up front and among the most important aspects of your photographic vision. Unless you’re street shooting where capturing the moment is critical, light is everything!!!
I show my students how to incorporate the Elements of Visual Design into their imagery, and these elements are put on an imaginary ‘Artist Palette’. The same ‘Artist Palette’ I’ve been carrying around in the back of my mind for the past forty-nine years.
When I’m out shooting I look for things not immediately visible without the help of my palette. I look for: Light, Texture, Patterns, Shapes, Vanishing Points, Perspective, Color, and most important Line.
I look for different ways to show the subject, whether it’s lying on my stomach and getting dirt on my shirt, or finding a way to shoot down on objects. Maybe panning is the answer, or a slow shutter speed, or using lens not necessarily meant for what I’m thinking about; a 100mm macro lens or a 300mm for portraiture as one example.
I look for ways to use Negative Space to define my subjects, as well as balancing my composition. I use lines to move the viewer around the frame, especially if I can introduce a Vanishing Point. I introduce Color on overcast days, and I also use color to communicate ideas. I see a tree, and I look for what else it is.
This is making pictures and a hell of a lot more fun than just bringing the camera up to my eyes and clicking the shutter.
Finally, there’s creating pictures, and this is my favorite way to shoot. To me, my camera on a tripod is the same as a blank canvas on an easel.
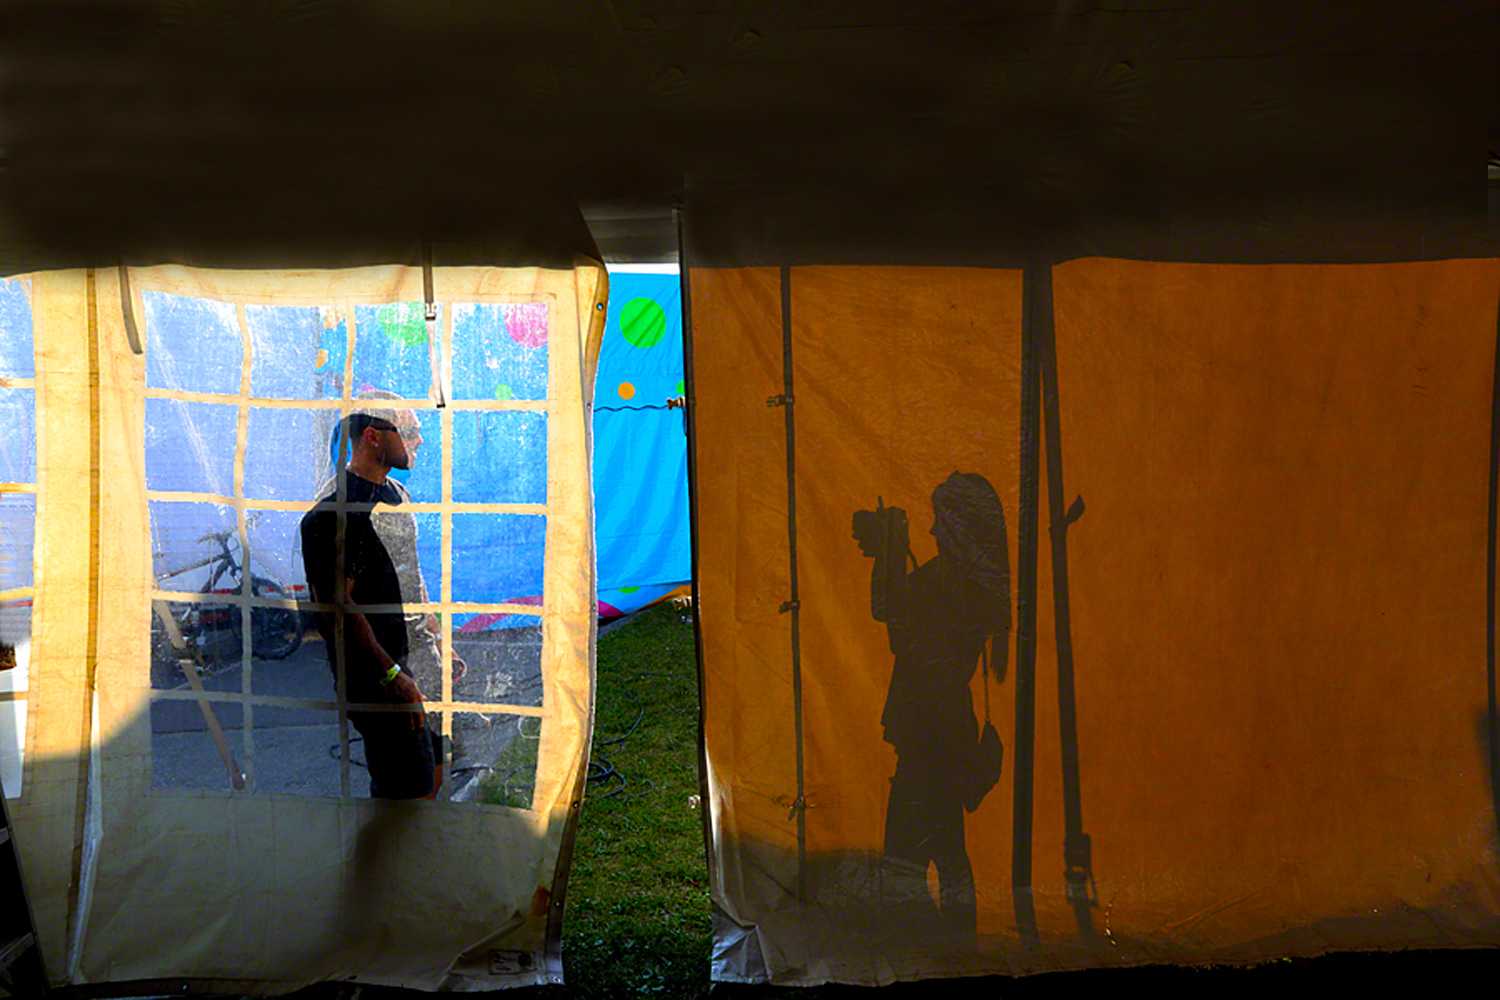
Creating pictures means adding a prop, asking someone to pose for me, or moving things around to gain more interest and tension. The above photo was taken during my Maine Media Workshop I conduct every year at the end of July beginning of August.
This was at the Lobster Festival in Rockland. I saw the couple outside of the tent taking turns shooting each others picture so I asked them if they would mind if I took a picture of the young woman taking a picture of her boyfriend. I had first noticed the wonderful light creating silhouettes from others walking by and the wonderful squares (shapes) that were backlit.
I placed the woman so all I would see is her silhouette, and I put the man so his face would appear in one of the squares. I then told them to forget I was here and continue taking pictures. The blank canvas was in my mind so I began creating my art.
So now you’ve read about three approaches to the art of photography. You can continue to take pictures and travel the well worn road to mediocrity, you can begin making pictures and experience a whole new way to gain attention to your images, or you can create pictures and really have fun…even reaching Nirvana!!!!
🙂
Visit my website at: www.joebaraban.com, and check out my 2018 workshop schedule at the top of this blog. Come shoot with me sometime. I can promise you a lot of fun, reaching Nirvana might be a little more difficult. I’ve a couple of openings in my Springtime in Berlin workshop next May 23rd. A fantastic city with so many great locations we’re going to be shooting.
This coming July 29th will be my 30th anniversary teaching at the Maine Media Workshop. I’ve always picked this time as it’s the week of the Lobster Festival down the road in Rockland. This ofers a unique set of photo ops, different from the Maine Coast, fishing villages and lighthouses. The Lobster Festival is all about color, design, light, energy, people watchng and environmental portraits everywhere you look; some people are there in costumes and loved to be photographed.
In conjunction with The Santa Fe Workshops, October 2nd I’ll be leading a group in San Miguel de Allende. A beautiful oasis and artist colony, and the entire city is a UNESCO site.
Come join me for a week of fun and photography…what could be better?
I would safely say that the biggest hurdle I have in my online class with the BPSOP, and in my “Stretching Your Frame of Mind” workshops I conduct around the planet, is to get my students to use a tripod. The digital era has brought with it a new class of photographers that think the only way to take a photo is to always hand hold their camera; and that’s fine a lot of the time. When I’m walking around, either when I’m traveling or just taking snapshots around my hometown, I’ll carry my camera over my shoulder. That’s when the photos are for a record of where I’ve been, or possibly for planning out my next shoot, or for showing a family member something or someone I might have seen, or perhaps for a teaching aid.
However, when I’m going out to take serious photos, I always use a tripod…why you ask?
Because I’ll never let my camera tell me when and where I can take a photo. I’m going to be the only one that decides if I can shoot something or not…certainly not a machine. Ok, I know you can jack up the ISO to a million (give or take a few hundred thousand), but I wish I had a dollar for every time a student explained that the reason the photo they submitted looked weird is because they forgot to change the ISO back to the normal range. I’ve also been told that they don’t shoot when the light is toooooooooo low because they can’t hand hold their camera during that time…YIKES!!!!! Tell me it ain’t so!!!!!!
All this is predicated on the idea that early in the morning or late in the evening is going to be the best light, and therefore that’s when I’m going to shoot; it’s the only time I shoot when I’m serious. I want to be able to shoot at any shutter speed I want, and with any aperture setting…and any combination of the two. This is how I maintain control of my photographs.
If you like shooting after breakfast right after lunch, and before dinner and your goal is to take “half way decent pictures” and be a fairly good photographer, then by all means hand hold your camera. If you want something more, then get a tripod. The key is to get a tripod that’s simple to use and lightweight. So many students of mine have inexpensive tripods that are only good for putting hanging plants on. It’s a life time investment and one of the best you’ll ever make. Buying one and occasionally using it won’t do you any good. It takes practice…a lot of practice. When you get use to it you’ll find that it’s going to open up soooooooo many creative doors for you. It’s going to free up your hands…why is that important you ask?
To me, I think of a camera on a tripod like a canvas on an easel. When I’m on a tripod, I can leave the camera and adjust something in my composition and know that when I take a look at whatever changes I’ve done, the camera will be in the exact same position. If you’re hand holding your camera and you make a change, you’ll never be able to go back to the same position. When I’m designing the Negative and Positive space for example, or moving something into or out of my frame, I want to be able to see the exact change in my viewfinder
BTW, buy the best tripod you can, that way you’ll only cry once!!
Visit my website at: www.joebaraban.com, and follow me on Instagram: www.instagram.com/barabanjoe. Check out my 2018 workshop schedule at the top of this blog. Come shoot the sunrise and sunsets with me. You might want to bring along a tripod!! I’ve a couple of openings in my Springtime in Berlin workshop next May 23rd. A fantastic city with so many great locations we’re going to be shooting.
It’s amazing how often I see photos that were taken either for my online class with the PPSOP, or in my “Stretching Your Frame of Mind” workshops I conduct around the planet, that appear to be taken from the exact same height; that height being the distance from their eyes to the ground.
In other words, my fellow photographers shoot from the same POV (point of view) all the time….why you ask?
Two reasons:
The first is because it’s the easiest and laziest way to take a photo. All you have to do is raise the camera up to your eyes, aim, then pull the trigger (Texas talk for clicking the shutter). Simple and quick, am I right? The second reason is because most of my fellow photographers take instead of makepictures. Part of that is what I refer to in a past post as “I came, I shot, I left“.
🙁
If I can make a suggestion, that will help take your photos what I always refer to as “up a notch”, change your point of view the next time you go out shooting. Instead of bringing the camera up to your eye and shooting from the same height as always, think about getting down low to the ground. Look all around, there might be a railing or balcony you can shoot from. How about shooting through a window or the windshield in your car? Is there a ladder nearby? If you’re shooting flowers, get down to their level. Get some dirt on the front of your shirt!!!
The next time you’re shooting your kids, or your friends kids, or your grand kids, don’t just stand over them and point your camera down. Get on their level, and you’ll immediately see how much more powerful your photo is.
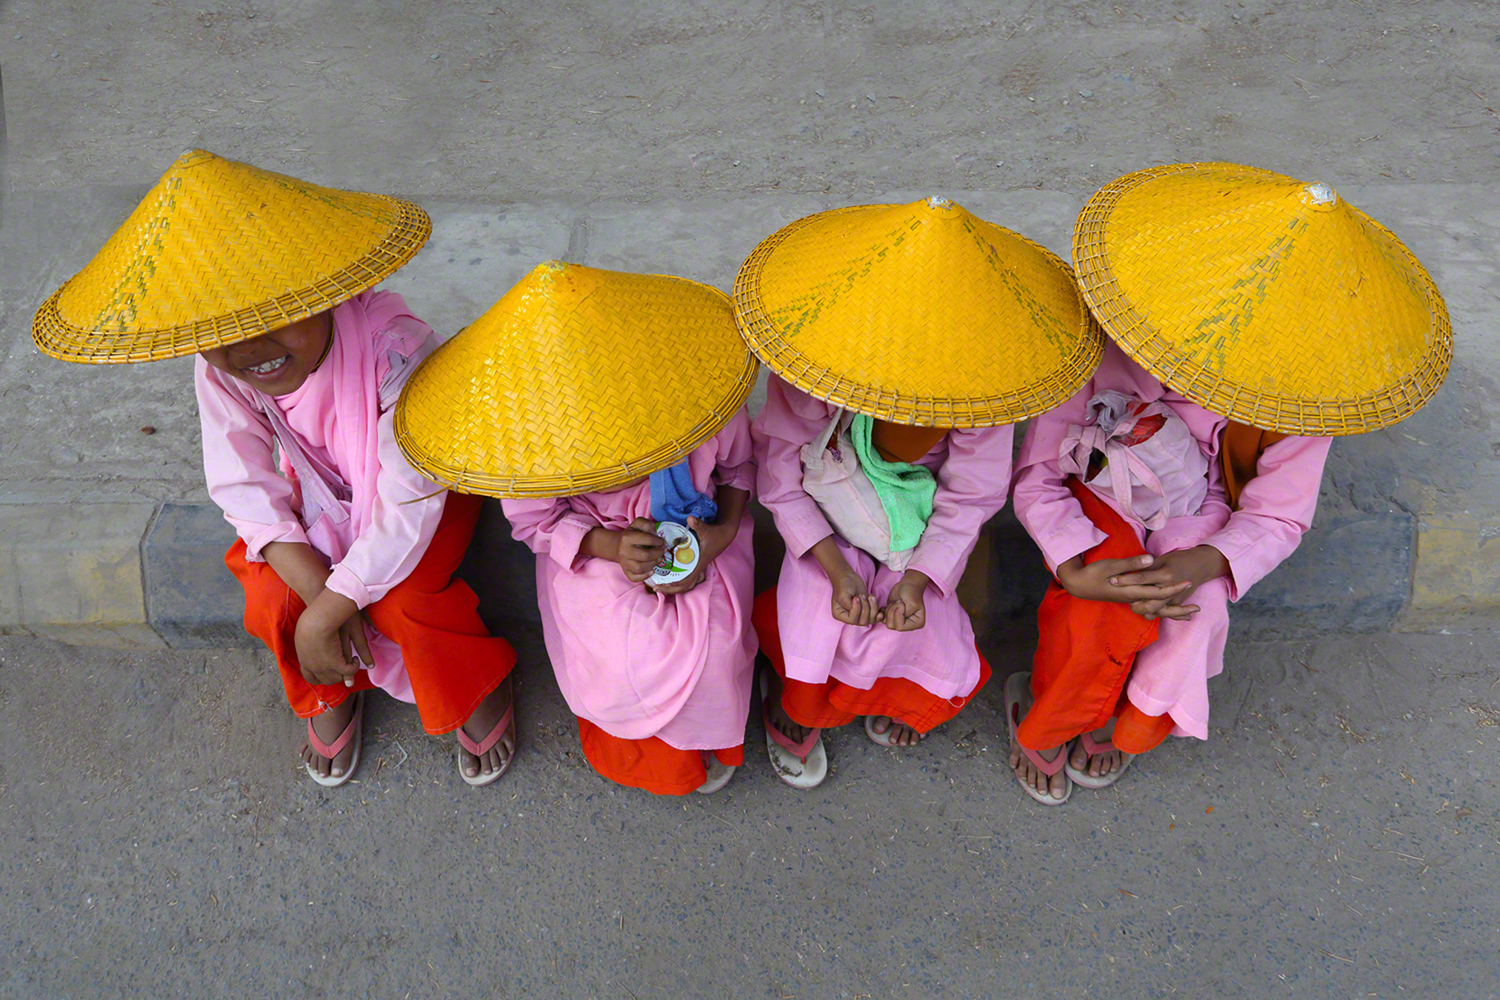
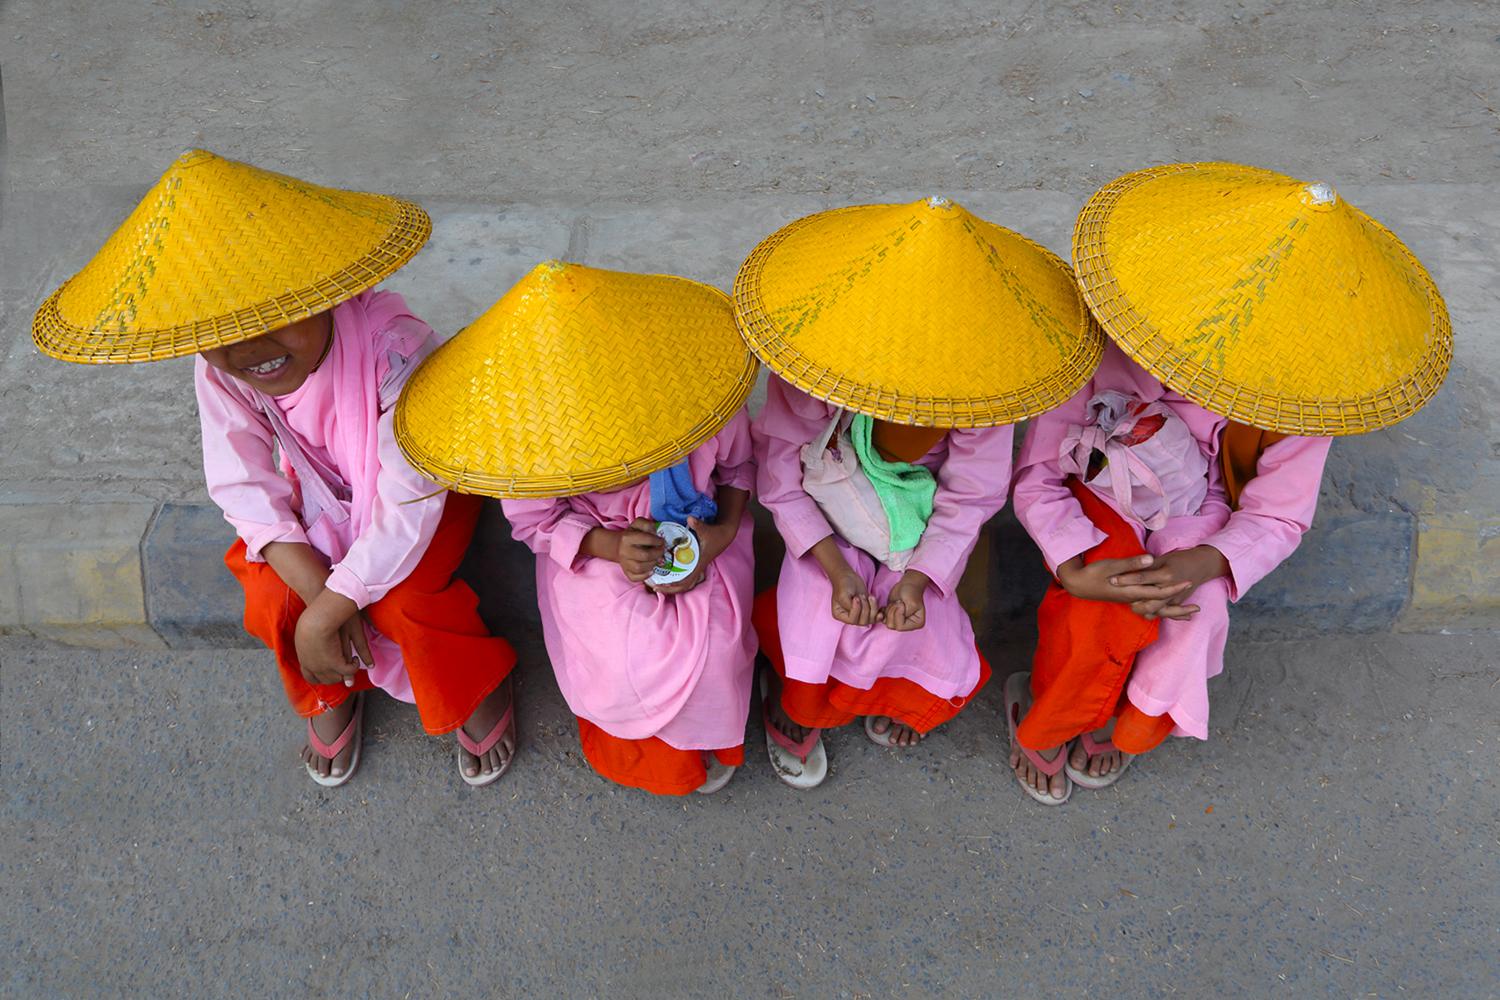
The above photo was taken while I was conducting a workshop in Myanmar. Our guide had these small girls that were about to go in a convent to become nuns pose for my fellow photographers. They all had fun taking various portraits of individual girls and as a group. When they were all done I asked our guide to have them sit next to each other on the curb. I put on my 17-40mm Canon lens and stood on my tiptoes above them.
I had pre-visualized the photo in my mind so it took just a few seconds to shoot it. This photo is one of my favorite, if not the number one favorite, of everything I had taken while in the country.
Visit my website at: www.joebaraban.com and check out my 2018 workshop schedule at the top of this blog. Come shoot with me sometime. I’ve a couple of openings in my Springtime in Berlin workshop next May 23rd. A fantastic city with so many great locations we’re going to be shooting.
Don’t forget to send me a photo and question to: AskJoeB@gmail.com.