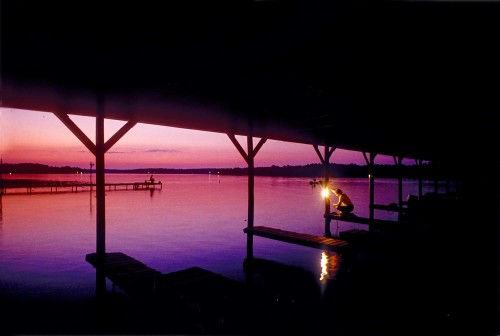
Since I’m from the old School of Photography (you know the one, the school where you learned to do things “in the camera”, and as a result became a good photographer), I do my own ‘bracketing’.
Now, in the digital age of Photography, the ‘powers that be’ decided to help out and made it so that their cameras could do the work for you. The problem with that is that it’s not always in your best interest. Notwithstanding the important fact that you won’t have a clue as to what your camera is doing, and if it’s doing the right thing at the right time.
But I digress!!!
First, let me go back to the very beginning, as in the definition of ‘bracketing’. I know a lot of you will find it hard to believe, but there’s a lot of photographers out there that have no idea what I mean by ‘bracketing’. I know this because I conduct my “Stretching Your Frame of Mind” workshops around the planet, and also with a top online school called the BPSOP, so I periodically get this question.
Without further qualifications, Wikipedia’s definition of ‘bracketing’ usually refers to exposure bracketing: the photographer chooses to take one picture at a given exposure, one or more brighter, and one or more darker in order to select the most satisfactory image. Technically, this can be accomplished by changing either the shutter speed or the aperture. That is, if you’re shooting a subject or a landscape where the Depth of Field isn’t critical.
If the Depth of Field is important, you just want to bracket the shutter speed, and if the shutter speed is important, then you bracket the aperture. The point is to give yourself exposure options.
Ok, here’s an example:
Knowing exactly (to the degree) where the sun was going to rise by using the combination of my Sunpath readings and my Morin 2000 Hand Bearing Compass, I set up beforehand to take a photo of a boy looking for something using a Coleman lantern. It was a few minutes after sunset when I began shooting, the light coming from the direction where the sun set was very soft and delicate. My Minolta One Degree Spot Meter (you can find them on e-Bay) told me that the exposure on the boy’s face lit by the lantern was 1/30th of a second at F11. If I had taken that one exposure, the odds of my picture looking good was very small. Vegas wouldn’t have taken that bet. So to make sure I had it “in the can”, I ‘bracketed’ the exposure the meter gave me. I took one photo at 1/30th at F11, and then I shot one at:
- 1/30th at F8
- 1/30th at F5.6
- 1/30th at F4
- 130th at F16
These were the settings to overexpose (brighten) the picture to make sure it didn’t come out too dark. If you notice, there is only one bracket that’s underexposed from the reading of F8; that would be F16. The reason is that because the light was so low and delicate, one stop under was more than enough to cover me.
Ok, another scenario:
If I had been there later in the afternoon when the sun was higher in the sky, and the light was much harsher I didn’t need to worry about my photo coming out too dark. I would have worried about it being too bright and washed out.
Then, my meter might have said something like 1/250th of a second at F8. In that scenario, I would want to bracket more on the underexposed side of F8, so my brackets would have been:
- 1/250th at F11
- 1/250th at F16
- 1/250th at F22
And one stop underexposed at 1/250th at F5.5, because more than likely I wouldn’t have to worry about my photo being too dark, only too bright.
The reason I do this manually, and with a hand held meter is because the meters in digital cameras are not accurate and not as precise.
A lot of my students set the meter in their camera to bracket automatically, but when you do that, it won’t consider the softness of the light. It’s going to bracket the same way all the time. Not the best way to take photos.
Over the years of bracketing, I can feel, sense, see, and read the light and know instinctively what to do. It’s about being a well-rounded photographer that understands the light, because in all my classes, I always tell people that “LIGHT IS EVERYTHING”, and when you find the Light you’ll find the shot.
BY THE WAY, The last thing you want to do is to change the bracketing sequence all the time. Especially when you have only seconds left of that “drop dead gorgeous light”.
That’s just not a good idea. Do you really want your camera to be in charge of how your photos turn out? I recently had a student tell me that she could only bracket three exposures because that’s what her camera would allow.
“YIKES”, I said to her. “Are you hearing yourself”, I continued. “What the camera allows? Do you have a place at the dinner table for your camera? I hope it’s at the head”.
If you ever want your photography to jump “up a notch”, I would strongly suggest that you take control.
But that’s just me!!!
View my work at: www.joebaraban.com, and follow me on Instagram https://www.instagram.com/barabanjoe/ Come shoot with me sometime.
JoeB


