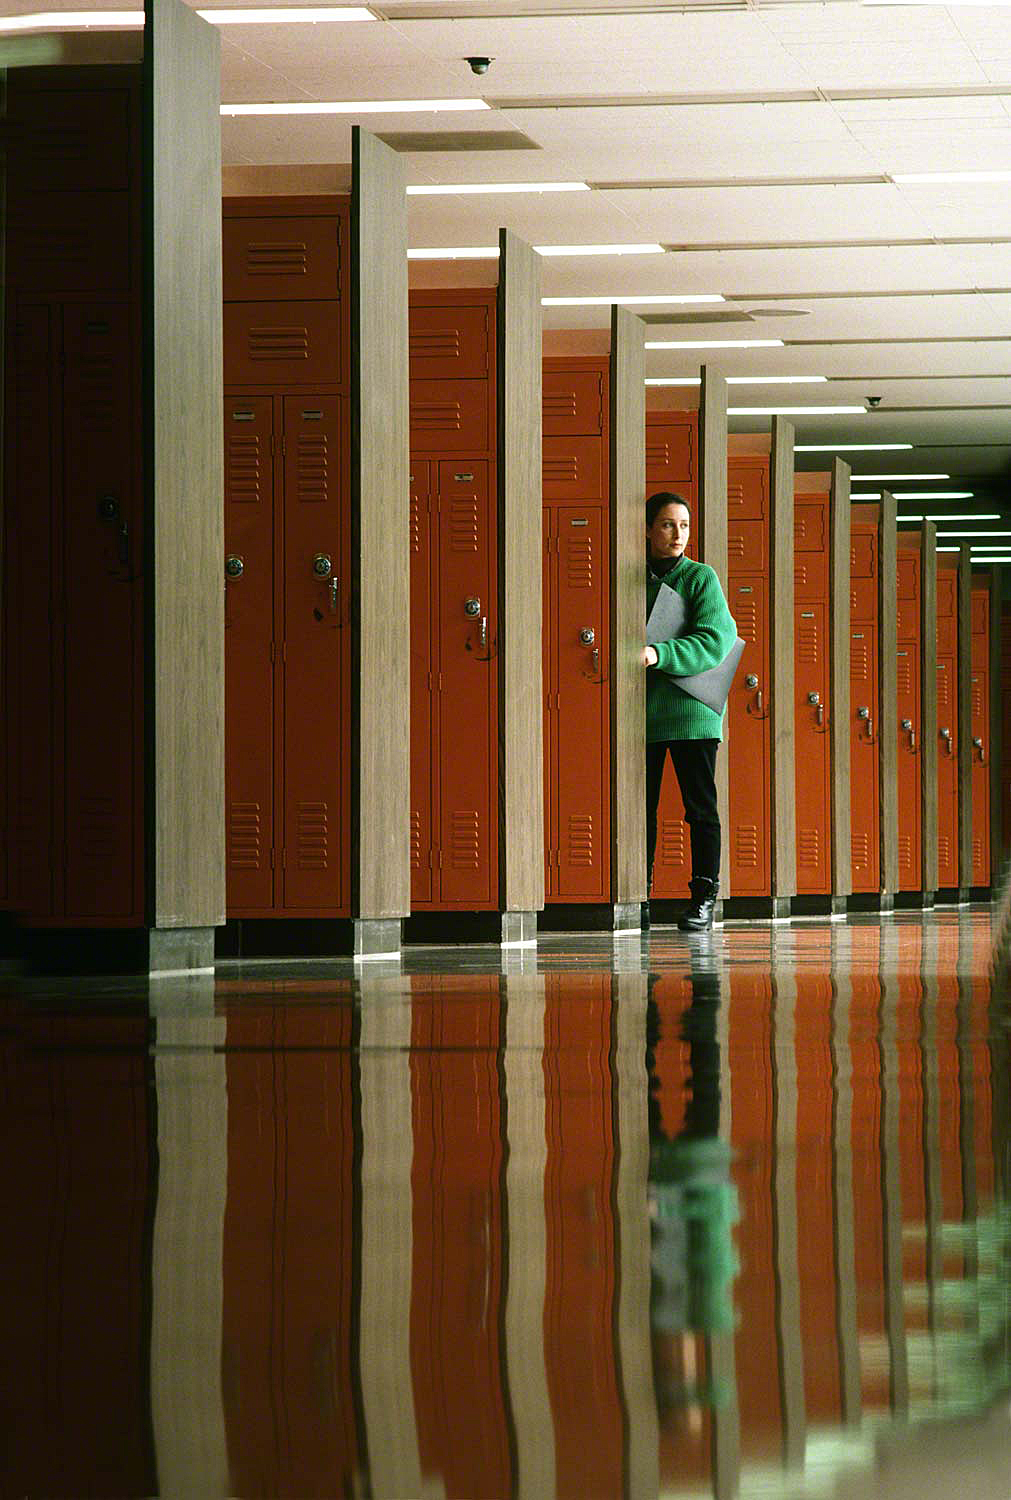
In my online class with the BPSOP, and in my “Stretching Your Frame of Mind” workshops I conduct around the planet, we work on using the Elements of Visual Design and composition to take our photos what I always refer to as “up a notch”. One of the basic elements of Visual Design is Pattern.
Patterns are repeating elements of line, shape, and color that appear in ordinary ways. The four basic shapes are triangles, squares, rectangles, and circles. When lines, shapes, and colors within a picture occur in an orderly way, they create patterns that often enhance the attractiveness of photographs. Creating your pictures around repeating elements or patterns provides picture unity and structure. Pattern repetition creates a rhythm that the eyes enjoy following.
When used as a subordinate element, they can greatly enhance your composition. They should only be used to strengthen or add to your photographs. Patterns can provide unity to your composition. They create a sense of visual rhythm that the eye can easily follow. Life is filled with patterns and once you get an eye for spotting them you’ll be amazed by what you see and you’ll wonder why you didn’t incorporate them into your photography before.
Broken patterns break the rhythm and are often more compelling than unbroken patterns. Think of a close-up of hundreds of M&M’s on a table. They are all red except for one green one. I’m always looking for patterns as well as all the elements on my Artist Palette. Whenever possible I try to find ways to break the patterns by incorporating some object or person…Why?
Because it will give the viewer one more thing to discover and think about, which will keep him/her around longer. Isn’t that just what we want?
Visit my new website at: www.joebaraban.com and check out my workshop schedule at the top of this blog. Come shoot with me sometime.
I keep saying how much I love writing for this category. Some of the quotes I write are written by photographers, while others were written by other types of artists; from singers, songwriters, and musicians to novelists and poets.
One of the quotes that have stayed with me over the years was said by Bob Marley. Yes, it’s the same guy you’re thinking of…the Reggae King from Jamaica. Bob Marley died from Cancer about thirty years ago at a hospital in Miami. He was only thirty-six, but his music and lyrics were filled with thoughts and ideas that I’ve found to be in keeping with the way I not only approach my online class with the BPSOP but in my “Stretching Your Frame of Mind” workshops I conduct around the planet. One quote has always stuck with me. Bob said, “Some people feel the rain, while others just get wet”.
If you think about it, it can have a profound impact on the way we approach picture-taking. Ok, my students and fellow photographers might ask, what does that quote have to do with my ability to take pictures”?
Well, it’s all about the difference between taking and making pictures. It’s about the total immersion into your new found passion and craft. It’s about mastering light and understanding exposure. It’s about getting some dirt on your shirt or at least your knees. It’s about taking on the challenge of being a good photographer, not a good computer artist or digital technician. Let me explain further:
Determining the light and the direction it’s coming from before you raise your cameras up to their eye to me is the most important factor. Making your own decisions as to the correct exposure to use instead of letting the camera and lightroom do the work for you, scouting ahead of time and pre-visualizing your ideas in your mind then executing it, and spending more time than the “I came, I shot, I left” frame of mind I find happening all the time, is about “Feeling the rain”.
The “I’ll fix it later” mentality that has come along with the digital era, has sucked the life and breath out of the right side of our brain; the creative side. Why should I bracket when I can do it in lightroom? Why should I worry about the horizon line being straight when I can just use my straightening tool later in front of my computer? It just goes on and on, and this is all about “just getting wet”.
I’ve been following this train of thought since I first picked up a camera fifty-three years ago, in the days way before digital. It’s always been the love of my life, and I suppose that’s what has made it easier for me to caress it and “feel the rain”.
Visit my website at www.joebaraban.com and check out my workshop schedule at the top of this blog. Come shoot with me sometime.
I’ve been conducting workshops since the early eighties, and over the years I’ve been known to occasionally spout out something fairly intelligent. These quips have morphed into what I now affectionately refer to as my “Personal Pearls of Wisdom“. One of my favorites that I’m always using in my online class with the BPSOP, and in my “Stretching Your Frame of Mind” workshops I conduct around the planet is “make it a quick read”.
If there are those out there that shoot primarily for themselves, then you need not worry about whether or not the viewer gets what you’re trying to say-since no one will ever look at your photos. If you like shooting for the enjoyment of others, then you need to make sure that the message you’re trying to get across, is indeed getting across. In the first of my series on this Pearl of Wisdom, I want to address the importance of the use of negative space to help make your photos a quick read.
Everything that’s not positive space (areas that have mass) is considered negative space, but the area that I’m referring to is that area of negative space that borders the positive space, defines it and gives it meaning. What do I mean by that? I mean that the area immediately surrounding the two people in the above photo is the negative space that defines the arms, legs, and bodies. Without that very important area, you wouldn’t be able to tell where one person ends and the other begins. Therefore, the negative space has defined the positive space (the two people} and has given them meaning-it has made the two people…two distinct people.
Remember that when you’re shooting, whether you’re going after negative space to define the positive space or simply trying to get your thought process across to the viewer, you won’t be around to explain yourself. Unless you’re going for an abstraction in which you want different people to get different messages, make it a quick read. Just imagine yourself in the mind of the viewer so you can see what he does.
Btw, the negative space is no accident. I have a walki-talki on the belt of the man on the right telling them what to do so I can make the two people a “quick read”. They’re about forty dollars for the pair, a handy addition to your bag of solutions.
Once again, the next time you’re out shooting, be sure to notice and use to your benefit the area that borders all the positive space in your composition.
Visit my website at www.joebaraban.com, and check out my workshop schedule at the top of this blog. Come shoot with me sometime.
I’ve been a grandpa for a long time, but I still think back to the days when all of my four grown kids were young; young enough to be coloring in a coloring book. Well, as it turned out, none of them ever had a coloring book…why, you ask? Because I never wanted them to worry about having to color inside the lines!!!
How stifling can that be? At least that’s my opinion, and I can now back it up by saying that my kids are very creative in all of their endeavors, and for the most part have always danced to a different drummer. A definite “chip off the old block”. So what did I do for their art time?
Instead of a coloring book, I took them to the Texas Art Supply where we bought plain white drawing paper, and the biggest box of Crayons they made at that time. I can’t remember how many were in the box, but there were a lot. The only thing I would tell them was to use all the colors and to try filling in the entire piece of paper.
In my online class with the BPSOP, and in my “Stretching Your Frame of Mind” I basically tell my fellow photographers to color outside the lines which is basically what the eighties expression “Think outside the box” was all about.
I can always tell when one of my students simply brings the camera up to his/her eyes and takes a picture. It really became obvious when all the photos that are submitted for review were all taken at the same height. When they go out with me, chances are that their clothes will come back with either dirt, grass, water, leaves, or an occasional critter that was inadvertently stuck to the front or even clinging to the back of their shirt…or all of the above.
🙂
Next time you go out, take a lens you seldom shoot with, some props, and remember that you’re an artist. The only difference is that your medium is a camera and not a paintbrush, colored pencil, or pastels.. That said, look at things from a point of view you never thought of before.
Let everyone else be predictable and always come back with the same old…same old. Never walk down the already beaten down path to follow and retrieve an idea. Take the road less traveled, and I can guarantee you that it will make you a stronger photographer with images that people will spend time looking at.
Think about coloring outside the lines!!!!!!!!
Visit my website at www.joebaraban.com, and check out my workshop schedule at the top of this blog. Come shoot with me sometime.
I was just listening to the radio where they had a program that was all about bands in the fifties and sixties that came out with a hit record, then disappeared from the charts into oblivion without leaving a trace. They called the program “One and Done”.
As I was listening to the disc jockey talking about some of the bands, I couldn’t help thinking about all the times I critique photos submitted from my online class with the BPSOP, and in the daily discussions during my “Stretching Your Frame of Mind” workshops I conduct.
It seems to be a common thread that ties all my fellow photographers together. What I’m driving at is when I’m walking down the street either next to or behind one of my students and see them raise their camera up to take a photo, it’s one and done.
In other words, they take one shot then move on. Maybe it’s just me but I find it to be mindboggling to think that someone can take that quick a photo and expect it to be something worthwhile; something that can stand the test of time.
I can tell you that Vegas would give it at least twenty to one that it would be. For me, that’s just not good enough odds…why? Because I rarely like the first photo I take. It’s a series of adjustments and variations before I’m satisfied and would be proud to show it.
I also see these same people raise their camera up without considering where the sun is and how their subject will react to it; it’s still the mindset of one and done.
The first shot should be the one that gets the creative juices going. It should segue into a stronger image by looking at from a different POV, perhaps a lens change, including or eliminating people, increasing or decreasing your aperture., etc., etc.
This is how you come back with a photo that you’ll keep, instead of scratching your head while looking at your monitor wondering why in the hell you shot it in the first place.
FYI, I spent a lot of time working on the photo above. I would say maybe a dozen different variations.
Visit my website at www.joebaraban.com, and check out my workshop schedule at the top of this blog. Come shoot with me some time.
One of my favorite posts to write is about all the funny stories that have happened to me during my fifty-three career as an advertising and corporate photographer. During that time I also shot a lot of Pro Bono photography for various organizations. I was always eager to help out if it could make people’s lives a little better by taking these photos either for ads , brochures, or magazine articles for the specific charities.
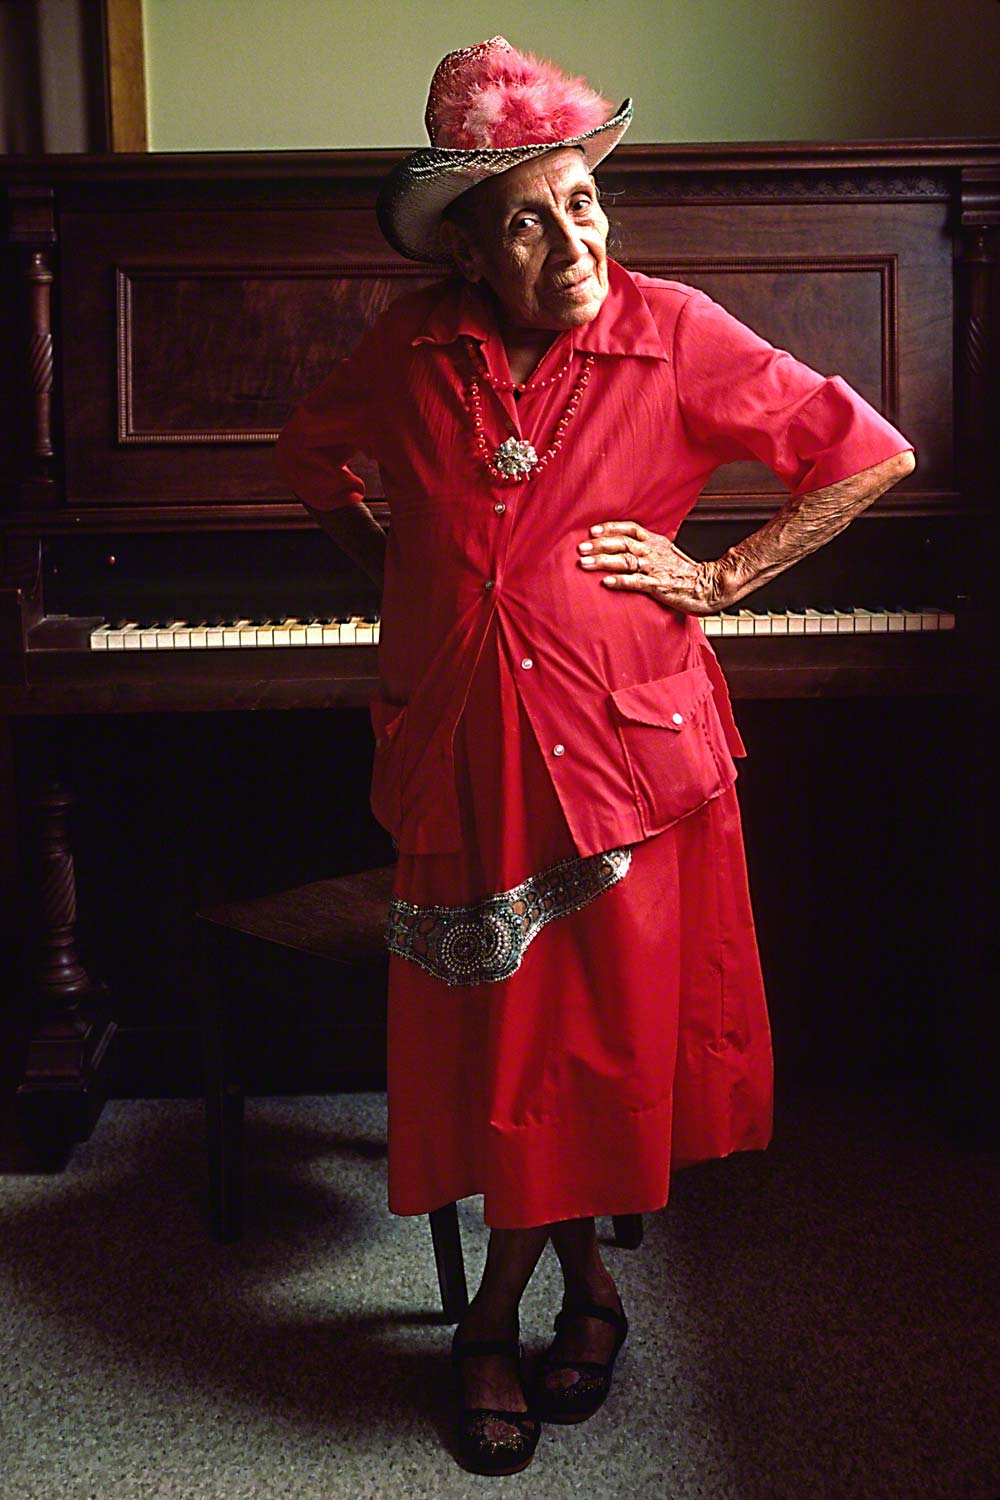
I was asked to shoot the Annual Report for the Salvation Army in Houston. As I tell my online class with the BPSOP, and in my “Stretching Your Frame of Mind” workshops I conduct around the planet. The best thing you can do for yourself is to scout ahead of time. Going to a location in advance is just the ticket in taking your photos what I always refer to as “up a notch”. I call it pre-visualization, and it’s on my “did it do it list” for good composition.
One of the photos they wanted me to represent was the activities that were offered to all the people that relied on The Salvation Army for part of their daily lives. when I went to their offices they sent me to a small building where they held a dance every Friday night. Of course it was empty and fairly devoid of any useful photo opportunities; I was sort of stumped.
They wanted a photo that talked about the dance, and how so many people that didn’t have much in their lives to look forward to, came dressed up and ready to swing!
I asked my contact that was escorting me around what kind of people came to the dance and was there anyone special that came to mind. His eyes immediately lit up and said, “Of course, Josephine comes every Friday, and loves to dance.” “Great,” I said, “I’ll be back at seven the day after tomorrow. Don’t tell her anything because I don’t want to alter what she wears or does in advance.”
It was in the summer when it didn’t get dark until well after the start of the dance. I went a little early to try and find some way to light her using available light. I found the perfect room that had a large window that faced North, and as luck would have it an upright piano.
I set up and waited for Josephine, and I didn’t have to wait very long. My contact brought her into the room. I immediately fell in love…how could you not? It was the way she dressed every Friday and it could not have been more perfect; especially since I’m a sucker for women in a red dress, red dress, red dress.
We started talking and it didn’t take long for me to realize that she was very shy (believe it or not) and hesitant to be photographed. We made a deal!!! If she would let me take her portrait, I would stick around and dance with her.
So we danced, and danced, and danced…the night away. I had a great time.
Btw, after we danced she gave me a goodbye kiss, and it was sweeter than honey!!!!!!!!!!!!
🙂
Visit my new website at www.joebaraban.com, and check out my workshop schedule at the top of this blog. Come shoot with me sometime.
For those that are new to my blog, I teach an online class with the BPSOP, and I conduct my “Stretching Your Frame of Mind” workshops all over our (round) planet.
I was shooting film a million years ago when the name Adobe was a type of house in the Southwest part of the US…in other words before Photoshop when everything had to be done in the camera. Here’s one of my stories:
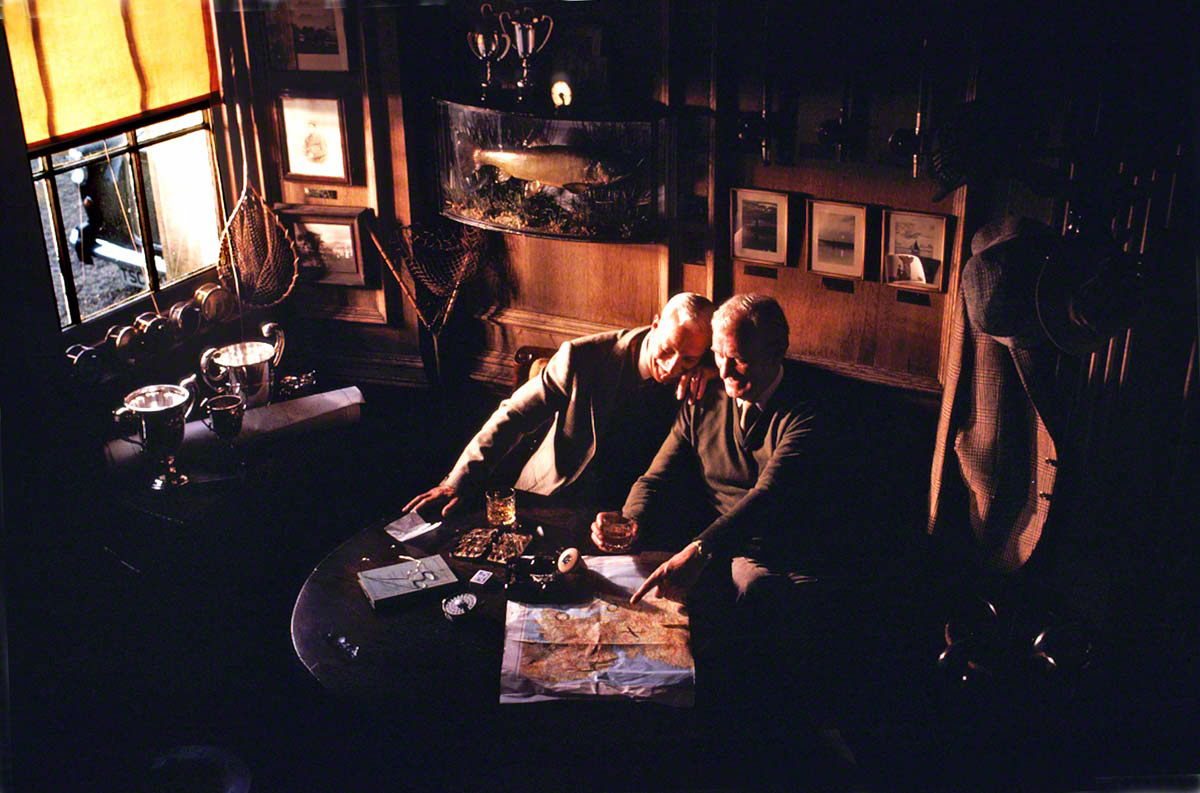
I was hired by Leo Burnett Advertising to shoot a series of ads in Scotland. One of the ads featured two fishing buddies exchanging their secret fly-fishing locations.
While we were shooting the others, I sent a location scout out to find an authentic Scottish Pub…a location I thought would be easy considering where we were; I was so wrong. After spending a couple of days, the scout came up empty.
At that point we extending the search to find a room that would fit the layout. We found a back room in a private boy’s prep school that would work but would require a lot of stying.
We all went out looking for stuff that had a fishing theme and found exactly what we needed…we began to convert the room into a ‘Scottish Pub’. That’s when it went downhill.
The headmaster came in to see what we were doing and at that point said that since the wood paneling was over seven hundred years old, and we weren’t allowed to touch it, he just wanted to know how we were going to do it. It was like being run over by the business end of an Amtrak train (express with no stops).
Acting quickly and purely out of desperation, an idea came to me. We ran over to the nearest fishing store and purchased enough twenty-pound monofilament line to reach across the entire country.
So everything you see on the wall is not actually touching, but is suspended down from hooks mounted on the ceiling and is approx. 1/8th to 1/4 of an inch in front of it. It’s what you had to do when Photoshop was years away from being invented. You had to shoot everything in the camera.
The men had never seen each other before that day. We went out in the street and recruited these two you see in the photo. The reason that they look like old friends exchanging their secret fly-fishing spots was that being realistic, I had them actually drinking Dewars. In this photo, they are so drunk that we had to hire private cars to take each one of them home.
FYI, this photo was lit with one 12K HMI out the window and a large roll of white seamless between the camera and the men.
Here’s the room before we started:
Visit my website at www.joebaraban.com, check out my workshop schedule at the top of this blog. Come shoot with me sometime.
In my online class with the BPSOP, We work on a number of assignments over the course of four weeks. In week three, after my students have had a chance to accumulate most of the elements of visual design and composition and begin incorporating them into their imagery we work on color and light.
I gave each participant a color for each of them to go out and find; making the color the subject. The reasoning behind this particular assignment is to get them to “see past first impressions”. I want them to begin “focusing their eye”, and start discovering things as a result.
Rob, one of my students in my January class was assigned the color blue. Since it was winter, he didn’t have much hope. This is what he said:
“I was assigned the color blue, and during a walk, I came across this house. I walked around until I found some trees to frame the doorway, and laid on the snow to get the stream. I then decided on a vertical shot with vertical trees for added tension and also to tightly crop the house. I spent a lot of time trying to get the white window completely visible, but it would not fit between the trees. If I moved closer it would have cut off the stream. I was definitely a bit bummed about that.”
What an incredible find and because of Rob’s perseverance, it paid off. He swears it was real, and I have no reason not to believe him!!!
Here’s what Rob was trying to do: He wanted to show all the window by providing some Negative Space (the lesson in week one is to use Negative Space to define the Positive Space) between the right edge of the window and the left edge of the tree. He didn’t want to move closer because we had been discussing ways to lead the viewer around the frame and the concept of ‘continuance’ in the Psychology of Gestalt.
He wanted a vertical photo because I pointed out in an earlier discussion that Vertical formats have more energy than horizontal ones…why, you might ask?
In a vertical format, the viewer will start out as he usually does from the bottom to the top. It will take him longer to get to the top in a vertical and that time it takes created more energy. When you put vertical objects in a vertical format it increases the energy even more.
I reminded him to only shoot in a 3:2 aspect ratio for the class…which, as you can see, in this photo he didn’t!!!!!!!! The only reason why I’m showing it is because he was ‘thinking’.
Tension=Energy. I’m talking about visual Tension, not the Tension that comes from mental or emotional strain.
Visit my website at www.joebaraban.com and check out my workshop schedule at the top of this blog. Come shoot with me sometime.
Here’s a really quick tip that will help you take your photos what I refer to as “up a notch”. It may be written as a quick tip, but I assure you that it’s anything but quick. I say that because it’s one of the biggest problems my online students with the BPSOP and in my “Stretching Your Frame of Mind” workshops I conduct around the planet have. My fellow photographers will invariably concentrate on the subject or center of interest and forget about everything and anything else…especially the horizon line.
Line is the most important of all the elements of Visual Design. Without line, none of the other elements I teach would exist. In fact, without line, planes, trains, automobiles, and even people wouldn’t exist as well. Why? Because we all have an outLINE. That said, the most important line is the horizon line, and when I see a horizon line that’s not straight it’s a sure sign that a novice took the picture. Don’t get me wrong, It’s not a judgment, merely an observation. In my opinion, the only time the horizon line wouldn’t appear straight is if you were in the Space Shuttle.
You would think that it’s an easy fix, and you would be partially right. If you’re on a tripod, like I am early in the morning or very late in the afternoon, you simply straighten the horizon right away and then forget about it. It will continue to be straight right up to and including the part when you actually take the photo. Of course, if you want to be a tad on the lazy side, you can always fix it later in front of a computer monitor. It won’t make you a better photographer, but it will keep your Lightroom and Photoshop skills honed as far as post-processing goes…if that’s your cup of tea!!!
However, most people don’t like being in complete control so they persist in hand holding their camera. The inherent problem is in the fact that you have to look at the horizon line while you’re composing, and then again right before you take the photo. That’s going to make it hard to concentrate on a host of things like capturing the moment, human and non-human gesture, body language, the peak of any action, etc., etc.
I’ve been shooting for fifty-three years and I can count the times on one hand that I forgot to look at the horizon line….and would have enough fingers left over to hold a martini glass.
The next time you go out shooting, look at the horizon line and remember these words. It will take your photos “up a notch”.
🙂
Visit my new website at www.joebaraban.com and check out my workshop schedule at the top of this blog. Come shoot with me sometime.
There are two important types of Perspective that I teach in my “Stretching Your Frame of Mind” workshops and in my online classes with the BPSOP. The most common one is Linear Perspective.
This deals with parallel lines that converge at a point on the horizon. As the lines move farther and farther away from the eyes, they appear to converge at a point just before, on, or just past the horizon line. This is better known as a Vanishing Point; a very powerful way to move the viewer around the composition.
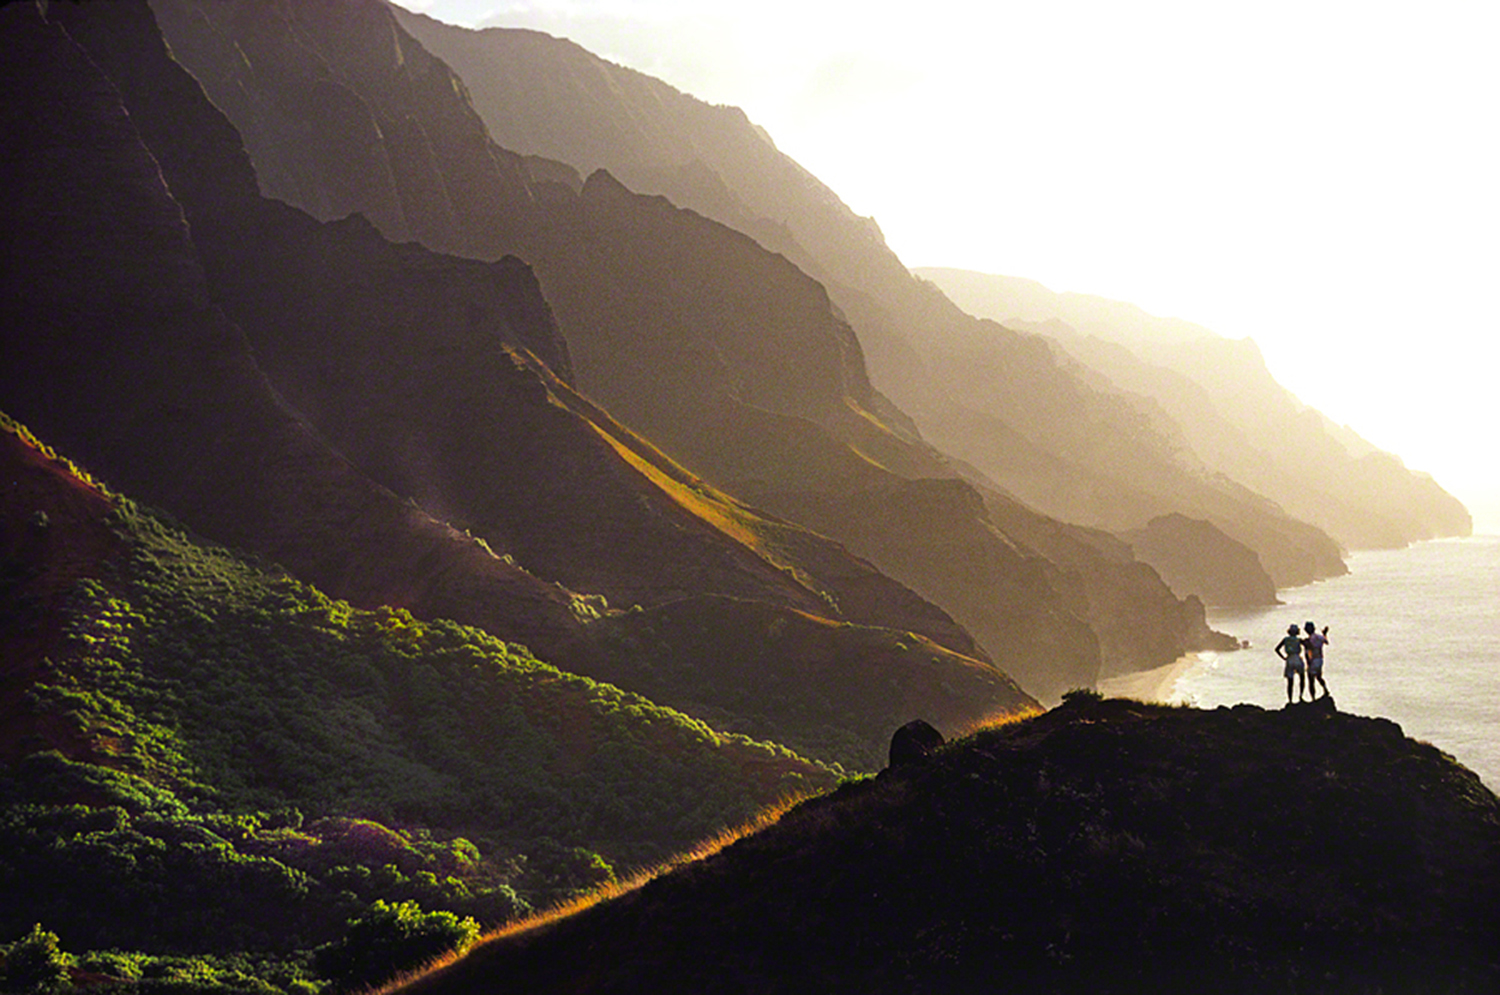
The other type and not thought of as much as the first-mentioned is Atmospheric Perspective. This way of seeing (as does Linear) helps the viewer perceive the depth of your composition. Btw, both of these are ways to show in a two-dimensional representation (the photo) three-dimensional reality.
Atmospheric Perspective consists of a gradual decrease in clarity and color, as the area recedes into the distance; which implies a sense of depth. Our air is filled with water vapor containing billions of tiny molecules of water, as well as minute particles of dust, which scatter light waves as they pass through. Shapes appear slightly blurred and a lot less contrast; colors become almost monochromatic.
The above photograph is a perfect example of Atmospheric Perspective. As you can see, the farther away the mountains get the less intense they become; this is what creates the depth.
So, my fellow photographers, next time you’re outside and in a position to look at things across a distance, check out how they appear in your viewfinder. Try to incorporate this concept in your imagery, and see what happens…you’ll be glad you did!
Visit my new website at www.joebaraban.com, and check out my workshop schedule a the top of this blog. Come shoot with me sometime.
I would say that the most common phrase for getting over the hump is that past the midpoint of the week, Wednesdays, are considered the Hump; as in halfway to the weekend.
I don’t know about you, but to me, there’s a lot of other kinds of humps one has to get over in life. For example, that first piece of sushi that actually has fish in it. Your first attempt at riding a bicycle, or the first time you try to parallel park.
Ok, now getting over the hump in photography. In both my online classes with the BPSOP and in my “Stretching Your Frame of Mind” workshop I conduct around the planet, I often talk to my students about getting over the hump. This means different things to different people. For example, one student keeps forgetting to straighten the horizon (the epitome of distraction), while another might not understand the concept of balancing the Negative and Positive Space until he does it for the first time; figuring out that it makes his photos stronger. All photographers have some sort of hump to transcend.
I will tell you this, all my students forget to incorporate my “fifteen Point Protection Plan”, checking the four corners, and the Border Patrol until they use it for the first time and understands how important it is. Btw, that doesn’t mean they won’t forget it the next time…because more than likely they will!!
One of my all-time favorite expressions is, ” I don’t photograph what I see because I never see what I want, so I photograph what I’d like to see. If I’m composing a photo, and I need to change something or ask someone (usually a stranger) to move over a step so a pole isn’t growing out of their head, I have no problem asking…not if it will make for a better photograph.
If I had to list one hump that the majority of my students have a very hard time getting over, it’s approaching a stranger to ask them something that would improve their photo; or to even take their picture.
Another one that might rival it is using a tripod. What I often see is someone carrying the tripod in one hand and the camera in the other. It’s a pain to stop, put the tripod in place, take the camera and attach it, compose your shot and then take the camera off the tripod, put it back in your hand and the camera over your shoulder or in your hand.
No wonder people don’t take a tripod when they need to, and when it comes to being freaked out because everyone is watching you, it’s still another hurdle to get over.
When I use a tripod, it’s usually during the Blue Hour, sunrise and sunset, when you’re shooting with a slow shutter speed. I keep the camera on the tripod and then put it over my shoulder. It becomes one piece of equipment and thus much easier and faster to use.
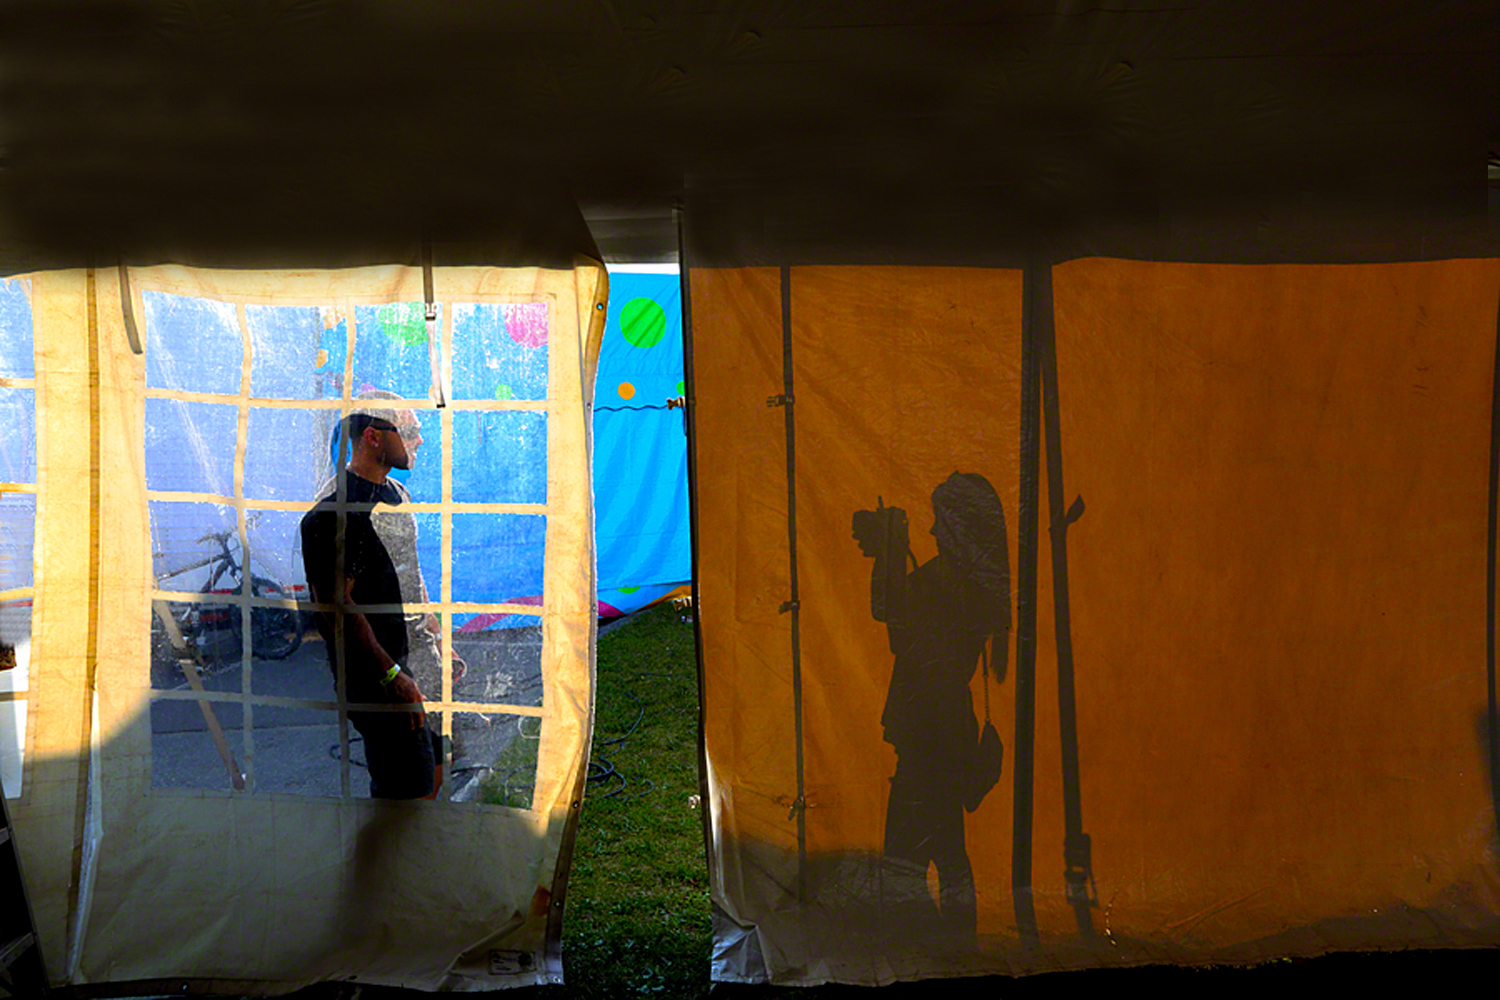
I guess I’ve been doing it for so long it has become second nature to me. I figure that all they can say is no. The key is to not walk up to someone with the camera in your hand, which is sure to intimidate…especially nowadays when everyone’s personal space is up for grabs.
In the above photo, I was walking inside this tent at a festival and saw these two people right outside it. I was an interesting shot, filled with visual interest., The guy was moving around for her and for the most part, the lines forming the windows were always going right through his eyes.
I told them what I was trying to do and if he would listen to me directing him so that I could get his head unobstructed in the window..worked like a charm!!
Visit my website at www.joebaraban.com, and check out my workshop schedule at the top of this blog. Come shoot with me sometime.
One of the most important Pearlsof Wisdom I share with my online class with the BPSOP, and with my “Stretching Your Frame Of Mind” workshops I conduct around the planet is, “I don’t photograph what I see, I photograph what I’d like to see”.
Don’t get me wrong, I do photograph what I see all the time. I’m perfectly happy to walk around using my Artist Palette which has all the basic elements of visual design on it. I’m able to use the right side of my brain (the creative side) to see what’s all around me.
However, I don’t know about you but for me, it’s not often that I can just come upon a location, situation, or subject where all I have to do is bring the camera up to my eye and click the shutter; and walk away with a great photo.
So not being a patient person, I’m just not going to wait for that to happen. I’m going to make it happen!!! I’m going to take the old proverbial bull by the horns.
I graduated college with a BA in Journalism and a minor in art, and starting back in middle school through high school and ending in my senior year I was very involved in painting and design. In virtually all those years the medium was painting, pencil drawing, watercolor, pastels, and printmaking; I even stretched my own canvas.
My tools were: brushes, colored pencils, pastel sticks, and an occasional printing press. I would start out with a blank piece of paper on a drawing table or a canvas on an easel. I added subject matter and a background of some sort until I thought I had a finished “work of art”.
Fifty-three years ago I switched the medium to a camera (it was instant gratification), and I still consider myself a painter/artist. Now, instead of a canvas on an easel, I have a camera on a tripod. I’m still painting, and that’s where the “photographing what I’d like to see” comes in.
Now, I know that there are photographers out there that would never alter anything in a scene/location they come upon because they call themselves purists; they always photograph what they see.
Well, that’s all well and good, but what happens if they never come across anything they like? Do they just settle for whatever is there? To me, reality is not like Willie Wonka’s Chocolate Factory where everything you see looks great and good enough to eat…not so far it isn’t.
Since I usually don’t see what I want, for me photography is about making pictures not taking them; if I were ever to have a creed/motto I would print on a t-shirt, that would be it.
I add, subtract, or just move things around within my frame for a variety of reasons, and whatever I do comes from using the elements of design that appear on my ‘Artist Palette’.
For example, I use negative space to define the positive space and I usually strive for a balance between them. Sometimes that means moving an object to the right or left. I’ll get up close and personal so I can anchor the subject in the foreground using Perspective to create layers of interest.
I’ll generate Visual Tension by placing or moving the subject close to the edge of the frame, or any of the other methods to create Tension that I teach. I’ll wet things down to create reflections. Line, Shape, Texture, Pattern, and Form are always at the back of my mind. I’m also a big believer in creating directional lines or Vanishing Points to lead the viewer through my frame.
Sometimes I travel with colorful props in the event I need something to communicate an idea or to provide more visual interest to my photo; or I’ll just move something colorful into my frame. Since I’m always saying that “Light is everything”, I’ll move things around alter the direction of the existing light to create a mood or add depth.
I know that a lot of photographers either don’t think about moving something (after asking permission, if need be), or they might be afraid to, or perhaps there’s a touch of the “lazy” in them.
These are just a few of the things I’m constantly thinking about when I start composing.
All I can say is to give it a try. Imagine your self a painter and you’re putting the finishing touches on your masterpiece. If it’s a matter of getting over the hump then just do it!!! You’ll be sooooo glad you did; I promise you won’t go to hell.
Here are a few more completely random examples of making pictures. In each case, I either saw it the way it was or the way I wanted it to be. You decide!!
I teach people how to use the elements of visual design and composition to create stronger and more memorable images. Images that people won’t forget in the moments just after looking at your photo. Images that are compelling and will leave impression days, weeks and yes, even months afterward.
In my online class with the BPSOP, and in my “Stretching Your Frame of Mind” workshops I conduct around the (round) planet, I stress the fact that “light is everything”, and should be considered first when composing your photo. One of my Personal Pearls of Wisdom is, “You find the light and you’ll find the shot”.
Now I’m not referring to the shooters that like to prowl the city streets looking to capture an emotional photo that has some kind of consequence, a moment in someone’s life or as followers of Henri Cartier-Bresson work would say, “The Decisive Moment”. These are the type of photos that rely more on a quick finger hitting the shutter release and timing than of light. Instead, I’m talking about the type of photographers that likes to create beautiful photographs in any other genre that are timeless representations of reality. To me, these are the type of photos that require great light. Landscapes, Architecture, environmental portraits, to name a few.
OK, here’s where the Quick Photo Tip comes in. As I tell my students and fellow photographers, there is one genre that doesn’t need quality light to be memorable and that’s Humor. Humor is the one concept that can replace a day of flat, gray, and un-inspiring light. Whether it be a funny situation, an awkward expression on a loved one’s face, or perhaps something as simple as a misspelled word on a sign, if it’s funny that’s all you might need.!!!
One more thing I always tell my fellow photographers and is to look to include color on an equally bad day, and when you can achieve both, you just might have something.
Visit my website at www.joebaraban.com and check out my workshop schedule at the top of this blog. Come shoot with me some time and we’ll have a few laughs.
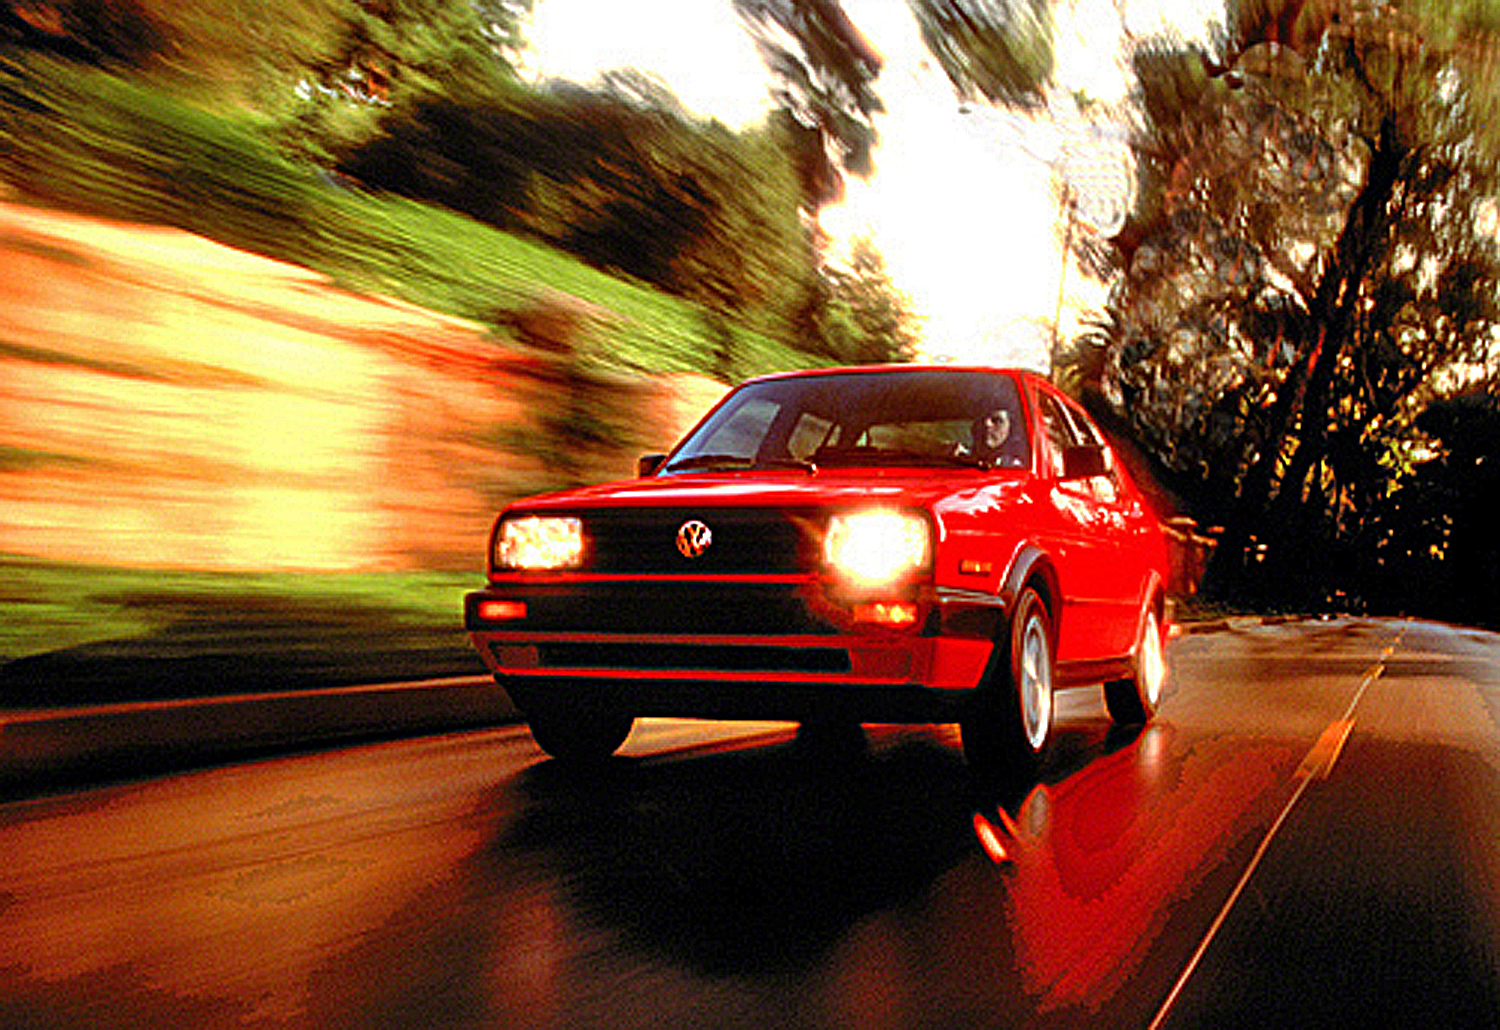
Well, I’m back again with yet another example of what it was like when Adobe was a type of house in the Southwest part of the US. In this Life Before Photoshop post, we’ll look at how we made things look as if they were screaming down the road back before we could just do it on the computer; before there were personal computers.
In my online class with the BPSOP, and in my “Stretching Your Frame of Mind” workshops I conduct around the planet, I want my students and fellow photographers to work on getting as much in the camera as they can…why? Because it will make them a more rounded photographer. One that depends on his or her skill with the camera, their ability to use the right side (the creative side) of their brain. Someone that cares more about “making pictures” than being a good computer artist. For me that’s the fun, to challenge myself every time I go out shooting knowing that I can come back with the illusive “OMG” photo that everyone hopes for each and every time they go out…without any help!!!
Ok, let’s talk about the above photo and how we use to make things appear to be moving fast all on one frame of film; and just one exposure.
If there was a decent budget, I would rent a camera car that had all the bells and whistles, and cranes to position yourself in the front, the side, or the rear of the vehicle you were shooting. If there wasn’t a budget, perhaps because it was for a regional and not a national market, we renting what use to be called “The poor man’s camera car”.
That was a Lincoln Town Car, and it worked like a charm, especially if you were doing a 2/3’s frontal view and the client wanted to have the car coming at you down the road. The best part about the Lincoln was that it had an extremely smooth ride and a unique stabilization system. You could be in the trunk of the car and it would be as smooth as a camera car at five times cheaper. Did I say trunk??? Yes, that’s where my assistant and I shot from.
In the above photo, we had wet down the road, then I got in the trunk. We moved at the exact same speed so I could make the car sharp while blurring the rest of the scene. We didn’t have to go very fast. In fact, in the above photo, we were moving together at approx. 10 to 15 miles per hour. The blur and movement come to play from the slow shutter speed. I would vary that to create different looks, and the shutter speeds ranged from 1/4 of a second to 1/30th; depending on the speed of the two moving cars.
FYI, if you’re wondering why the emblem and the rest of the front of the VW are bright, there is a small convertible to the left of the Town car and in front of the VW. In that convertible are a couple of my assistants holding a large silver reflector bouncing light into it.
It was great fun, and one hell of a challenge!!! Now, the car is shot in a studio on a blue screen, made to look like it was moving and the background is usually put in after the fact. How sad…how very sad.