Food for Digital Thought: Creating a Mood.

Creating a mood

Photography is most definitely the love of my life, but right under it is fishing and then cooking. I love to look through cookbooks, especially ones with great food photography and find interesting things to serve when entertaining…which we love to do. Having said this, I’m really into recipes, and I’m always using some kind of recipe when talking with my online students with the BBSOP, and my fellow photographers that take my “Stretching Your Frame of Mind” workshops I conduct around the hopefully round planet.

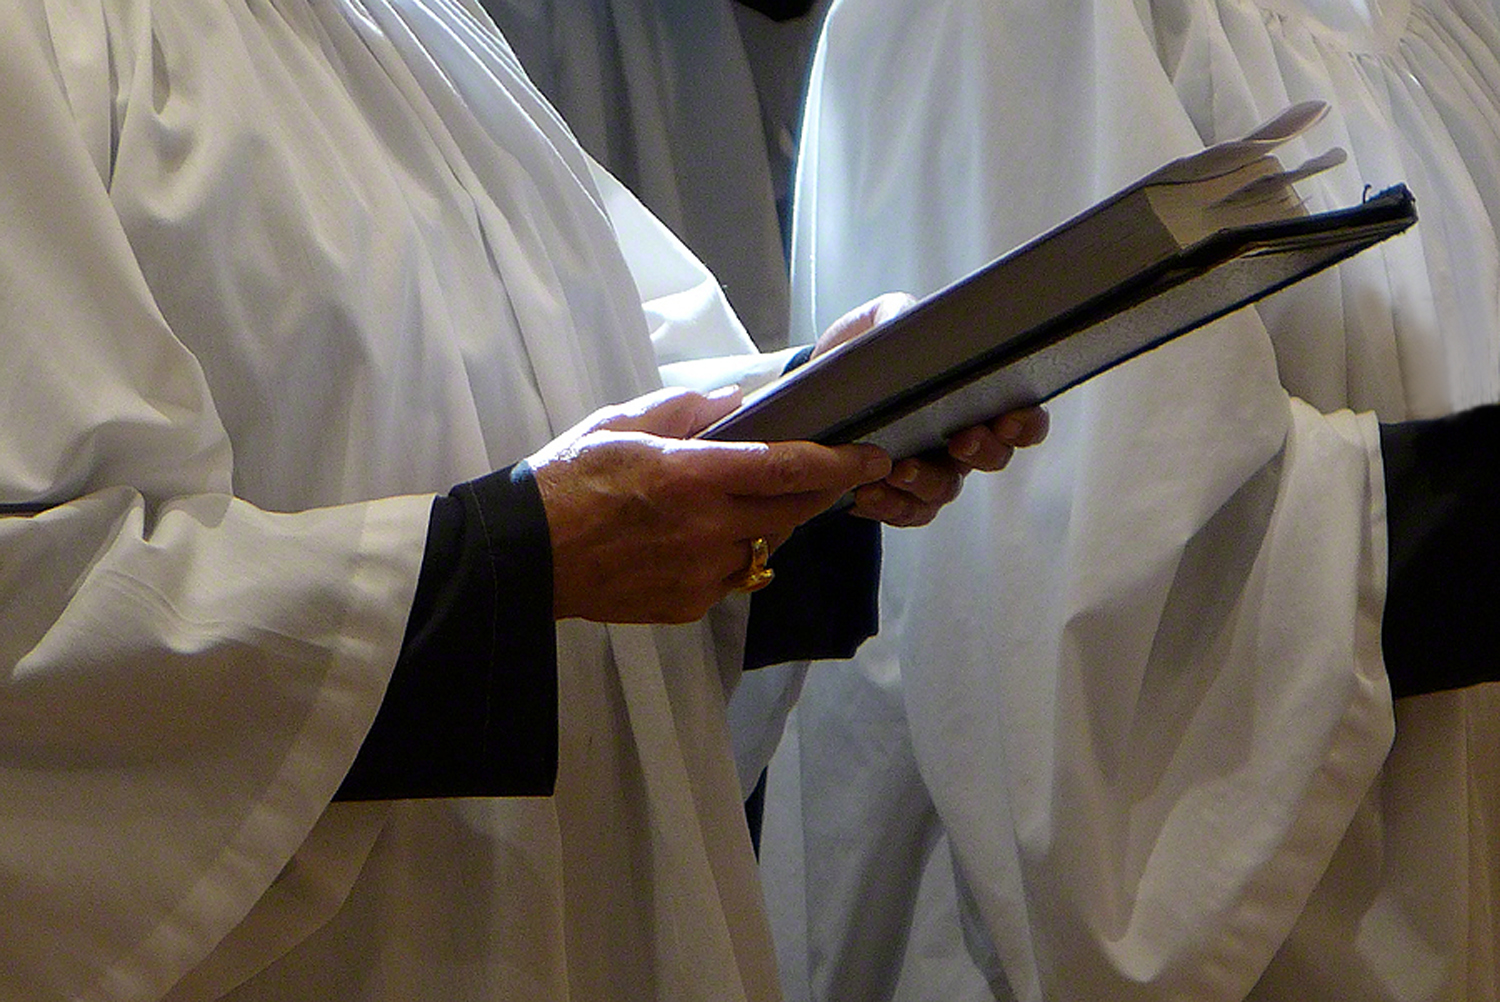
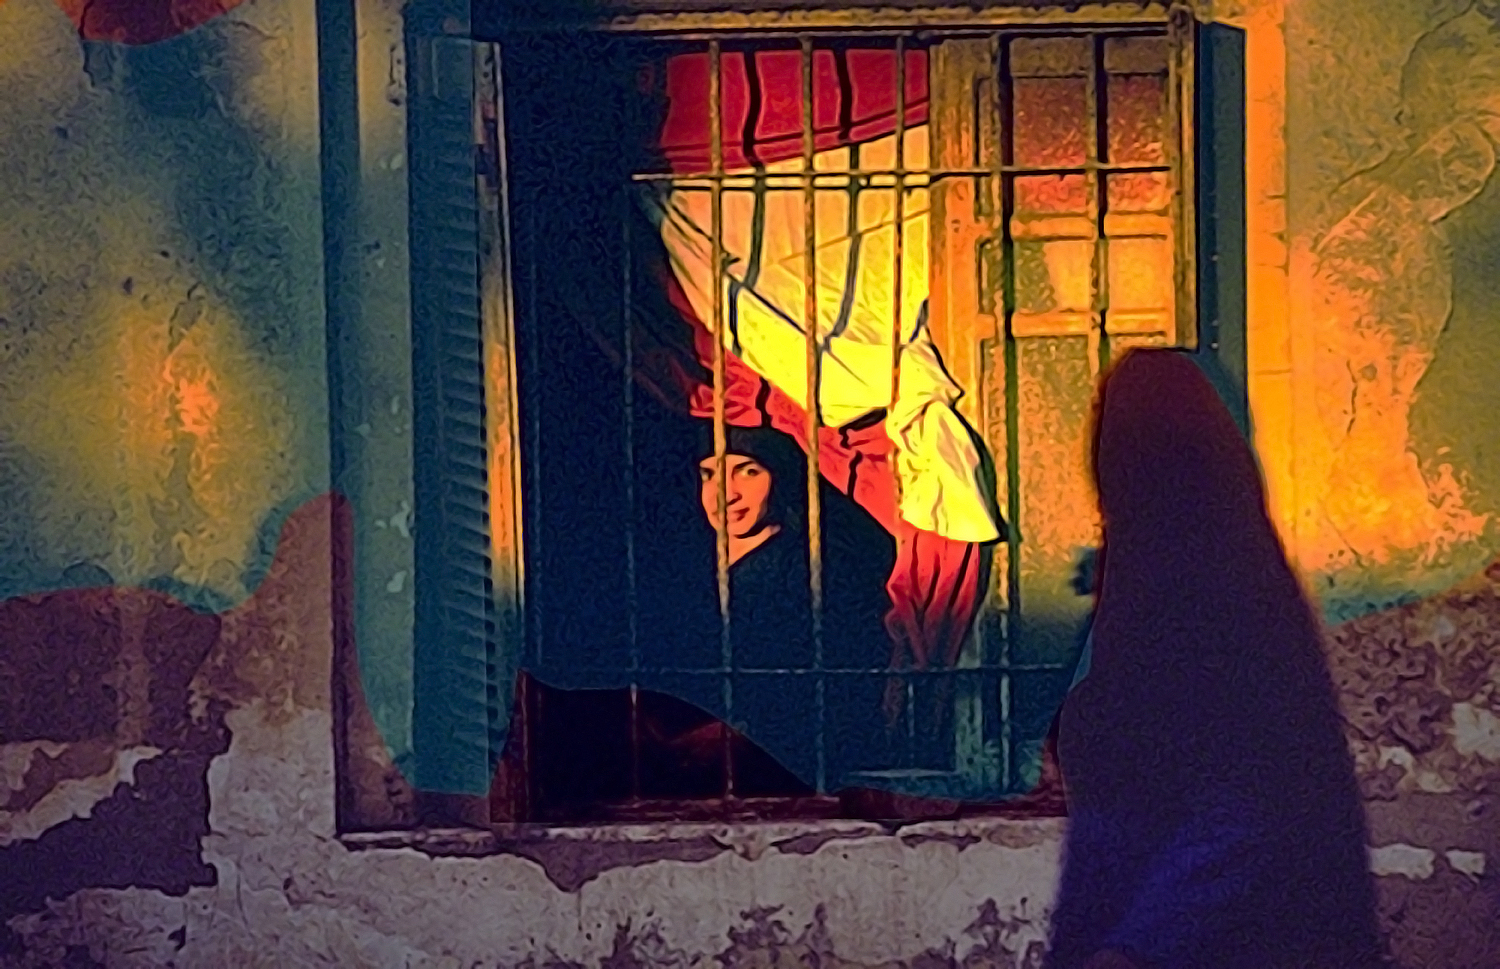
I often like to create an atmosphere where the viewer is drawn into my photo whether he wants to or not. I want to induce a feeling in his psyche.

Creating a mood is a good way to not only deliver your message visually but editorially as well. What do I mean by editorially? By using a certain mood to tell a story, which incidentally doesn’t have to be controlled by light.

According to the dictionary, the definition of mood is: “A temporary state of mind or feeling”. It also means “The atmosphere or pervading tone of something, especially a work of art”. This is where photography comes it since we’re all artists, our medium is a camera instead of a paintbrush.

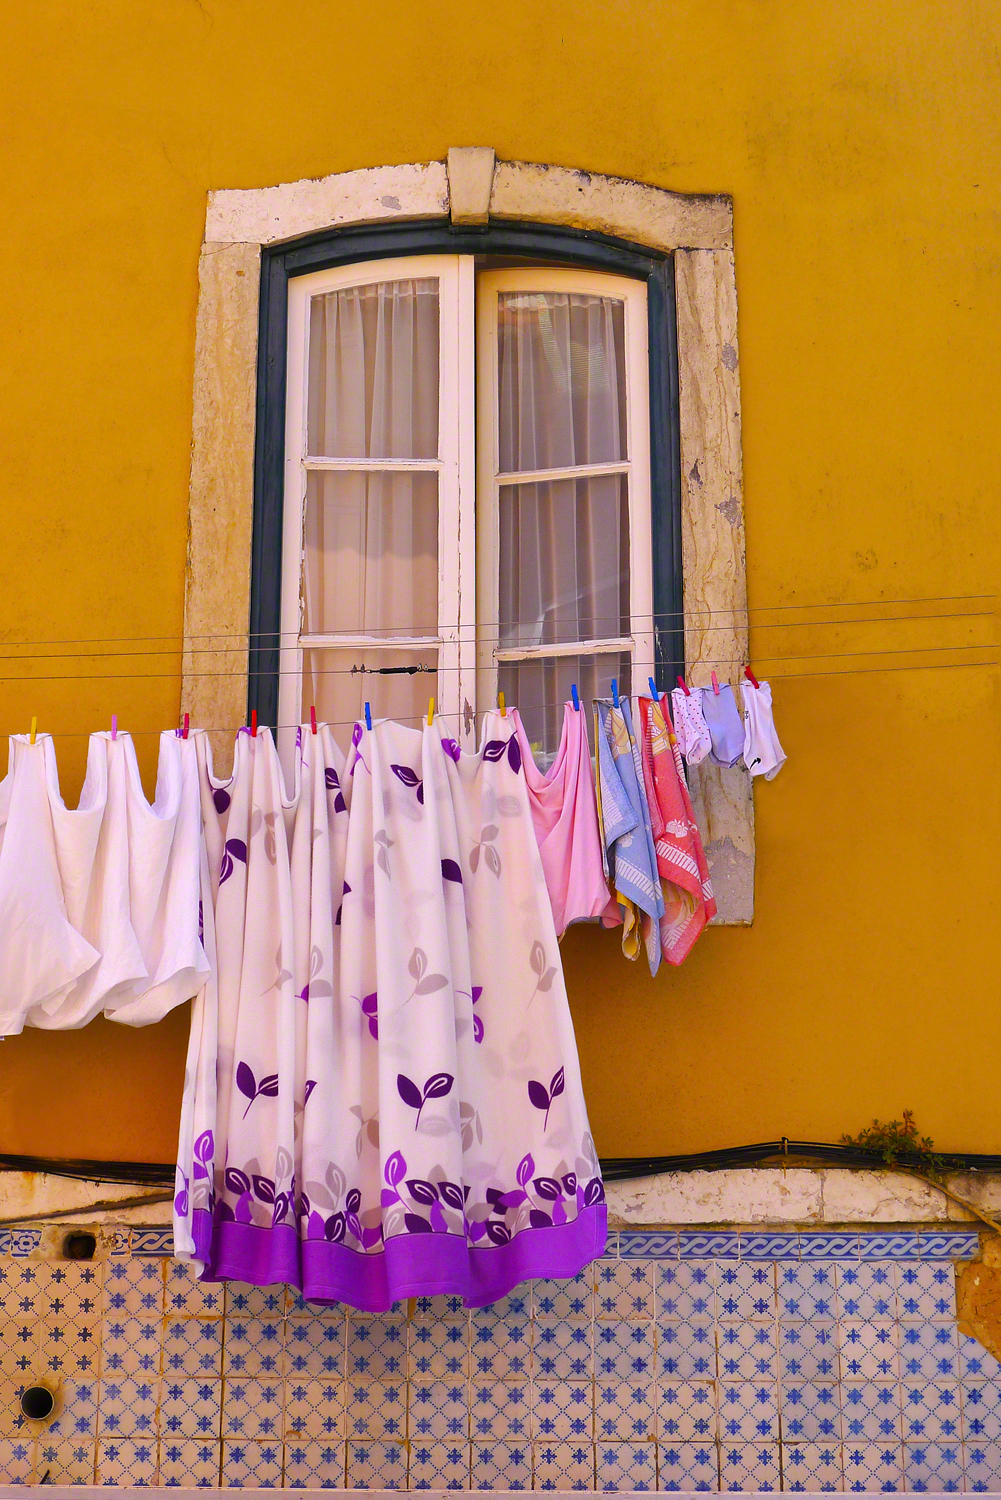
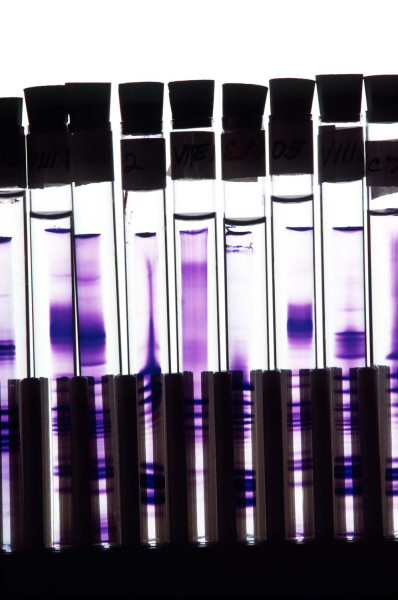
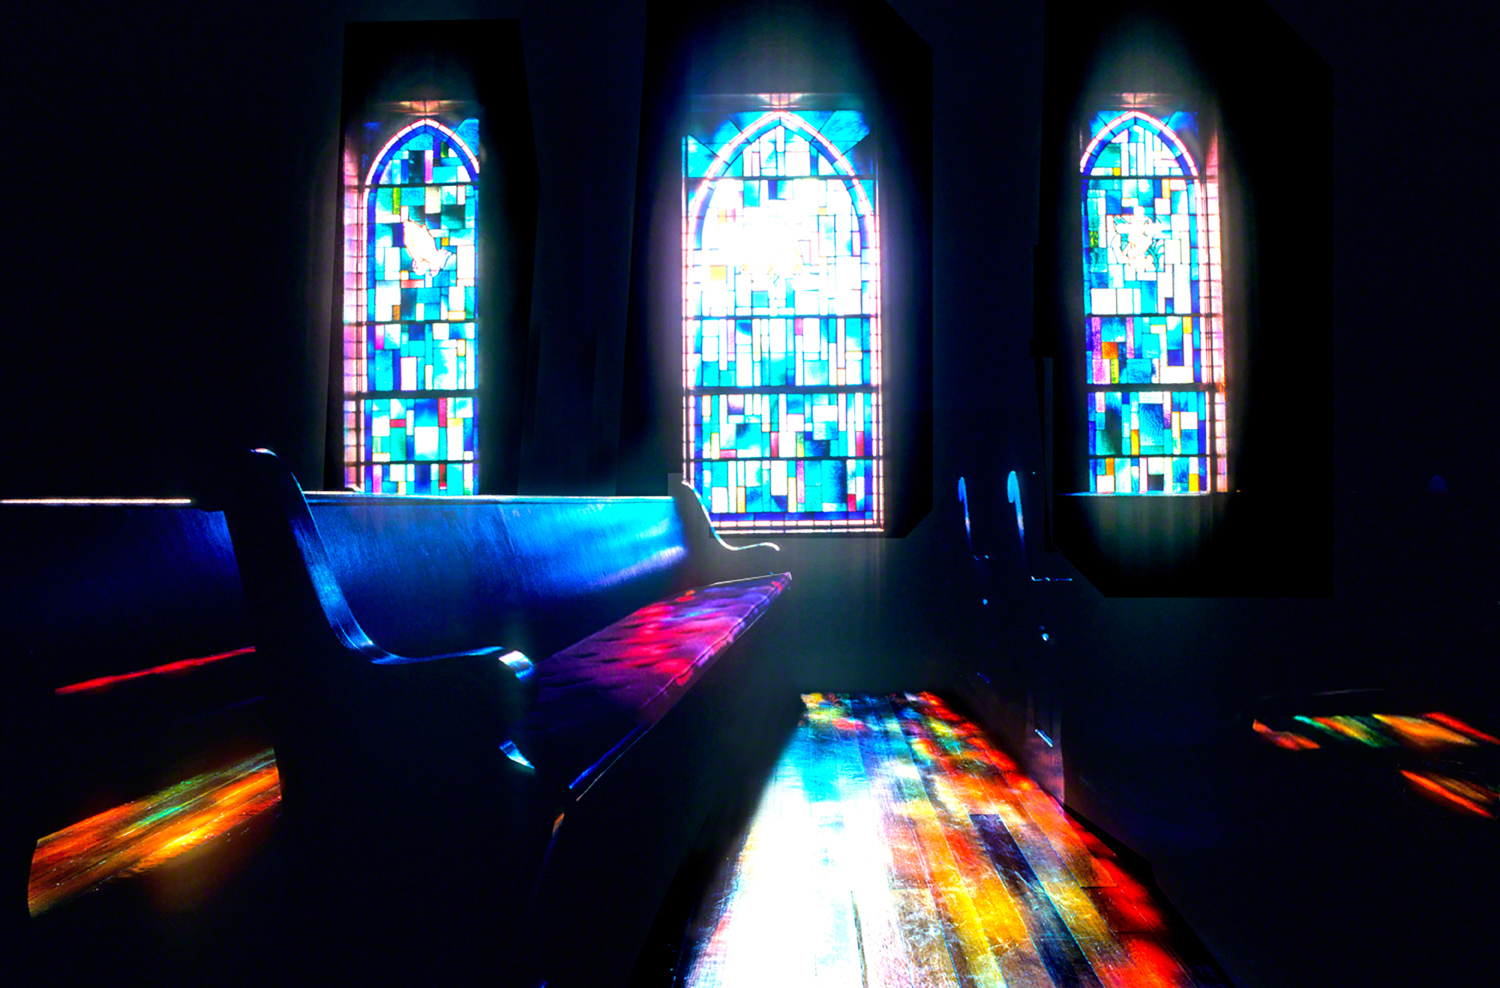
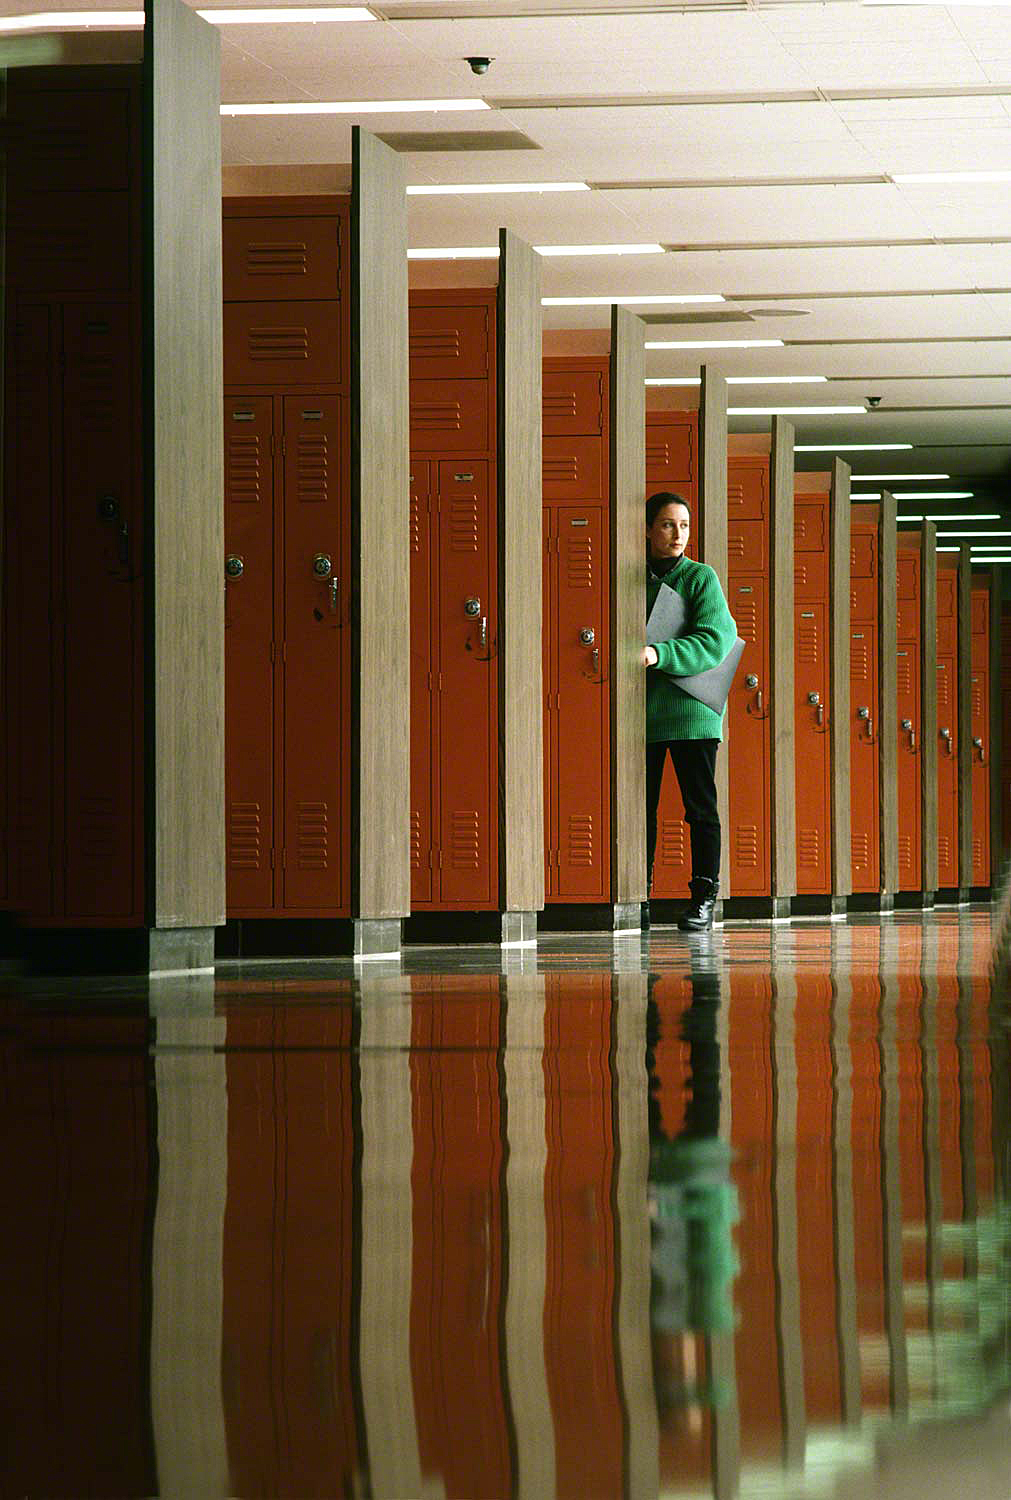
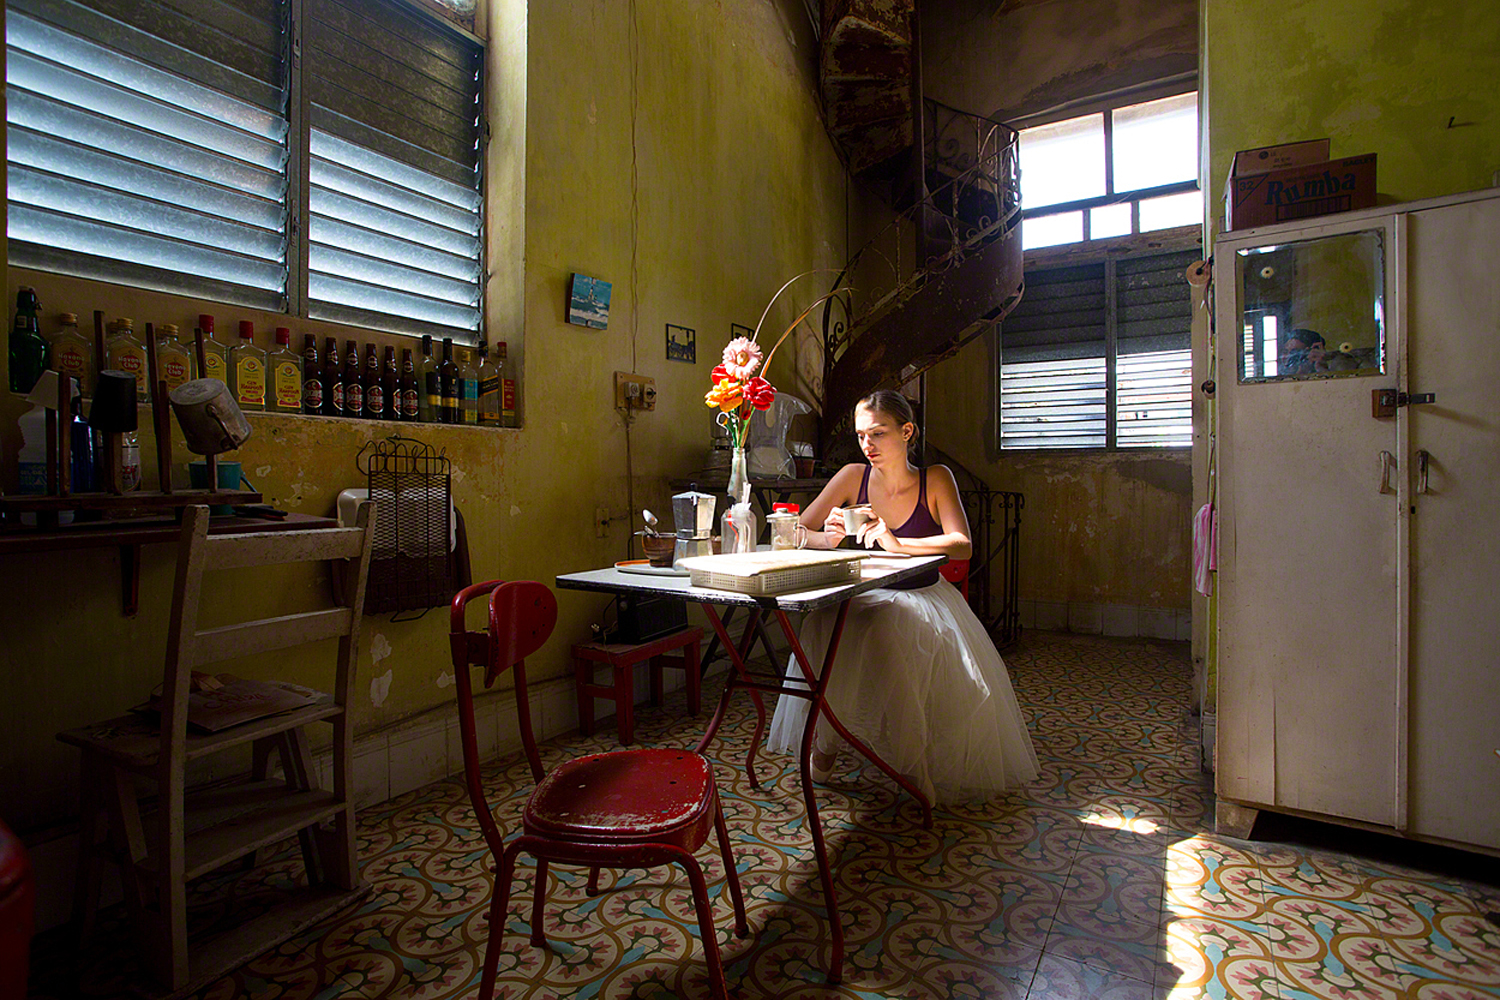
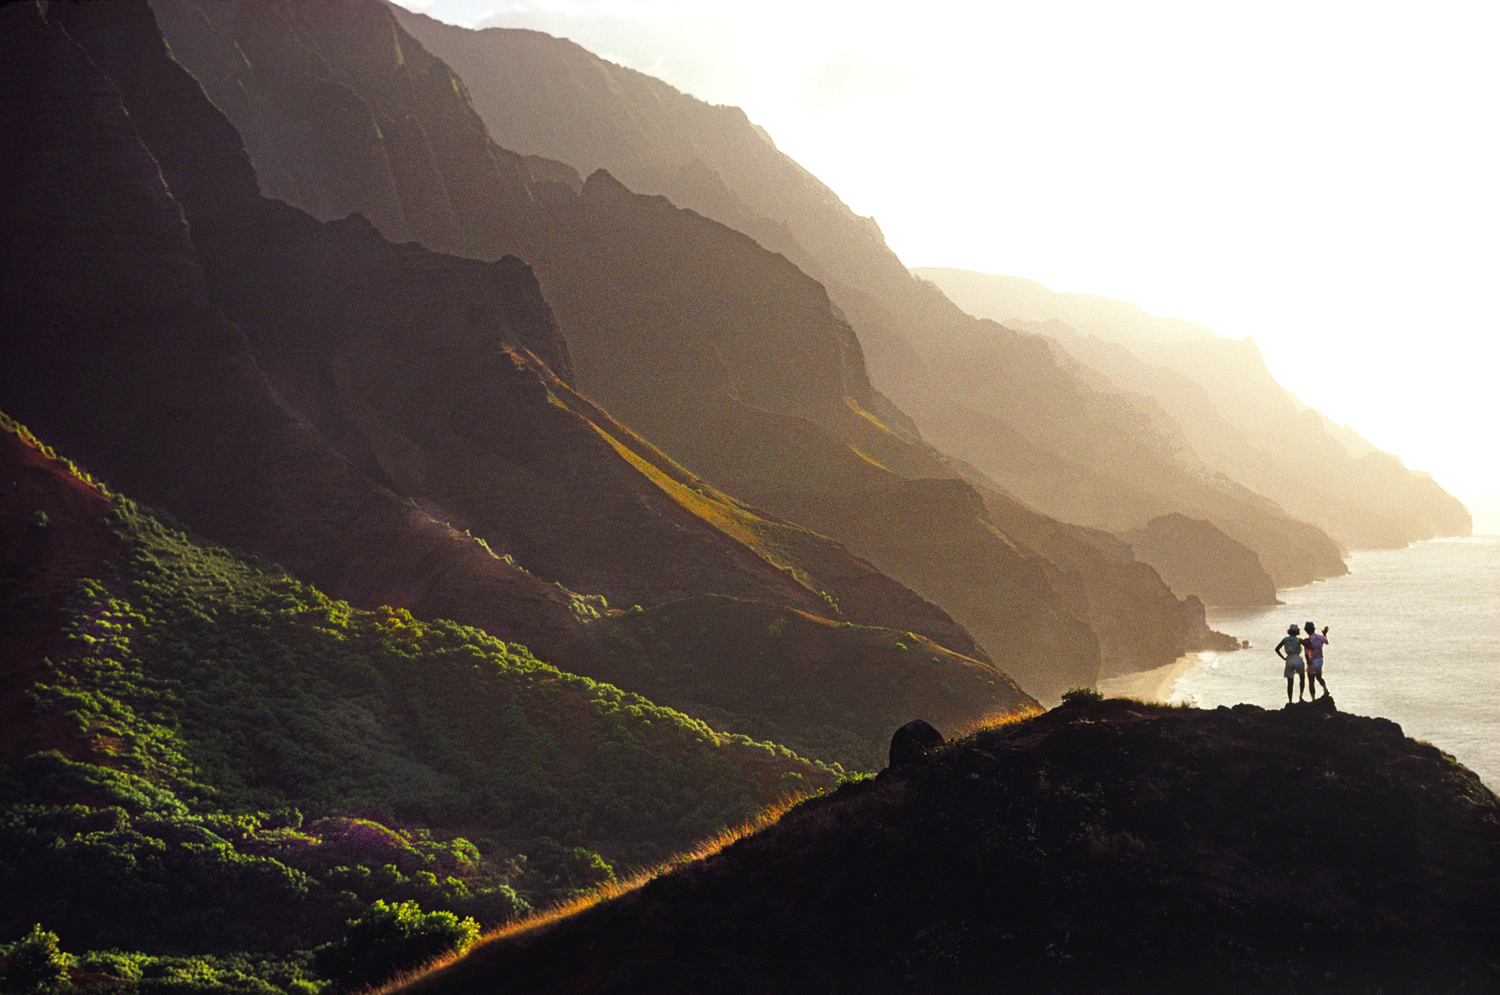
So how do we achieve this atmosphere, this state of mind?  Well, first you have to determine what kind of mood you’re after. Do you want your photo to ooze with a bright and happy feeling of tenderness and warmth…or a dark, melancholy and introspective mood? Do you want the viewer’s eyes to well up with sadness or the proverbial grin from ear to ear?

If this is the way you’re after, then it’s all about how you manipulate the light and color. Darker colors for somber pensive moods or rich, bold, and vibrant colors for a more cheery look. Although color is a big factor, the use of light transcends everything.

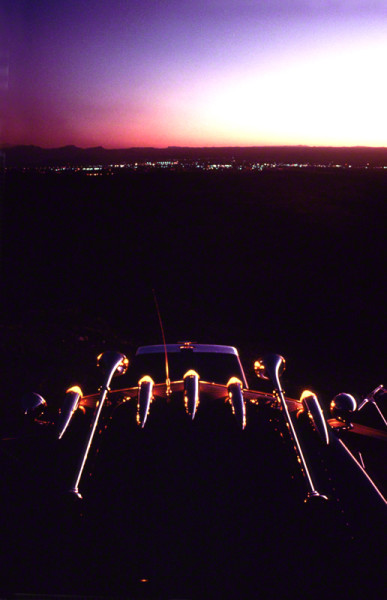
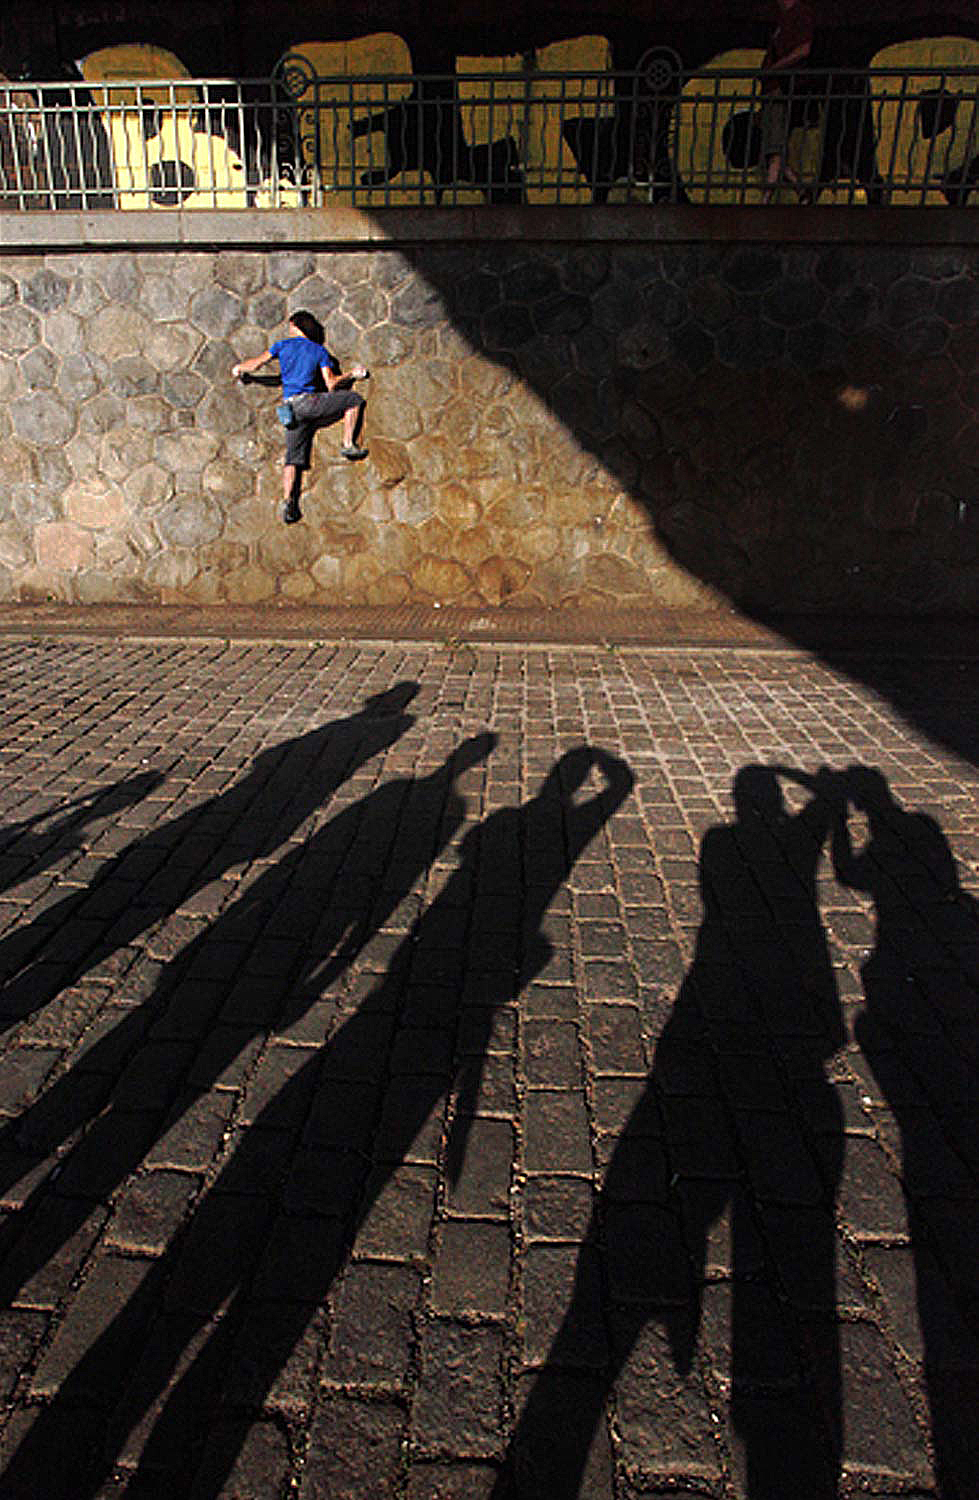
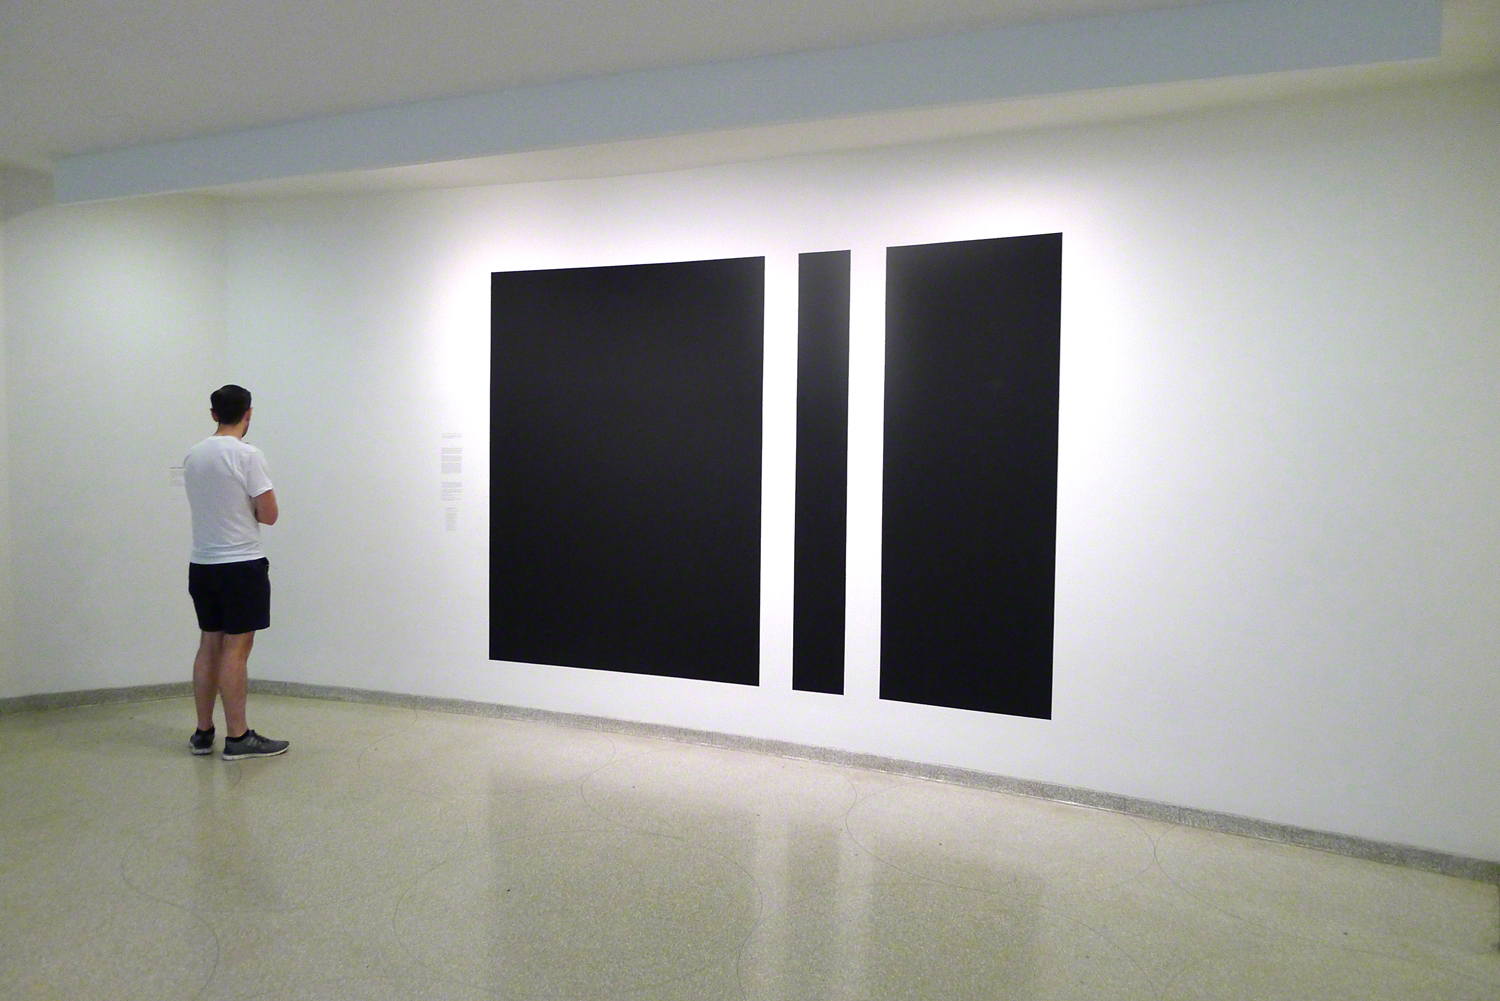
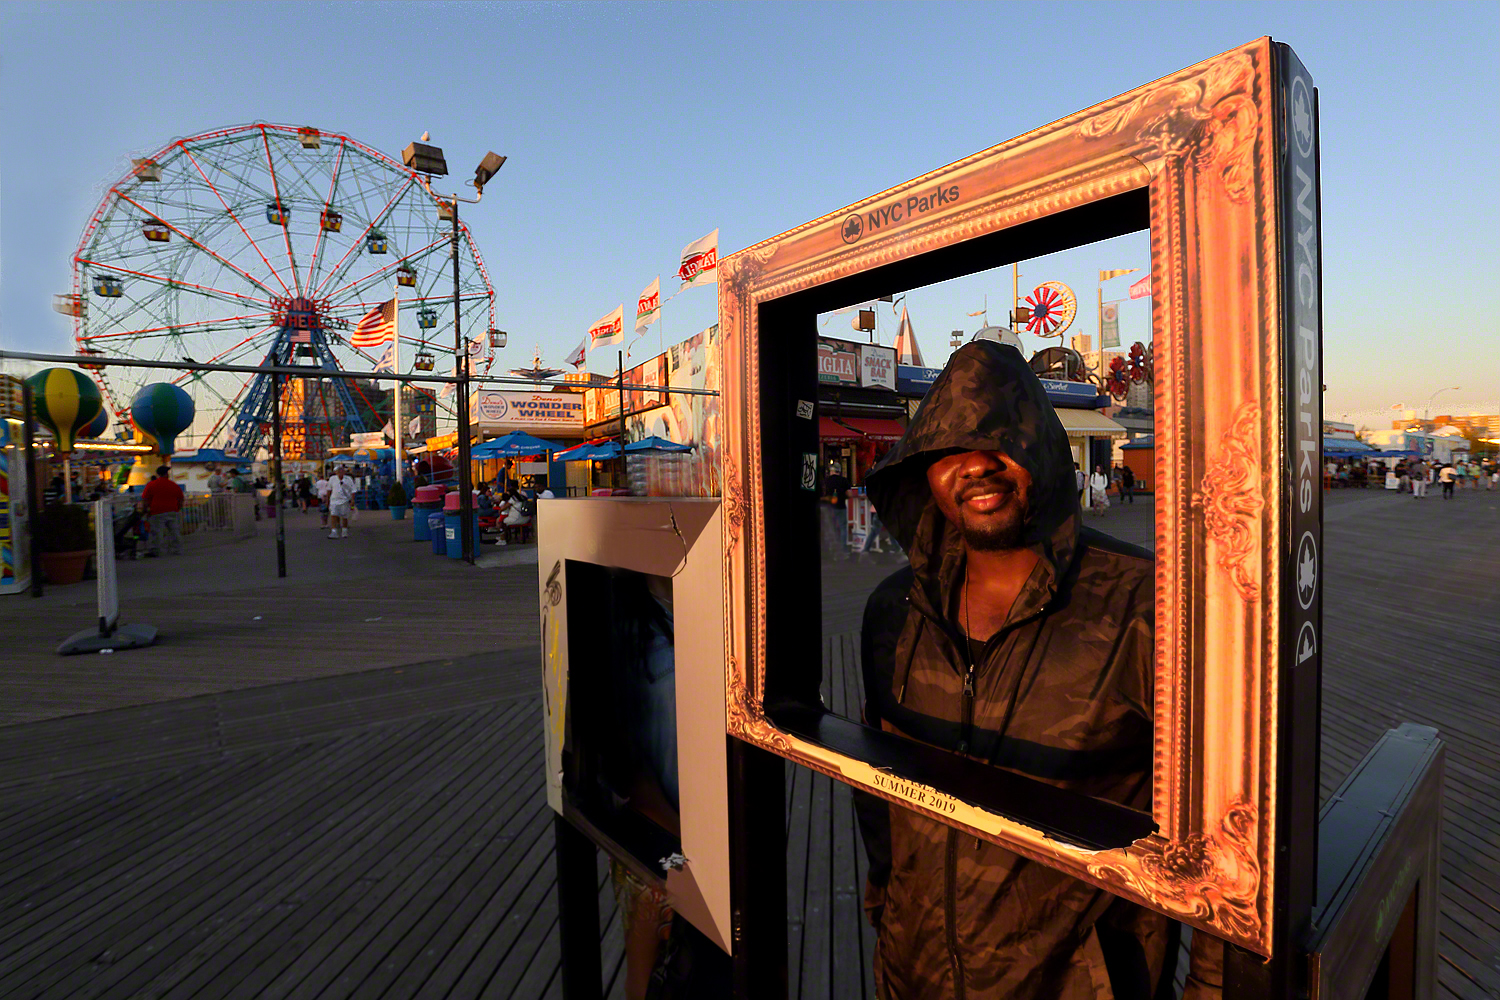
As I said, the use of light doesn’t always factor in. If you look at the above photo, light isn’t that important; it’s all about the story I was telling.

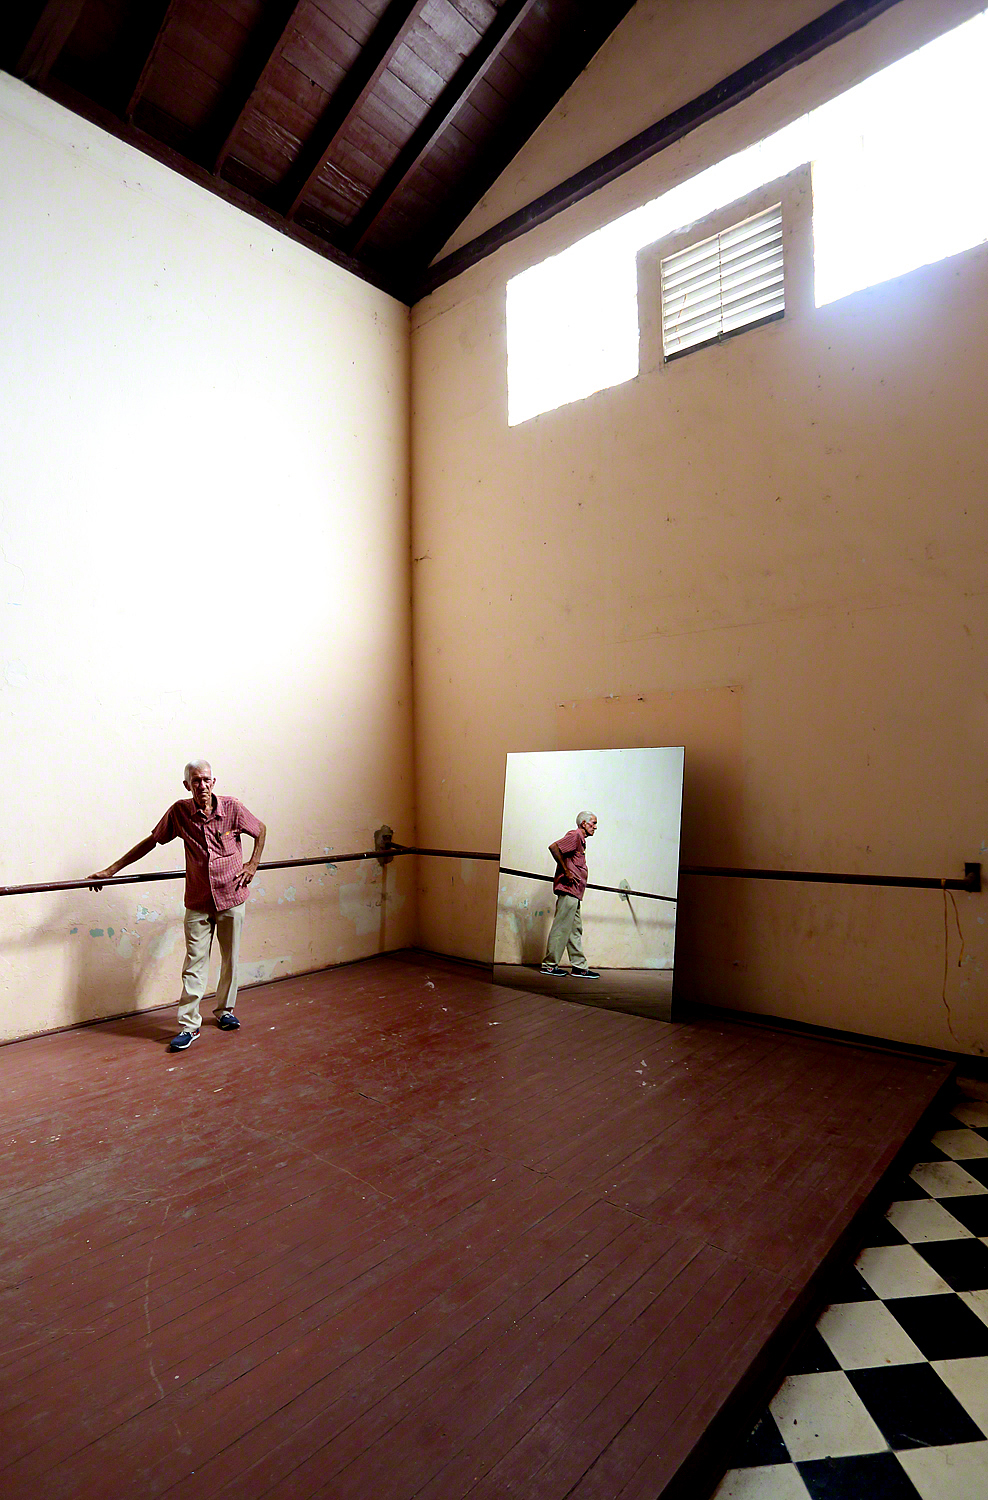
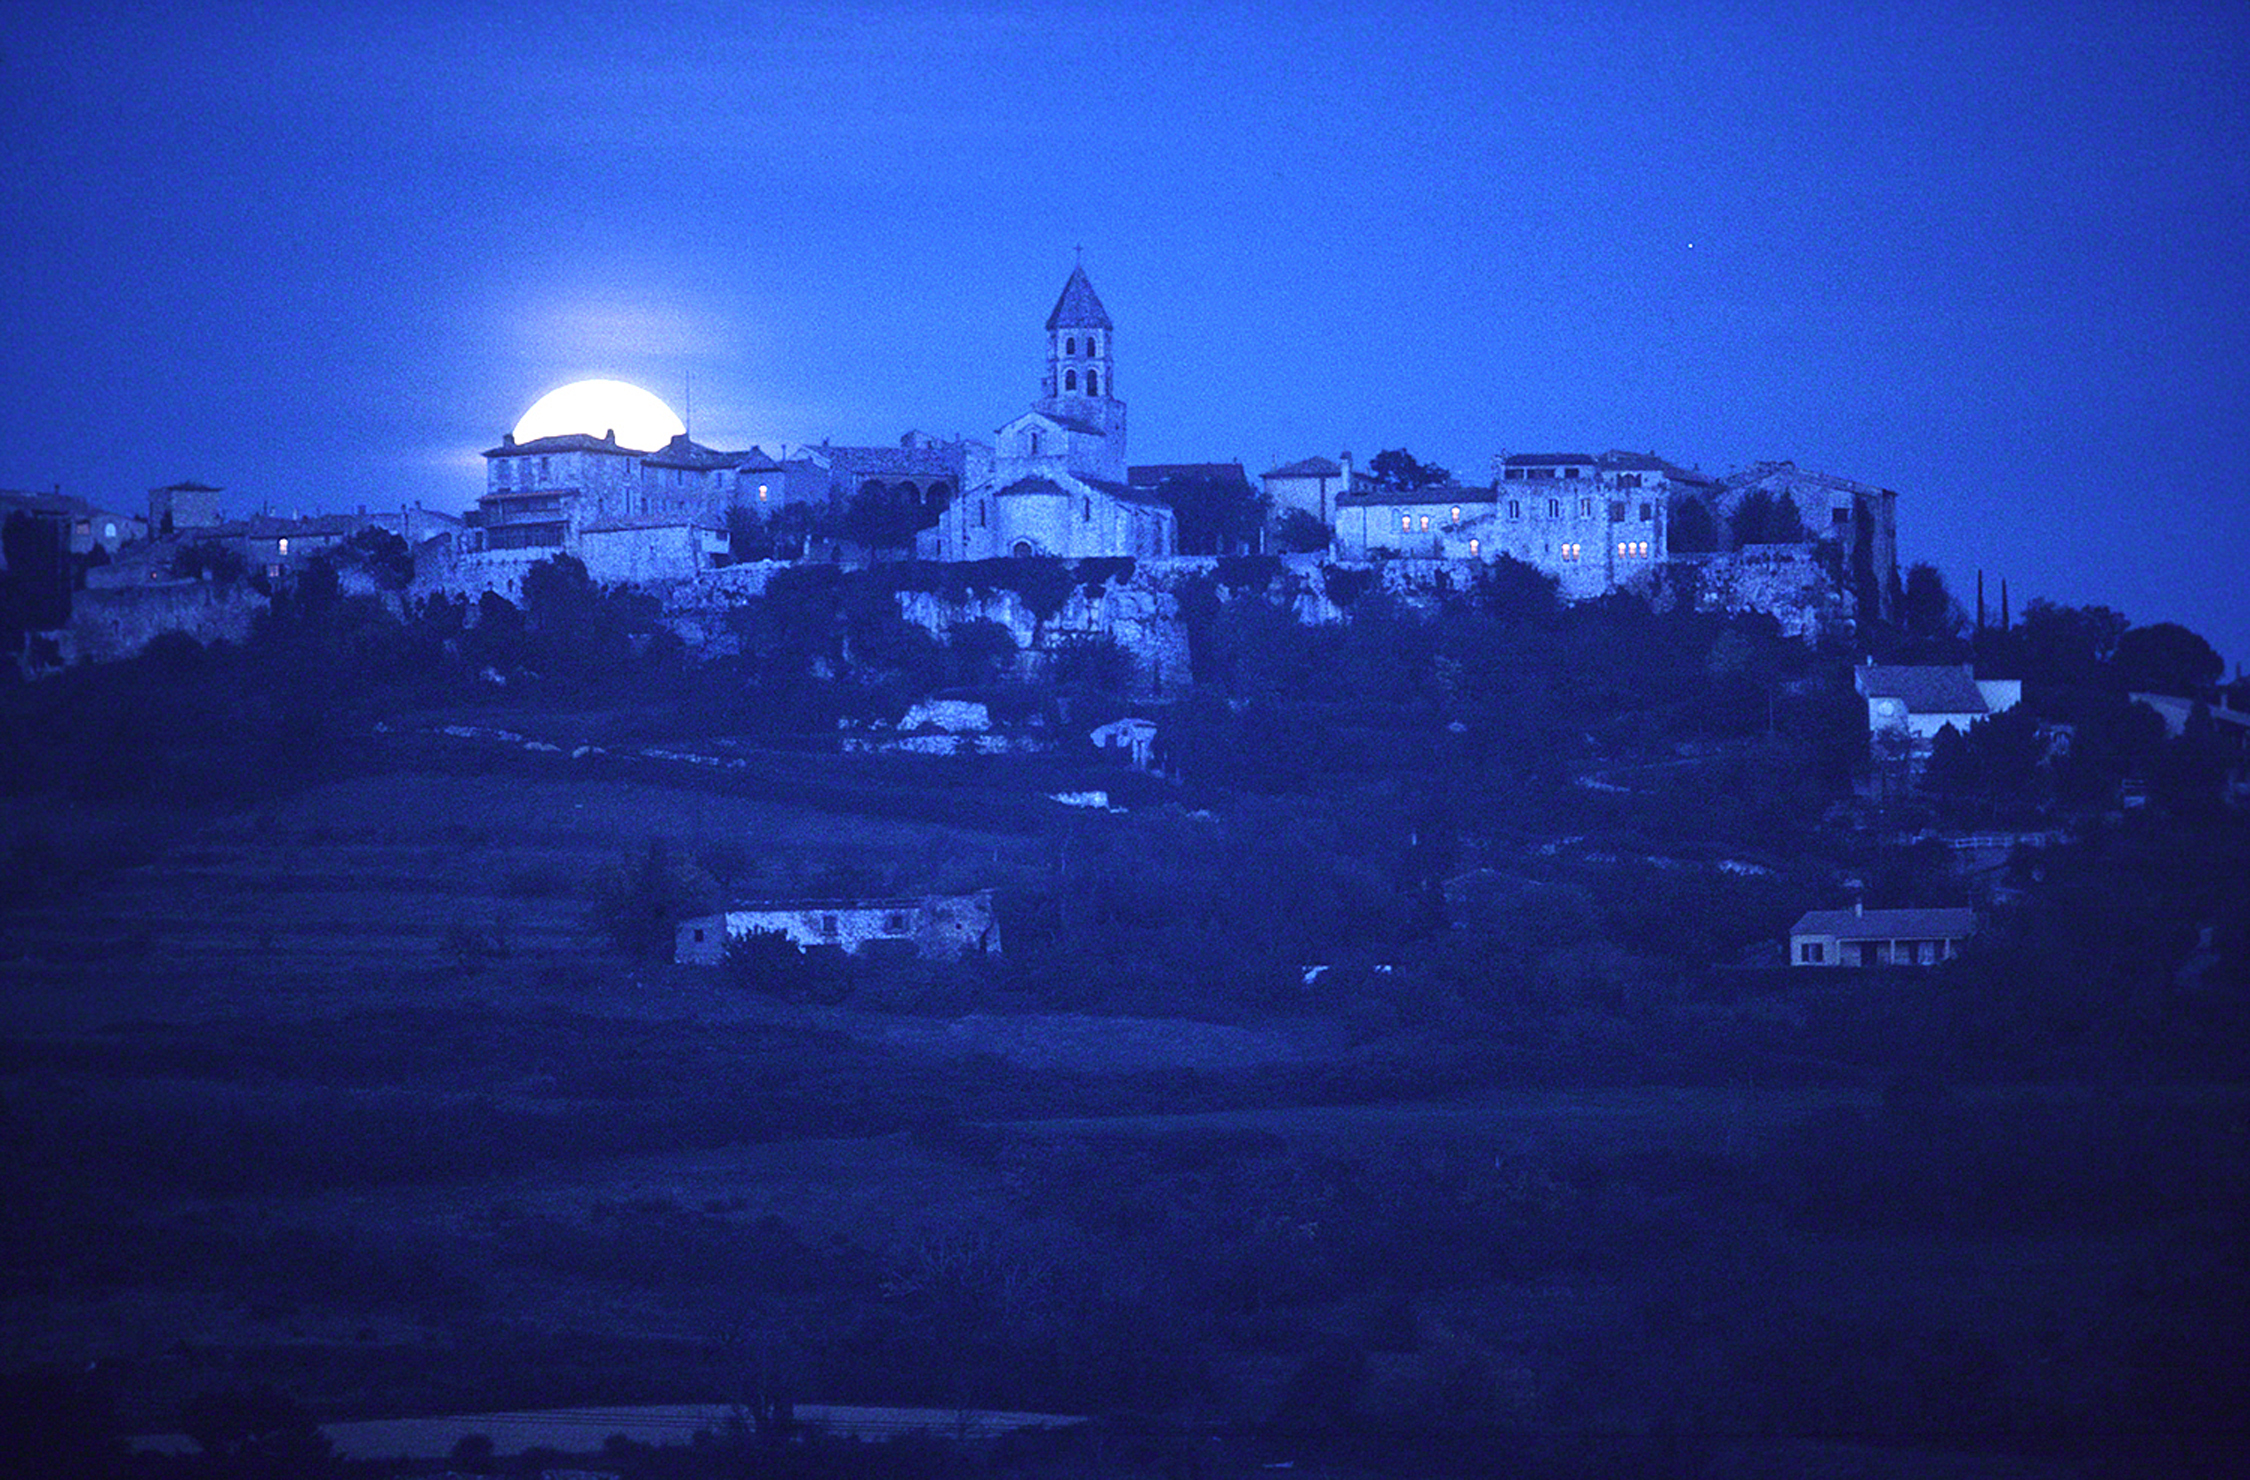
It’s hard to create a somber mood on a bright sunny day. It’s all about the emotional environment. Since I shoot early in the morning and late in the afternoon, the light is going to be softer and the shadows longer. An overcast, gloomy day is a good way to create a type of mood, as well as the placement of your subject.

Visit my website at www.joebaraban.com and check out my workshop schedule at the top of this blog. Come shoot with me some time and I’ll get you in the mood.

Food For Digital Thought: The Presumption of Humanity

Who are these people?

Since my background comes from a degree in Journalism, I’ve always liked to tell stories. Whether it be in my writing or my photography I like to entertain people, and I’ve been known to spew a few yarns here and there. I especially like to create a visual mood where I allow the viewer to take an active part in my photos.

That will certainly keep them around a little longer.

I’ve written about this in previous posts, and it’s all about the effects the Psychology of Gestalt has in taking our imagery what I refer to as “up a notch“. I want the viewer to stick around, and one way to do that is to imply the presence of people nearby, or maybe just barely out of the frame so they wonder who they are, what they look like, why they left, and when are they coming back?

In my online class with the BPSOP, and in my “Stretching Your Frame of Mind” workshop I conduct around the planet, we work on the elements of visual design and composition and how to incorporate these elements into our photography; storytelling is also an integral part in taking our pictures to a better place.

When creating these kinds of compositions, they’re like a still life, only it’s not always in the studio, or on a table in your house. Think about these types of images as icons that are a representational symbol of mankind. A time capsule for people of the future to ponder and possibly wonder what on Earth they were ever for!!!

Take a look at some examples of just what I mean:

Visit my website at www.joebaraban.com, and check out my workshop schedule. Come share some stories with me sometime.

JoeB

Food for Digital Thought: See, Think, Compose, Shoot

See, Think, Compose, shoot

If you really think about it, there are four steps one needs to go through to ‘make’ good pictures: See, Think, Compose, and Shoot; the last step is obviously the easiest…why? Because clicking the shutter is the easiest part of photography, and it doesn’t take a lot of artistry or talent to do it.

So, let’s take it step by step:

See: I’ve talked about this maybe a million times to both my online classes with the BPSOP and during the daily critiques in my “Stretching Your Frame of Mind” workshops I conduct all over the probably round planet.

When you’re walking around, whether it be street shooting or whatever else you like to shoot, don’t just look straight ahead; I witness people doing it all the time. When you do that you’re only seeing 25% of the possible photo ops. Each couple of steps look to the right, then the left, then look behind you as well. This will cover 100% of the playing field that will greatly increase your chances of going home with the ‘good stuff’. I call it 25X4=100.

Think: When you do see something interesting, try to pre-visualize the composition as far back as you can so that when you get to what you were thinking about, there won’t be any time wasted. Light and those ‘moments’ are so fleeting that you can miss either or both in the blink of an eye.

Make sure of your message, and be ‘crystal clear’ as to how you want the viewer to perceive and process the information you’ll be giving him/her in the form of a photograph. Remember that you won’t be around to explain what you were thinking so unless you’re going for an abstract, letting people decide for themselves what it is, make it a ‘quick read’.

Compose: There are three things that I tell my students to remember if nothing else they get from me when they are in my classes or workshops. The first one I call my “Fifteen Point Protection Plan”…click on the link.

The second is called my “Border Patrol”...see the link. The third is what I call the 4 corner checkoff.

If you are diligent about using these tools for stronger photos, I can guarantee you that your photography will go up to what I refer to as ‘up a notch’.

Shoot: Once you’ve clicked the shutter your not done yet. If you take just one photo, one POV, the odds are against you to go back home with a ‘wall worthy’ image. Unless you’re street shooting and that one moment in time allows you to get off one shot, shoot as many variations as you can, with slight adjustments for each one.

I rarely shoot just one idea, It’s a series of shots from different angles, different light, and shutter speed exposure combinations that segue to what I consider the last shot that I’m comfortable with.

So, my fellow photographers, there are a lot of things you need to be thinking about before you click the shutter. Remember what I said about clicking the shutter is the easiest part of picture-making…even a caveman can do it.

Visit my website at www.joebaraban.com, and check out my workshop schedule at the top of this blog. Come shoot with me sometime.

JoeB

Quick Photo Tip: Shadows as the Center of Interest

Shadows as part of the subject.

In the past year, I’ve written a couple of posts on the importance of using shadows to create drama in our imagery, and as a result, leave the viewer with a memorable experience.

In my online class with the BPSOP, and in my “Stretching Your Frame of mind” workshops I conduct around the planet, I’m always stressing the use of shadows in their photos. Shadows are our best friend, and the sooner my fellow photographers embrace them the sooner their photos will go what I always refer to as “up a notch”. I’ll occasionally be writing some additional posts about the use of different kinds of shadows, starting with this one.

This first post has to do with the type of shadow that’s the center of interest and it can often tell a story on its own. In the above photo, the shadows are from a group of photographers that were taking one of my workshops. We were down next to the Charles River at sunset and there were several young kids that were climbing up the wall of rocks. As I walked up to them, I immediately noticed their shadows on the ground and the fact that they led my eye to the kid climbing on the wall.

To me, the story is obvious as it clearly shows the shadows as the center of interest, and they also become directional lines leading the viewer to the kid.

Visit my website at www.joebaraban.com and check my workshop schedule at the top of this blog. Come shoots some shadows with me sometime.

JoeB

My Favorite Quotes: Henri Cartier-Bresson

Real, or artificially contrived?

Cartier-Bresson is one of my most favorite photographers. I think I’ve talked about and quoted him the most in my online classes with the BPSOP and in my “Stretching Your Frame of Mind” workshops I conduct all over the place. I guess one of the reasons is that he has been quoted so often and his quotes can be found in so many places.

For me, it’s because so much of what he said, and the way he composed his images hit home more than most other photographers I’ve studied throughout my career.

I’ve said on many occasions that I don’t often photograph what I see because I don’t often see what I want (being somewhat impatient by nature), so I photograph what I’d like to see. Which takes me to the reason for writing this post.

Cartier-Bresson once said, ” The greatest thing to fear is the artificially contrived”.

When I’m talking to a student, I encourage them to move something out of the frame if they don’t like it and can’t compose differently. Conversely, I also say to move something into the frame if it will add visual input and a layer of interest.

It’s important to remember that we, as photographers, are artists who have chosen the camera instead of a paintbrush.

The difference between a painter with a blank canvas on an easel and a photographer with a camera on a tripod is in the fact that as a painter you fill in the canvas until you finish with a ‘work of art’. Photography is the art of subtraction whereas you remove objects until you achieve a ‘work of art’.

Here’s where the quote comes in.  If you do decide to add a prop, or some element, or even a person, make sure you believe it. Make sure the viewer will believe it instead of thinking that you put it there yourself.

When I’m composing (painting), right before I click the shutter, I always ask myself do I believe it. Case in point, I recently had a student take a closeup of a hubcap and decided to put a flower into of the holes. Well, it just would never happen that way and looked completely contrived. A similar occurrence was a rose on a manhole cover…what is it with flowers?????

There’s another way a photo can and usually will appear contrived, is when photographers shoot through something. Again, I encourage that because “framing a subject with a frame” is one of the ways to create Visual Tension.

Having said that, if you intentionally put your subject in let’s say between two spokes on a bicycle, or two trees close to one another, or posts on a pier, etc., there’s a good chance that it’s going to look weird…especially if the POV is too difficult for the viewer to have seen for himself.

Have fun out there and always try to “color outside the lines”, but be sure that people believe it.

BTW, the photo at the top was shot just the way I saw it….maybe?

Visit my website at www.joebaraban, and check out my workshop schedule at the top of this blog. Come shoot with me sometime.

JoeB

Food For Digital Thought: The Camera is your Brush

The camera is my paintbrush

Every once in a while I like to introduce myself to those that just started reading my blog. Whether you accidentally discovered it online, read about it somewhere, or it was suggested reading from a friend, My name is Joe Baraban and I ‘ve been a professional photographer for fifty-three years. Before that, I studied painting and design and especially loved Art History.

For a large part of that time, I was an advertising, corporate, and editorial photographer based in Houston, Texas. Now I teach online classes with the BPSOP, and I conduct “Stretching Your Frame of Mind” workshops around out perfectly round planet.

I show my fellow photographers how to incorporate the elements of visual design into their imagery, as well as several elements of composition. I also show people how to use Light as well as color to create strong, memorable photographs.

For me, a camera on a tripod is just like a blank canvass on an easel. If you ever studied the old masters, you can easily see how they used the light in their paintings. For example Johannes Vermeer and Rembrandt.

They painted with Light back then, and today’s photographers are still artists, the camera is now our paintbrush. The poetic way Vermeer used light for his subjects using window light, is akin to the way we love a North Light Studio or at least a window that faces North.

One of the things I stress, and actually have as a lesson in my part II online class is the fact that shadows are your best friend. This also goes way back to the Old Masters.

There was a technique called Chiaroscuro, (from Italian chiaro, “light,” and scuro, “dark”), that was used in paintings to represent light and shadow as they defined three-dimensional objects.

In today’s digital world, I use this technique to illustrate one of the basic elements of Visual Design…Form. Form refers to the three-dimensional qualities of an object.

Getting back to Vermeer, in Amsterdam it was written that Vermeer would have met Rembrandt, whose forceful chiaroscuro effects complemented the intensity of his paintings.  To this day Rembrandt Lighting is very dramatic and one of the most iconic setups. This way to light is known for the triangular spot of light under the subject’s eye on the opposite of the face that the light is coming from.

As you can see, Light is probably the most important part of Photography, and to me, it should always be considered first. Before I bring my camera up to my eye, I look to see where the light is coming from, and how can I best use it to create my “works of art”.

Visit my website at www.joebaraban.com, and check out mt workshop schedule at the top of this blog. Come shoot with me sometime.

JoeB

Food For Digital Thought: When Preparation Meets Opportunity

When preparation meets opportunity

Although I was never a Boy Scout, I’ve always been a firm believer in being prepared. When I was actively ( until the last dinosaur disappeared) shooting advertising campaigns, corporate annual reports, brochures, or magazine assignments I made sure I had everything with me; I called it my Bag of Solutions.

Besides scouting every photo ahead of time, or at least most of the time and certainly whenever possible, I knew that during the actual shoot some extracurricular event, or in other words outside the normal routine, could possibly come up. When this opportunity crossed my path, I wanted to be prepared for it…on many levels.

This would usually be some small window when time was of the essence, whether it be a sudden change in the light, something new either entering or leaving the frame, or even needed to be added at the last minute…when I had the wrong piece of equipment on or not on and missed it by seconds, that really sucked!!!

When I’m talking to a student in my online classes with the BPSOP, I will often be asked what they should be taking when they go out to shoot for one of the lessons they’re assigned each of the four weeks. For them it’s easy, I tell then to put as much gear in the trunk of their car as they can. That way they will have a fighting chance to change something when the time is right.

When I conducting my “Stretching Your Frame of Mind” workshops around the planet, I’m asked the day before what lens should they be taking. Being prepared is problematic at that point because so much of the time we’re walking around.

And so my fellow photographers that are reading this blog, when in doubt take as much as you can. To win the argument you have with yourselves, I would, as my go-to lens, start out with a medium zoom that might address a lot of the things that will be coming your way. I keep a 17-40mm lens on most of the time, and I have quick access to equipment when the time is right.

Keep your equipment clean, make sure you have a fresh card in your camera (never delete images off your camera, it could corrupt the card), and take an extra one just in case. for those of you that have a second body, be sure to bring it. Putting a tripod in your trunk couldn’t hurt in case you wind up shooting during the Blue Hour.

As Eddie Adams once said, When you get lucky, be ready.

Visit my website as www.joebaraban.com, and check out my workshop schedule at the top of this blog. Come shoot with me sometime.

JoeB

My Favorite Quotes: When you get lucky, be ready

I was lucky and I was ready.

Over the years, I’ve managed to mentally acquire several quotes made by famous people in the arts that apply to my approach in teaching with the BPSOP, an online school I’ve been with several years and my “Stretching Your Frame of Mind” workshops I conduct around the planet.

These are quotes that really hit home for me, and as a result, have made me a better photographer for the past now closing in on fifty-four years, and a better teacher for the last thirty-three of those years. This is one of my favorite quotes and the first of many posts in this category that will cause you to “stop, listen, and learn”. The first quote I want to talk about was said by Eddie Adams, a Pulitzer Prize-winning photographer. He once said, “When you get lucky, be ready”.

For years, that has been one of my many Mantras, and it couldn’t be truer. Over those same years, I’ve had dozens of my fellow photographers ask me how I can capture some of my photos that are exposed perfectly, especially since I take most of my pictures in the camera with little or no post-processing. I tell them that when I’m just walking down the street with a camera over my shoulder I always take a few generic photos just to get the exposure down. I’ll take several different exposures, usually based on a fast shutter speed, and pick the right combination of shadows and highlights. This is when the action is happening to fast to bracket. Now I’m ready and waiting to get lucky.

The above photo was taken in the Guggenheim Museum in New York. I was coming back down after seeing the Kandinsky exhibit ( my very favorite abstract artist) when I stopped to look at this work of art. While I was wondering what the artist’s message was, this man walked up and started reading about the painting.

I always have my little Lumix DMC-LX-7 with me and since photos are frowned upon above the lobby I had it in my pocket with my finger on the trigger (Texas talk) just in case something was to happen, and for a moment it did.

Since this guy couldn’t figure out what the artist was saying, he read for a couple of seconds and was gone…but not before I got off one shot.

Although there are many interpretations of this quote that apply to my style of shooting, this one sticks out the most as it seems to happen all the time to me.

Visit my website at www.joebaraban.com, and check out my workshop schedule at the top of this post. Come get lucky with me sometime.

JoeB

Quick Photo Tip: Take a Step Back

One step back

Besides teaching an online class with the BPSOP, and conducting my “Stretching Your Frame of Mind” workshops I conduct around the planet, I also do a six-month mentoring program where I work one-on-one with photographers.

Recently, I have the same issue come a couple of times which has led me to write a post on it. It’s when I’m talking about one of their photos, and there’s something that has been cut off on one of the edges of the frame.

There are several reasons why this happens. Either they’re in too much of a hurry to get to the next shot, or lunch, or that glass of wine, etc., they’re so focused on the subject that they miss everything else going on.

At best, when there is a subject worth shooting, they’re so focused on placing the subject in the best light and the best positioning in the frame, that they forget about the rest of the environment. That is, the balance between the Negative or Positive Space that’s surrounding the subject/main center of interest, or the contrast between the light and dark areas, or whether the colors complement one another…and so on.

I see it so often that if I had a dollar for every time I talk about it, I would be writing this post next to a pool at some villa I’ve rented for the year…with a blue and frothy drink (with an umbrella in it) next to me.

There’s a very easy and quick solution (although I dare tell the world as to perhaps lose my villa), and that is to just take a step back and make an adjustment. Sometimes it’s just one step that will do the trick, but you have to be paying attention.

In the above photo, I had a 17mm lens on and it just took one step back to include all the wonderful black and white tiled floor that I had cut off in my first shot.

Visit my website at www.joebaraban.com, and check out my workshop schedule at the top of this blog. Come shoot with me sometime.

JoeB

Quick Photo Tip: Keep Your Equipment Out of Your Composition.

Can you see the photo stand?

I’ve seen it happen all the time, and once upon a time long, long ago I was even guilty of it; as in the above photo. It’s why I tell my online class with the BPSOP and in my “Stretching Your Frame of Mind” to check your frame for any of your equipment right before you click the shutter.

Sometimes we get so wrapped up in composing our photos that we forget to take out a camera bag, a photo stand, reflector, or even the tripod that might be lurking somewhere in plain sight. It may be hard to believe, but for those of you that have never been guilty of this I can assure you that it’s not as hard to do as one might think.

Going hand in hand with this is the fact that if you’re not paying attention to said equipment, it can disappear in less time it takes to blink an eye.  I’ve seen so many of my students walk away from their camera bags to look at something from a different point of view, start shooting and forget to go back to it. Strange as it may sound, I’ve had students discover their camera bag some distance away when looking at the LED display of photos they just took with a telephoto lens.

YIKES!!!

Want a good piece of advice? When you’re shooting on a tripod keep your bag on the ground right in the middle of the tripod. That way it keeps it out of your photo and keeps it from becoming the proud possession of someone who has just stolen it. Try a photo backpack or a vest. If you’re walking around handholding your camera, keep your gear between your legs; unless it’s in a bag you have over your shoulder.

I tell my fellow photographers to buy the best equipment they can since it’s a lifetime investment. If you buy the best you can in the beginning, you’ll only have to cry once. This same philosophy holds true with having to replace a piece of equipment that vanished while you weren’t watching…that is by not having to cry when you have to buy it again.

visit my website at www.joebaraban.com, and check out my workshop schedule at the top of this blog. Come shoot with me sometime.

JoeB

Food For Digital Thought: Breaking The Rhythm Of A Pattern

Breaking the rhythm of a pattern.

In my online class with the BPSOP, and in my “Stretching Your Frame of Mind” workshops I conduct around the planet, we work on using the Elements of Visual Design and composition to take our photos what I always refer to as “up a notch”. One of the basic elements of Visual Design is Pattern.

Patterns are repeating elements of line, shape, and color that appear in ordinary ways. The four basic shapes are triangles, squares, rectangles, and circles. When lines, shapes, and colors within a picture occur in an orderly way, they create patterns that often enhance the attractiveness of photographs.  Creating your pictures around repeating elements or patterns provides picture unity and structure. Pattern repetition creates a rhythm that the eyes enjoy following.

When used as a subordinate element, they can greatly enhance your composition. They should only be used to strengthen or add to your photographs. Patterns can provide unity to your composition. They create a sense of visual rhythm that the eye can easily follow. Life is filled with patterns and once you get an eye for spotting them you’ll be amazed by what you see and you’ll wonder why you didn’t incorporate them into your photography before.

Broken patterns break the rhythm and are often more compelling than unbroken patterns. Think of a close-up of hundreds of M&M’s on a table. They are all red except for one green one. I’m always looking for patterns as well as all the elements on my Artist Palette. Whenever possible I try to find ways to break the patterns by incorporating some object or person…Why?

Because it will give the viewer one more thing to discover and think about, which will keep him/her around longer. Isn’t that just what we want?

Visit my new website at: www.joebaraban.com and check out my workshop schedule at the top of this blog. Come shoot with me sometime.

JoeB

My Favorite Quotes: Bob Marley

Feeling the rain

I keep saying how much I love writing for this category. Some of the quotes I write are written by photographers, while others were written by other types of artists; from singers, songwriters, and musicians to novelists and poets.

One of the quotes that have stayed with me over the years was said by Bob Marley. Yes, it’s the same guy you’re thinking of…the Reggae King from Jamaica. Bob Marley died from Cancer about thirty years ago at a hospital in Miami. He was only thirty-six, but his music and lyrics were filled with thoughts and ideas that I’ve found to be in keeping with the way I not only approach my online class with the BPSOP but in my “Stretching Your Frame of Mind” workshops I conduct around the planet. One quote has always stuck with me. Bob said, “Some people feel the rain, while others just get wet”.

If you think about it, it can have a profound impact on the way we approach picture-taking. Ok, my students and fellow photographers might ask, what does that quote have to do with my ability to take pictures”?

Well, it’s all about the difference between taking and making pictures. It’s about the total immersion into your new found passion and craft. It’s about mastering light and understanding exposure. It’s about getting some dirt on your shirt or at least your knees. It’s about taking on the challenge of being a good photographer, not a good computer artist or digital technician. Let me explain further:

Determining the light and the direction it’s coming from before you raise your cameras up to their eye to me is the most important factor. Making your own decisions as to the correct exposure to use instead of letting the camera and lightroom do the work for you, scouting ahead of time and pre-visualizing your ideas in your mind then executing it, and spending more time than the “I came, I shot, I left”  frame of mind I find happening all the time, is about “Feeling the rain”.

The “I’ll fix it later” mentality that has come along with the digital era, has sucked the life and breath out of the right side of our brain; the creative side.  Why should I bracket when I can do it in lightroom? Why should I worry about the horizon line being straight when I can just use my straightening tool later in front of my computer? It just goes on and on, and this is all about “just getting wet”.

I’ve been following this train of thought since I first picked up a camera fifty-three years ago, in the days way before digital. It’s always been the love of my life, and I suppose that’s what has made it easier for me to caress it and “feel the rain”.

Visit my website at www.joebaraban.com and check out my workshop schedule at the top of this blog. Come shoot with me sometime.

JoeB

Personal Pearls Of Wisdom: Make It A Quick Read

A quick read.
A quick read.

I’ve been conducting workshops since the early eighties, and over the years I’ve been known to occasionally spout out something fairly intelligent. These quips have morphed into what I now affectionately refer to as my “Personal Pearls of Wisdom“. One of my favorites that I’m always using in my online class with the BPSOP, and in my “Stretching Your Frame of Mind” workshops I conduct around the planet is “make it a quick read”.

If there are those out there that shoot primarily for themselves, then you need not worry about whether or not the viewer gets what you’re trying to say-since no one will ever look at your photos. If you like shooting for the enjoyment of others, then you need to make sure that the message you’re trying to get across, is indeed getting across. In the first of my series on this Pearl of Wisdom, I want to address the importance of the use of negative space to help make your photos a quick read.

Everything that’s not positive space (areas that have mass) is considered negative space, but the area that I’m referring to is that area of negative space that borders the positive space, defines it and gives it meaning. What do I mean by that?  I mean that the area immediately surrounding the two people in the above photo is the negative space that defines the arms, legs, and bodies. Without that very important area, you wouldn’t be able to tell where one person ends and the other begins. Therefore, the negative space has defined the positive space (the two people} and has given them meaning-it has made the two people…two distinct people.

Remember that when you’re shooting, whether you’re going after negative space to define the positive space or simply trying to get your thought process across to the viewer, you won’t be around to explain yourself. Unless you’re going for an abstraction in which you want different people to get different messages, make it a quick read. Just imagine yourself in the mind of the viewer so you can see what he does.

Btw, the negative space is no accident. I have a walki-talki on the belt of the man on the right telling them what to do so I can make the two people a “quick read”. They’re about forty dollars for the pair, a handy addition to your bag of solutions.

Once again, the next time you’re out shooting, be sure to notice and use to your benefit the area that borders all the positive space in your composition.

Visit my website at www.joebaraban.com, and check out my workshop schedule at the top of this blog. Come shoot with me sometime.

JoeB

Food For Digital Thought: Color Outside The Lines

coloring outside the lines

I’ve been a grandpa for a long time, but I still think back to the days when all of my four grown kids were young; young enough to be coloring in a coloring book. Well, as it turned out, none of them ever had a coloring book…why, you ask? Because I never wanted them to worry about having to color inside the lines!!!

How stifling can that be? At least that’s my opinion, and I can now back it up by saying that my kids are very creative in all of their endeavors, and for the most part have always danced to a different drummer. A definite “chip off the old block”. So what did I do for their art time?

Instead of a coloring book, I took them to the Texas Art Supply where we bought plain white drawing paper, and the biggest box of Crayons they made at that time. I can’t remember how many were in the box, but there were a lot. The only thing I would tell them was to use all the colors and to try filling in the entire piece of paper.

In my online class with the BPSOP, and in my “Stretching Your Frame of Mind” I basically tell my fellow photographers to color outside the lines which is basically what the eighties expression “Think outside the box” was all about.

I can always tell when one of my students simply brings the camera up to his/her eyes and takes a picture. It really became obvious when all the photos that are submitted for review were all taken at the same height. When they go out with me, chances are that their clothes will come back with either dirt, grass, water, leaves, or an occasional critter that was inadvertently stuck to the front or even clinging to the back of their shirt…or all of the above.

🙂

Next time you go out, take a lens you seldom shoot with, some props, and remember that you’re an artist. The only difference is that your medium is a camera and not a paintbrush, colored pencil, or pastels.. That said, look at things from a point of view you never thought of before.

Let everyone else be predictable and always come back with the same old…same old. Never walk down the already beaten down path to follow and retrieve an idea. Take the road less traveled, and I can guarantee you that it will make you a stronger photographer with images that people will spend time looking at.

Think about coloring outside the lines!!!!!!!!

Visit my website at www.joebaraban.com, and check out my workshop schedule at the top of this blog. Come shoot with me sometime.

JoeB