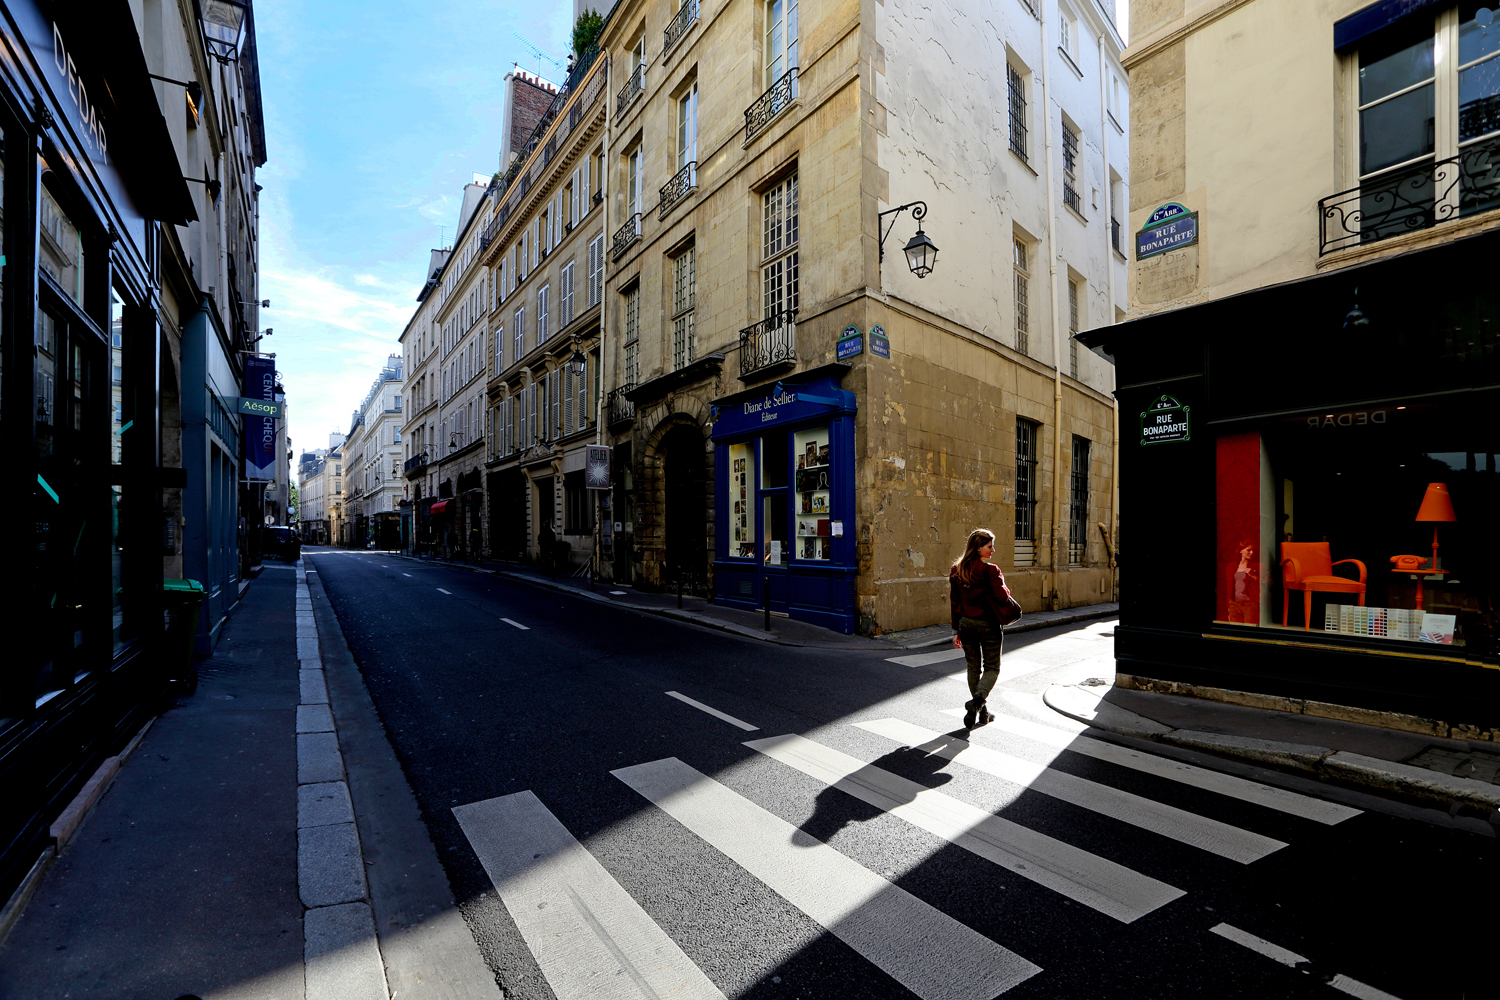
I’m always checking my four corners, even when I’m out street shooting.
I want to announce my next workshop “Autumn in France” to be next October 2nd. It will be in Bordeaux, Dordogne, and Toulouse. If you go to the top of my blog and click on the link, you can read the description. Join me for a great visual experience, seeing places that few people won’t ever be able to.
I’ve been shooting professionally for almost fifty-five years, and to this day I still go through my three checklist exercises to make sure what I want in my composition is there, and what I don’t want in my composition isn’t. These three practices are what I teach and preach to all my fellow photographers that either take my online classes with the BPSOP or attend one of my “Stretching Your Frame of Mind” workshops I conduct around the planet.
I have written posts on two of them that hopefully, you might have read: My Fifteen Point Protection Plan, and my Border Patrol. My third exercise is called my Four Corner Checkoff, and it’s very simple to use, and worth a couple of seconds it takes to complete….that is if you remember.
Right before I pull the trigger ( that’s Texas talk for clicking the shutter), I glance at all the four corners to make sure all is as expected. Among other things, I’ll look to see if there’s any vignetting from a poorly attached lens shade, or the wrong lens shade on the right lens. Until I bought an ultra-thin Polarizing filter, I would occasionally get dark areas in the corners from combining a lens shade and a filter.
Then, there’s just the common variety of mistakes like including tree branches, parts of un-wanted buildings, fingers and hands being cut off, etc.
I realize that all three of these exercises are tantamount to redundancy, but as far as I’m concerned, being redundant is a good thing; it’s saved me on many an occasion.
Visit my website at www.joebaraban.com, and follow me on instagram. check out my workshop schedule at the top of this blog. Come shoot with me sometime.
I want to announce my next workshop “Autumn in France” to be next October 2nd. It will be in Bordeaux, Dordogne, and Toulouse. If you go to the top of my blog and click on the link, you can read the description. Join me for a great visual experience, seeing places that few people won’t ever be able to.
Depending on how you look at it, shooting in winter can be fun, or not so much fun, as is the case when I shot for a drilling company’s annual report to their stockholders.
I was sent to Wyoming in February to shot on and around one of their deep drilling wells. I had often shot in cold weather, but I was not mentally prepared to shoot when the wind chill made it minus 20 degrees Fahrenheit. Needless to say that it was a real eye opener.
In the old days, if I were going to be shooting outdoors for an extended amount of time, I would take my cameras and have the lubricants taken out so they wouldn’t freeze up on me. In the digital era, here’s a couple of tips that will save you a lot of grief if your camera gets damaged because of the extreme cold.
I’ve often given this advice to students of mine that take my online class with the BPSOP and live in cold climates…Russia for an example. The same goes for people that take my “Stretching Your Frame of Mind” workshops that go back to their cold countries; again, Russia and Sweden come to mind.
The big problem is the batteries. Cold weather will drain them pretty quick, so always keep a fully charged extra one where it’s warm.The best thing you can do is keep your camera next to your body that’s hopefully being protected by extreme weather clothing. I wear special long underwear that’s made especially for below-zero temperatures. I have one camera set up with the lens I’m going to use and I keep it around my neck between my chest and the down vest and coat. I wear gloves that I can remove the tips around my fingers when it’s time to click the shutter. They really come in handy when you’re carrying an aluminum tripod around…btw, it would be a real good idea not to lick one of the tripod’s legs to see what happens!!!
I try to pre-visualize my composition ahead of time to minimize the camera’s exposure to the elements. When I got it framed in my mind I bring out my camera, attach it on the tripod (using my Sachtler quick release) and shoot. I then take it off and put it back next to my chest.
Keep your camera dry as condensation is not going to be your friend. Moisture that gets inside your camera can cause extensive damage. When your done shooting, and if at all possible, warm your camera up slowly. Those silica gel packets that you usually throw away can really come in handy if you use a large plastic bag to keep the camera in.
Try not to breath on our lens. It could create lens-frost that could permanently damage your lens. Keeping a filter on it will give it protection, and keep a lens cap on it when not in use.
The best tip of all is to have a cup of coffee with some Hennessy XO generously mixed in with it waiting for you when you get back home.
🙂
Visit my website at: www.joebaraban.com and follow me on Instagram. Check out any workshops at the top of this blog, and come shooting with me sometime.
Since I’m from the old School of Photography (you know the one, the school where you learned to do things “in the camera”, and as a result became a good photographer), I do my own ‘bracketing’.
Now, in the digital age of Photography, the ‘powers that be’ decided to help out and made it so that their cameras could do the work for you. The problem with that is that it’s not always in your best interest. Notwithstanding the important fact that you won’t have a clue as to what your camera is doing, and if it’s doing the right thing at the right time.
But I digress!!!
First, let me go back to the very beginning, as in the definition of ‘bracketing’. I know a lot of you will find it hard to believe, but there’s a lot of photographers out there that have no idea what I mean by ‘bracketing’. I know this because I conduct my “Stretching Your Frame of Mind” workshops around the planet, and also with a top online school called the BPSOP, so I periodically get this question.
Without further qualifications, Wikipedia’s definition of ‘bracketing’ usually refers to exposure bracketing: the photographer chooses to take one picture at a given exposure, one or more brighter, and one or more darker in order to select the most satisfactory image. Technically, this can be accomplished by changing either the shutter speed or the aperture. That is, if you’re shooting a subject or a landscape where the Depth of Field isn’t critical.
If the Depth of Field is important, you just want to bracket the shutter speed, and if the shutter speed is important, then you bracket the aperture. The point is to give yourself exposure options.
Ok, here’s an example:
Knowing exactly (to the degree) where the sun was going to rise by using the combination of my Sunpath readings and my Morin 2000 Hand Bearing Compass, I set up beforehand to take a photo of a boy looking for something using a Coleman lantern. It was a few minutes after sunset when I began shooting, the light coming from the direction where the sun set was very soft and delicate. My Minolta One Degree Spot Meter (you can find them on e-Bay) told me that the exposure on the boy’s face lit by the lantern was 1/30th of a second at F11. If I had taken that one exposure, the odds of my picture looking good was very small. Vegas wouldn’t have taken that bet. So to make sure I had it “in the can”, I ‘bracketed’ the exposure the meter gave me. I took one photo at 1/30th at F11, and then I shot one at:
1/30th at F8
1/30th at F5.6
1/30th at F4
130th at F16
These were the settings to overexpose (brighten) the picture to make sure it didn’t come out too dark. If you notice, there is only one bracket that’s underexposed from the reading of F8; that would be F16. The reason is that because the light was so low and delicate, one stop under was more than enough to cover me.
Ok, another scenario:
If I had been there later in the afternoon when the sun was higher in the sky, and the light was much harsher I didn’t need to worry about my photo coming out too dark. I would have worried about it being too bright and washed out.
Then, my meter might have said something like 1/250th of a second at F8. In that scenario, I would want to bracket more on the underexposed side of F8, so my brackets would have been:
1/250th at F11
1/250th at F16
1/250th at F22
And one stop underexposed at 1/250th at F5.5, because more than likely I wouldn’t have to worry about my photo being too dark, only too bright.
The reason I do this manually, and with a hand held meter is because the meters in digital cameras are not accurate and not as precise.
A lot of my students set the meter in their camera to bracket automatically, but when you do that, it won’t consider the softness of the light. It’s going to bracket the same way all the time. Not the best way to take photos.
Over the years of bracketing, I can feel, sense, see, and read the light and know instinctively what to do. It’s about being a well-rounded photographer that understands the light, because in all my classes, I always tell people that “LIGHT IS EVERYTHING”, and when you find the Light you’ll find the shot.
BY THE WAY, The last thing you want to do is to change the bracketing sequence all the time. Especially when you have only seconds left of that “drop dead gorgeous light”.
That’s just not a good idea. Do you really want your camera to be in charge of how your photos turn out? I recently had a student tell me that she could only bracket three exposures because that’s what her camera would allow.
“YIKES”, I said to her. “Are you hearing yourself”, I continued. “What the camera allows? Do you have a place at the dinner table for your camera? I hope it’s at the head”.
If you ever want your photography to jump “up a notch”, I would strongly suggest that you take control.
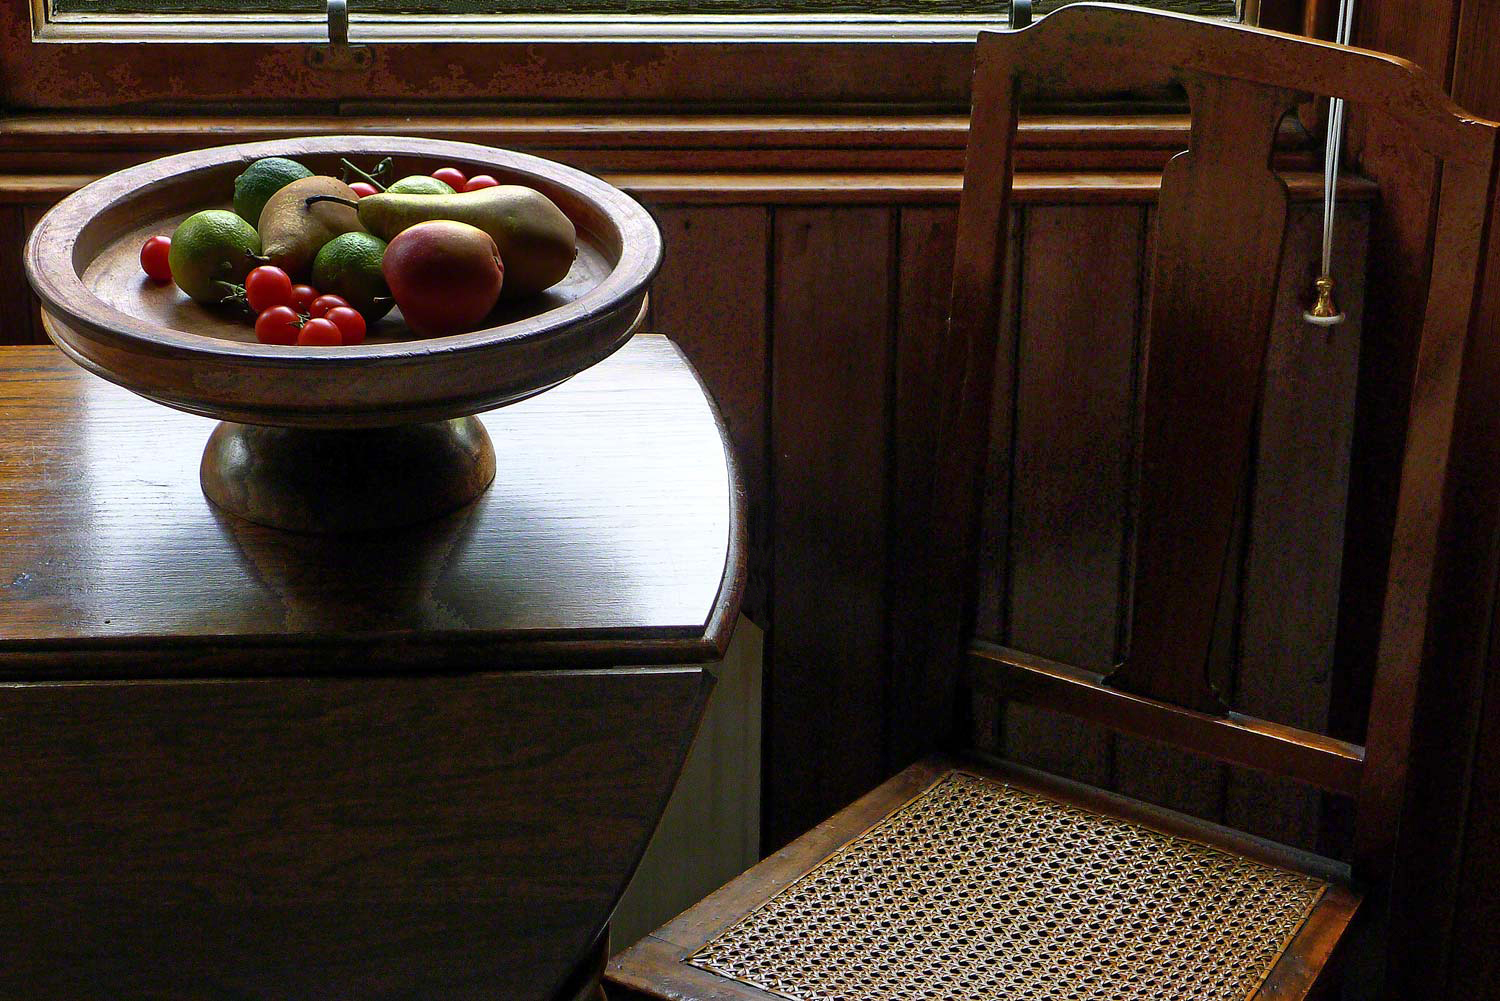
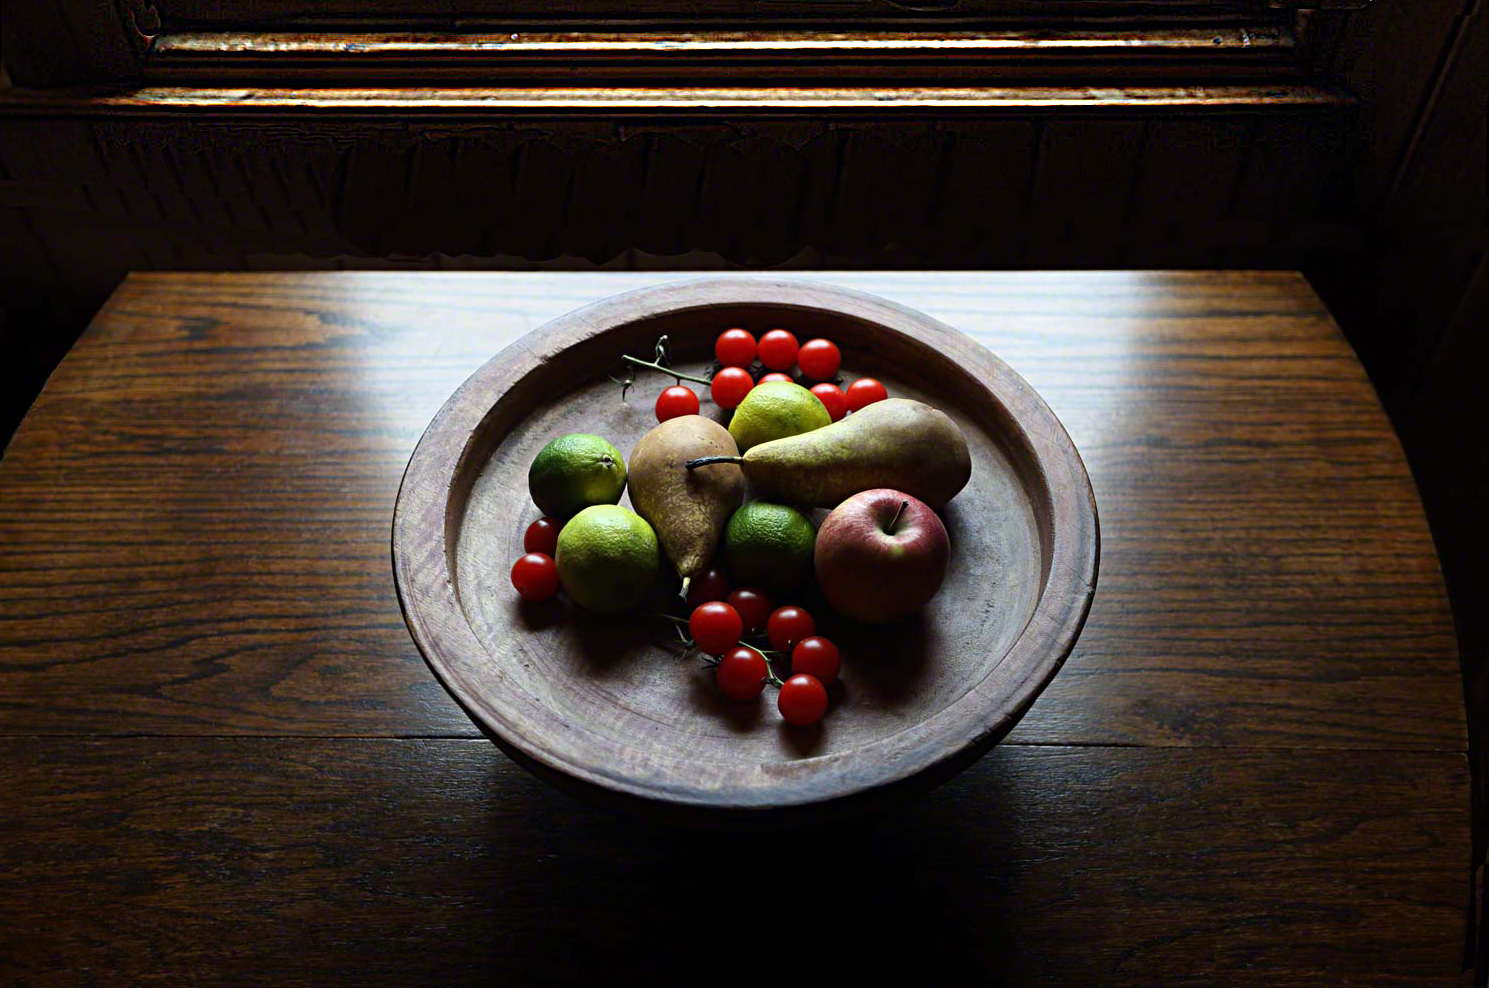
I teach three four-week classes with the BPSOP, and I also conduct my “Stretching Your Frame of Mind” workshops around the planet. Mostly in my online classes, I’m always telling my fellow photographers that just because it’s cold, gray, and sometimes raining when you want to shoot outdoors, that doesn’t mean you have to put your camera away until the sun comes out.
Think of locations that are indoors, for example, museums, churches, antique barns nearby, the lobbies of interesting buildings, historical homes, old train stations, etc. If you live in or just outside a big city, Google up the city or state’s Film Commission and or Tourist Bureau, and you’ll get a list of places that might just be the answer to your photographic woes.
Btw, Museums usually won’t let you take in tripods, so to get low light photos take a friend (another photographer) ) and use his/her shoulder to rest your camera on…works like a charm!!!
What about a farm nearby that you could get permission to shoot at. An old barn just might be a great place to spend some time in while you’re waiting for better weather. In fact, it would be a good place no matter what the light might be.
Sitting up a still life next to a window is always a good idea to pass the time; especially if it happens to be in an antique store or a house in a historical part of town. In the photo above, it was cold, gray, rainy, and all-around dreary outside of an old house in Scotland I happened to be in. I saw this bowl, then I happen to see a bunch of fruit in the corner of the kitchen. I put the two together by a window and the two hours I spent playing around with different compositions was a lot of fun…and took my mind away from the gloom outside the window; the glass of wine didn’t hurt!!!
I teach my fellow photographers how to use the Elements of Visual Design to create stronger compositions, as well as images that have strong visual interest. Unfortunately, it’s more than every once in a while that someone in my online class with the BPSOP, or someone that’s with me in one of my “Stretching Your Frame of Mind” workshops I conduct around the planet tells me that a friend told them not to do something.
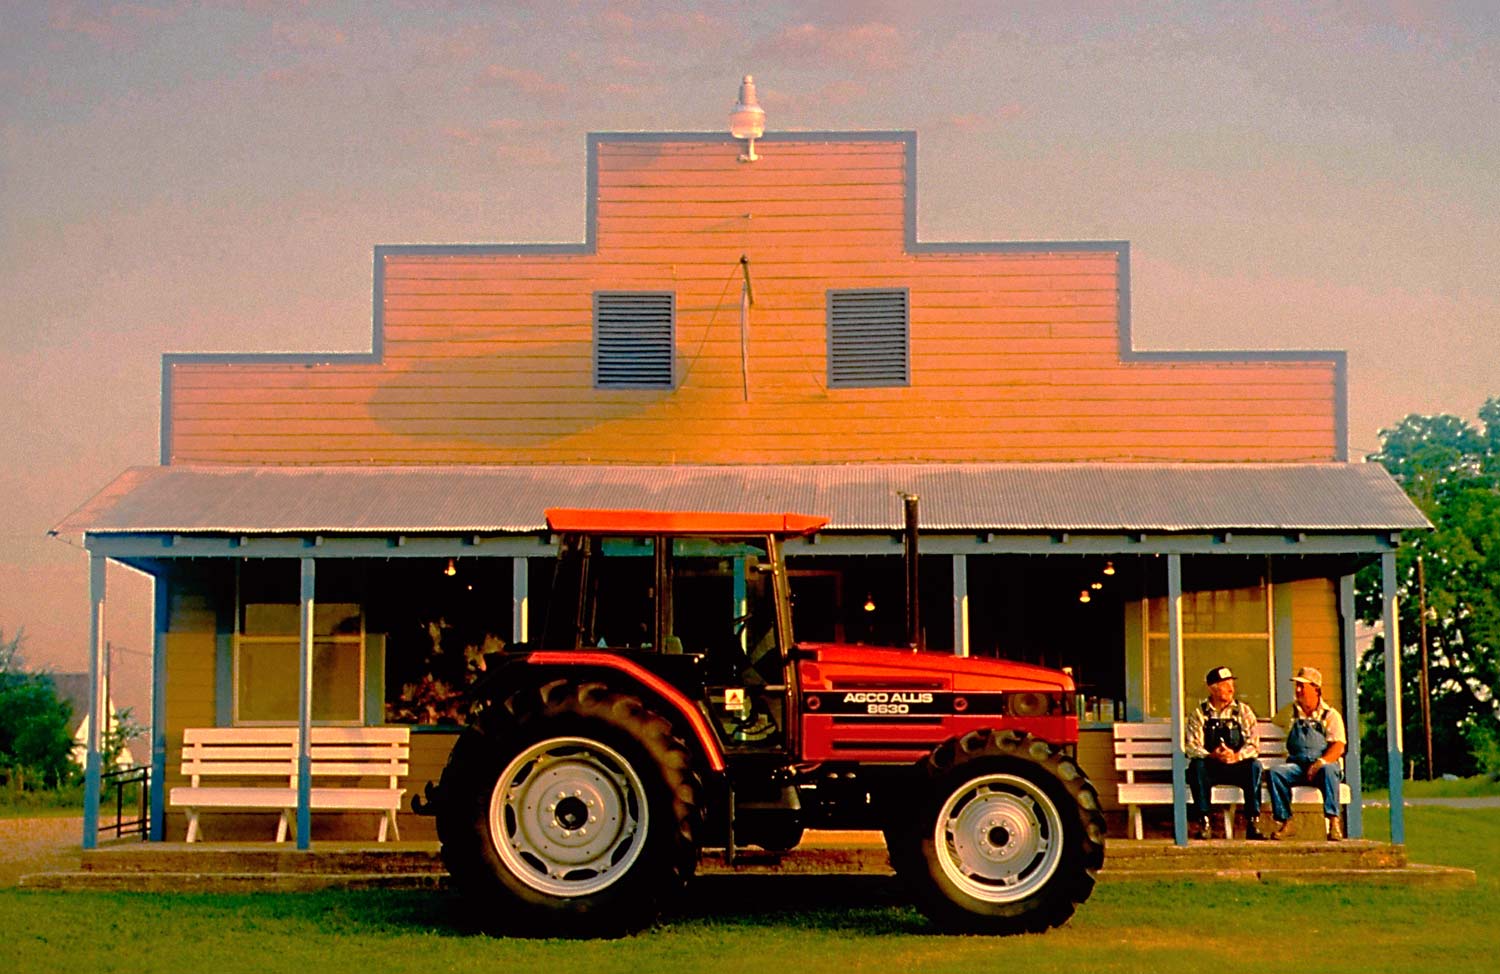
Just the other day, one of my students said that a friend of hers, that’s a “professional” photographer, told her to never shoot buildings from the front. WHAT?????
Moreover, I’ve also been told that friends (more professionals) have also said to never shoot anything that’s red. Someone, please shake me because I must be in some kind of twilight zone episode. How about this one from a friend to another friend…”Why worry about it now, you can always fix it later”. “Always have people walking into the frame so you can give them room to walk into”, is another ridiculous statement; by yet another professional photographer.
Let me digress for a moment by saying…by definition a professional photographer is someone that at one time in their life got paid for taking a photo. All it takes is one photo to qualify for this ubiquitous title so…I’m just saying!!!
My standard answer is…’Well, I guess if they told you to follow them while they jumped off that bridge, you would? If you do, leave your camera on the ground before you take a dive so someone might get some use out of it “.
I find it interesting that a lot of photographers, especially those that haven’t been at it long don’t have faith in their abilities and creative ways to make good photos. It’s hard to be objective when looking at our work, and so we sometimes rely on what others tell us, and we take it in good faith to be the way it is. After all, they want to sound as if they know what they’re talking about when in reality you probably know more than they do…at least as much!!!
Follow what you feel is right, and stop listening to your friends that just might have an agenda other than helping out. Take workshops from people whose work you admire. More than likely they’ll lead you down a better path. Read books like Freeman Patterson’s, The Art of Seeing. It’s one of my all-time favorites.
BTW, I guess I really screwed up when I shot this building straight on and put s red tractor in front!!!
How many of my fellow photographers that have taken my online class with the BPSOP, or been with me in one of my “Stretching Your Frame of Mind” workshops I conduct around the planet can afford to go photograph wild animals? Probably not that many, and fewer still can get away for that long.
For the ones that can, and I’ve know several friends that have gone to Africa on a Photo Safari, it’s not guaranteed that you’ll even come back with pictures that were worth the cost. You’re in a special truck with lots of other people shooting, and the time of day is not usually the most advantageous for quality light or seeing animals moving around in their natural habitat. I’ve been told that when they went out a lot of the animals were sleeping in the shade of a very hot sun.
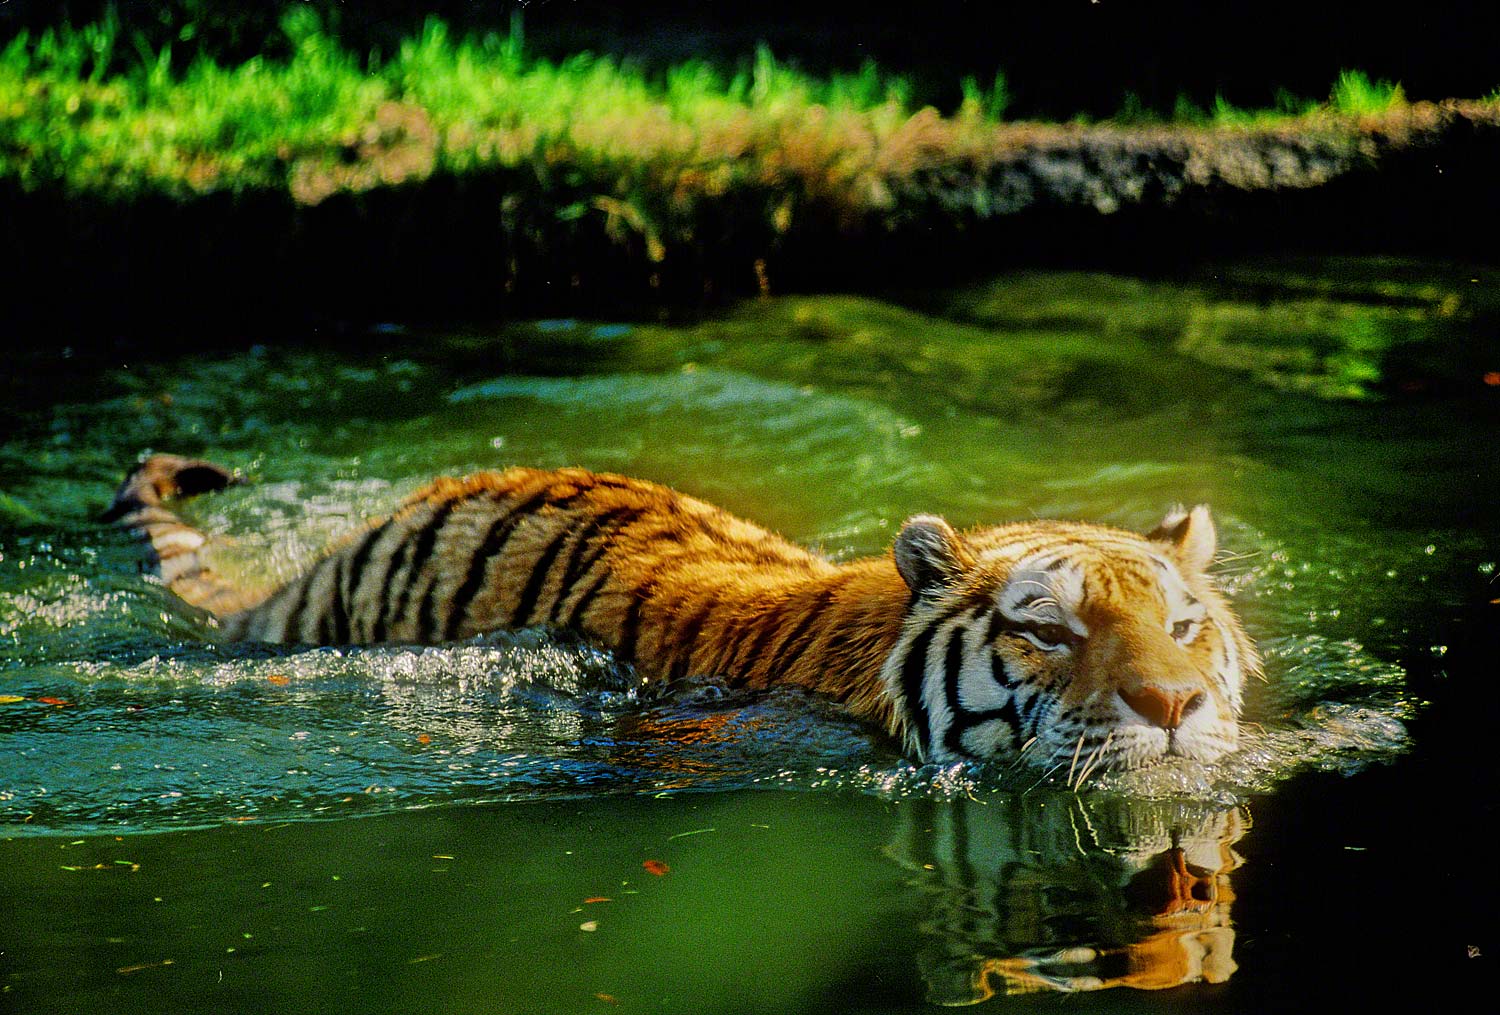
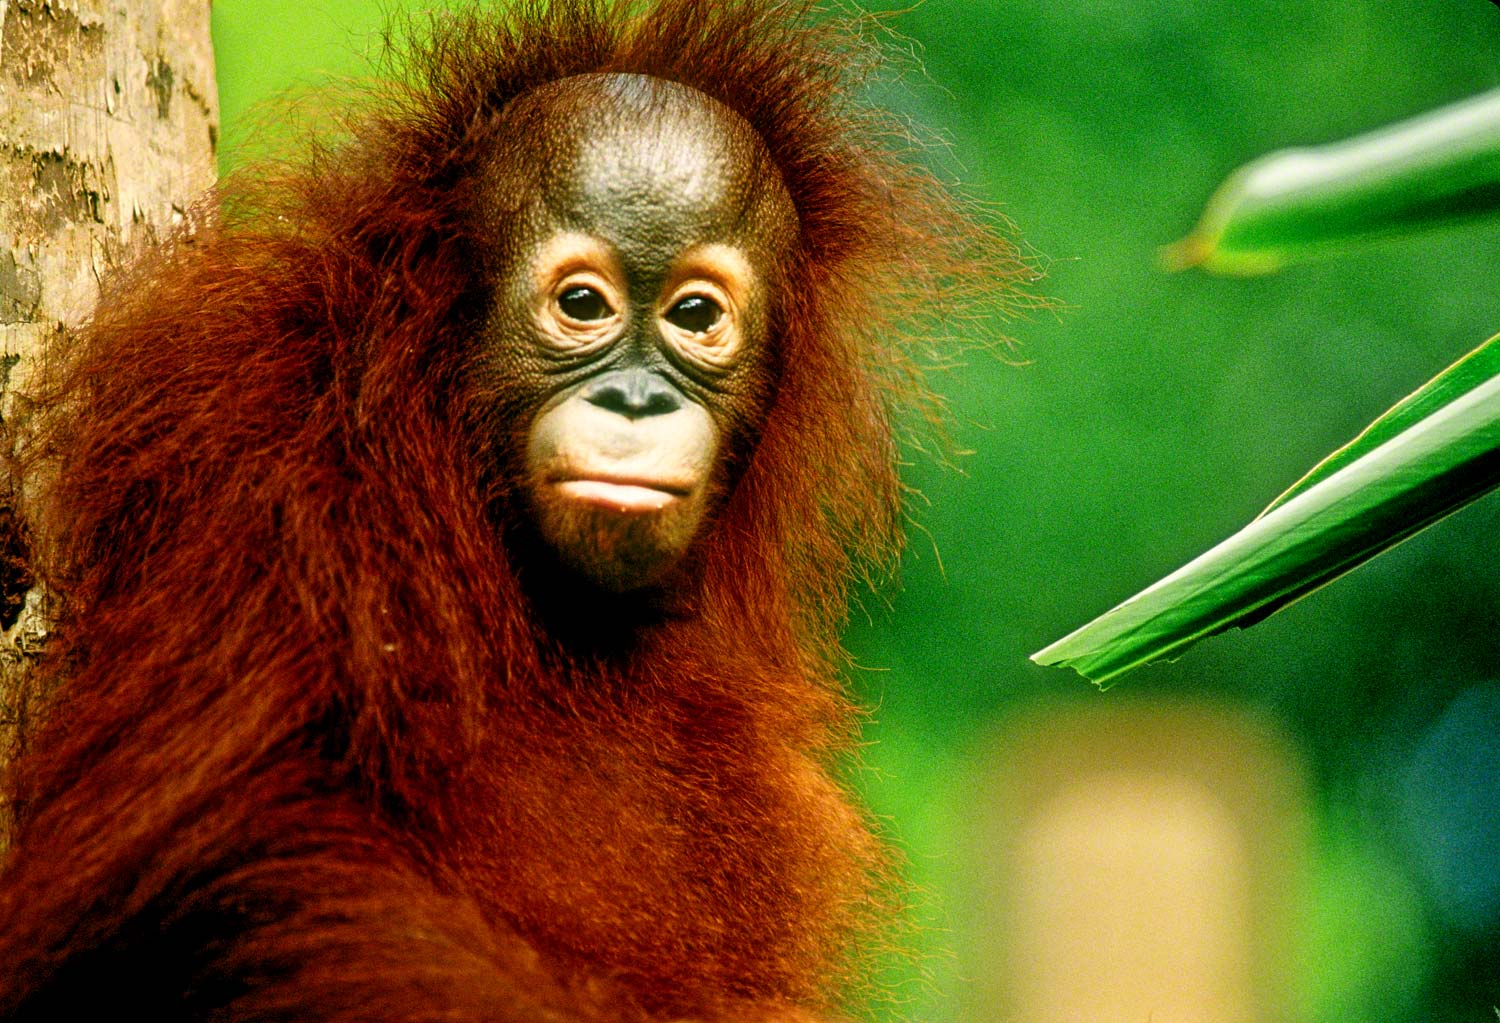
Well, here’s a good idea that will dazzle your friends and at the same time give you an idea of what it would be like to photograph exotic animals… go to your closest zoo!!!
Yes, I know it sounds dorky, dumb, and a host of similar adjectives too numerous to count, but I can tell you from experience that it can be a lot of fun. One gray day I was kind of bored, so I picked up my camera, my tripod, and my longest lens and headed to the Houston Zoo. I had no idea if it was going to work out or what I would come back with, but before long I was having a great time; I was in Africa. The key for me was to make sure the animals looked like they could have been free and wandering all around me, which meant to not show much of the environment…as in cages or walls with moats around them.
No cages or walls.
With my 300mm lens always set on F/2.8, I could knock everything out of focus except for my subject. I wandered around the zoo several times hunting animals. Since I had gone on a weekday morning, I felt as though I was wandering around in the jungle all alone, and it was great. It felt as if the animals sense this and acted as if they were also alone in the jungle. It was a great experience, and one I plan on repeating; now that I know what to expect.
You should give it a try sometime. Your friends just might start calling you Bwana!!
Shadows that are the center of interest and provide visual direction.
In the past year, I’ve written a couple of posts on the importance of using shadows to create drama in our imagery, and as a result, leave the viewer with a memorable experience.
In my online class with the BPSOP, and in my “Stretching Your Frame of mind” workshops I conduct around the planet, I’m always stressing the use of shadows in their photos. Shadows are our best friend, and the sooner my fellow photographers embrace them the sooner their photos will go what I always refer to as “up a notch”. I’ll occasionally be writing some additional posts about the use of different kinds of shadows, starting with this one.
This first post has to do with the type of shadow that’s the center of interest and it can often tell a story on its own. In the above photo, the shadows are from a group of photographers that were taking my “Springtime in Prague” workshop. We were down next to the Charles River at sunset and there were several young kids that were climbing up the wall of rocks. As I walked up to them, I immediately noticed their shadows on the ground and the fact that they led my eye to the kid climbing on the wall.
To me, the story is obvious as it clearly shows the shadows as the center of interest, and leads the viewer to the person.
Visit my website at: www.joebaraban.com and follow me on Instagram: www. Instagram/barabanjoe.com check my workshop schedule at the top of this blog. Come shoot some shadows with me sometime.
I teach people how to use the elements of visual design and composition to create stronger and more memorable images. Images that people won’t forget in the moments just after looking at your photo. Images that are compelling and will leave an impression days, weeks, and yes, even months afterward.
In my online class with the BPSOP, and in my “Stretching Your Frame of Mind” workshops I conduct around the planet, I stress the fact that “light is everything”, and should be considered first when composing your photo. One of my favorite pearls of wisdom is, “You find the light and you’ll find the shot”.
Now I’m not referring to the shooters that like to prowl the city streets looking to capture an emotional photo that has some kind of consequence, or as followers of Henri Cartier-Bresson work would say, “The Decisive Moment”. These are the type of photos that rely more on a quick finger hitting the shutter release and timing than of light. Instead, I’m talking about the type of photographer that likes to create beautiful photographs in any other genre that are timeless representations of reality. To me, these are the type of photos that require great light. Landscapes, Architecture, environmental portraits, to name a few.
OK, here’s where the Quick Photo Tip comes in. As I tell my students and fellow photographers, there is one genre that doesn’t need quality light to be memorable and that’s Humor. Humor is the one concept that can replace a day of flat, gray, and uninspiring light. Whether it be a funny situation, an awkward expression on a loved one’s face, or perhaps something as simple as a misspelled word on a sign, if it’s funny that’s all you might need.!!!
When you’re watching a car commercial on TV or looking at an ad in a magazine, have you ever noticed that the street looks wet? If not, next time one comes up look at the street. Why do they do this you ask?
In my online class with the BPSOP, and in my “Stretching Your Frame of Mind” workshop I conduct around the planet, I teach my students how to take their imagery what I refer to as “up a notch”. I do this by introducing the elements of visual design to them. One of the things we work on is Visual Tension, and one of the ways to create it is by the use of reflections. We also work on showing the subject and its reflection, but right now I want to talk about plain old reflections.
Besides the obvious reflection, that being in a mirror, reflections don’t necessarily have to show anything that’s recognizable. It can just be light and color reflecting off a surface. That alone is usually enough to create a pleasing and memorable photo. How do you achieve this? By doing a Wet down.
In the days when I shot the full line car brochures for several companies and national car campaigns, we use to do a Wet down before I shot. This required a water truck to lay down enough water to cover a street. There were two reasons for doing this: The first was to hide a particularly bad-looking street. Wetting the street down would hide all the problems by darkening the surface. The second reason was to create a surface that would reflect the environment in it. Being wet, it also took on a shine that made it easy to reflect all the light and color.
I realize that you probably can’t afford the money for a water truck, but I’ve also accomplished a Wet down by using a hose. I’ve even taken a bucket with me when I was shooting near a body of water.
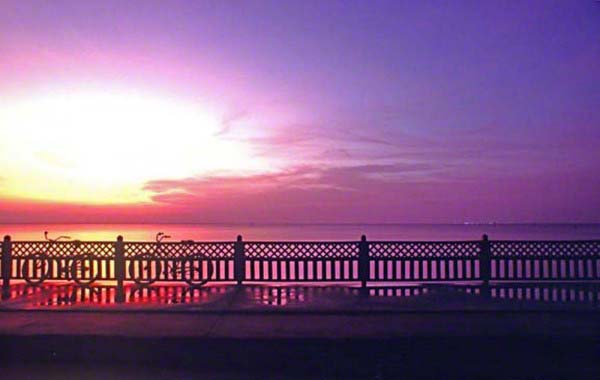
There are other things to consider wetting down. A pier for example, or the sidewalk in your front yard. Anything that can create a reflection will look a whole lot better if it were wet. Sometimes a partial Wet down looks good, as in the photo below of the boy sitting on a pier and the silhouette of the two bikes against a railing. I had taken along a bucket which proved to be a good idea. As Eddie Adams once said, “When you get lucky, be ready”.
Give it a try sometime and you’ll see how easy it is to create stronger photos. All you have to do is to “Stretch Your Frame of Mind”!!!!
A topic of conversation that always comes up in my online classes with the BPSOP, and in my “Stretching Your Frame of Mind” Workshops I conduct around the planet, to always shoot both horizontally and vertically. For one thing, it will give you choices.
The majority of the images that I look at are horizontal, mainly because that’s the easiest way to shoot; also because the camera is designed to shoot that way.
How easy it is to merely bring the camera up to your eye, no matter what the subject matter is. I can tell you that way of thinking is not going to be in your best interest.
Horizontals are calming, as they mimic the horizon. They should be thought of when your subject is wider than it is tall, and it will move the viewer across the frame.
Using lines, both leading and directional is a good way to do this, and usually works best when you have a lot of space to do it in…as in a horizontal….it’s the way we perceive and process information.
Line is the most important of all the elements of visual design, and nothing could exist without it. Planes, trains, and autos…you and I included all have an ‘outline’. When composing, consider the lines. Your longest lines might be the best way to determine whether you should shoot one way or another.Moving the viewer around is a good way to keep him involved in your composition, and when he is he will stick around longer
Verticals have more energy because it will take the viewer longer to look from the bottom of your frame to the top. That time is energy, and energy can be equated to tension. Tension gives your photos strength and intensity.
Verticals are best considered when the subject is taller than it is wide. A vertical subject is going to have even more energy when composed in a vertical format. It will keep the viewer from sensing any extended peripheral vision that would be in a horizontal.
The best advice I can give you is to always try to shoot both ways, and compare them back home on your computer where you have time to really think.
Visit my website at www. joebaraban.com and check out any upcoming workshops at the top of this blog. Come shoot with me sometime.
A difference between two opposite things: a division into two opposite groups. A division into two mutually exclusive groups or entities.The dichotomy between theory and practice.The process or practice of making such a division of the population into two opposed classes.
Ok, now that all of you know what a dichotomy is, I can get to the reason why it can be an important part of our thought process when looking for subject matter to photograph.
I’m always telling my online students with the BPSOP and in my “Stretching Your Frame of Mind” workshops I conduct around the planet, to look for that which is un-predictable. Something that conveys more than one idea. It’s all about keeping the viewer interested in what we have to say.
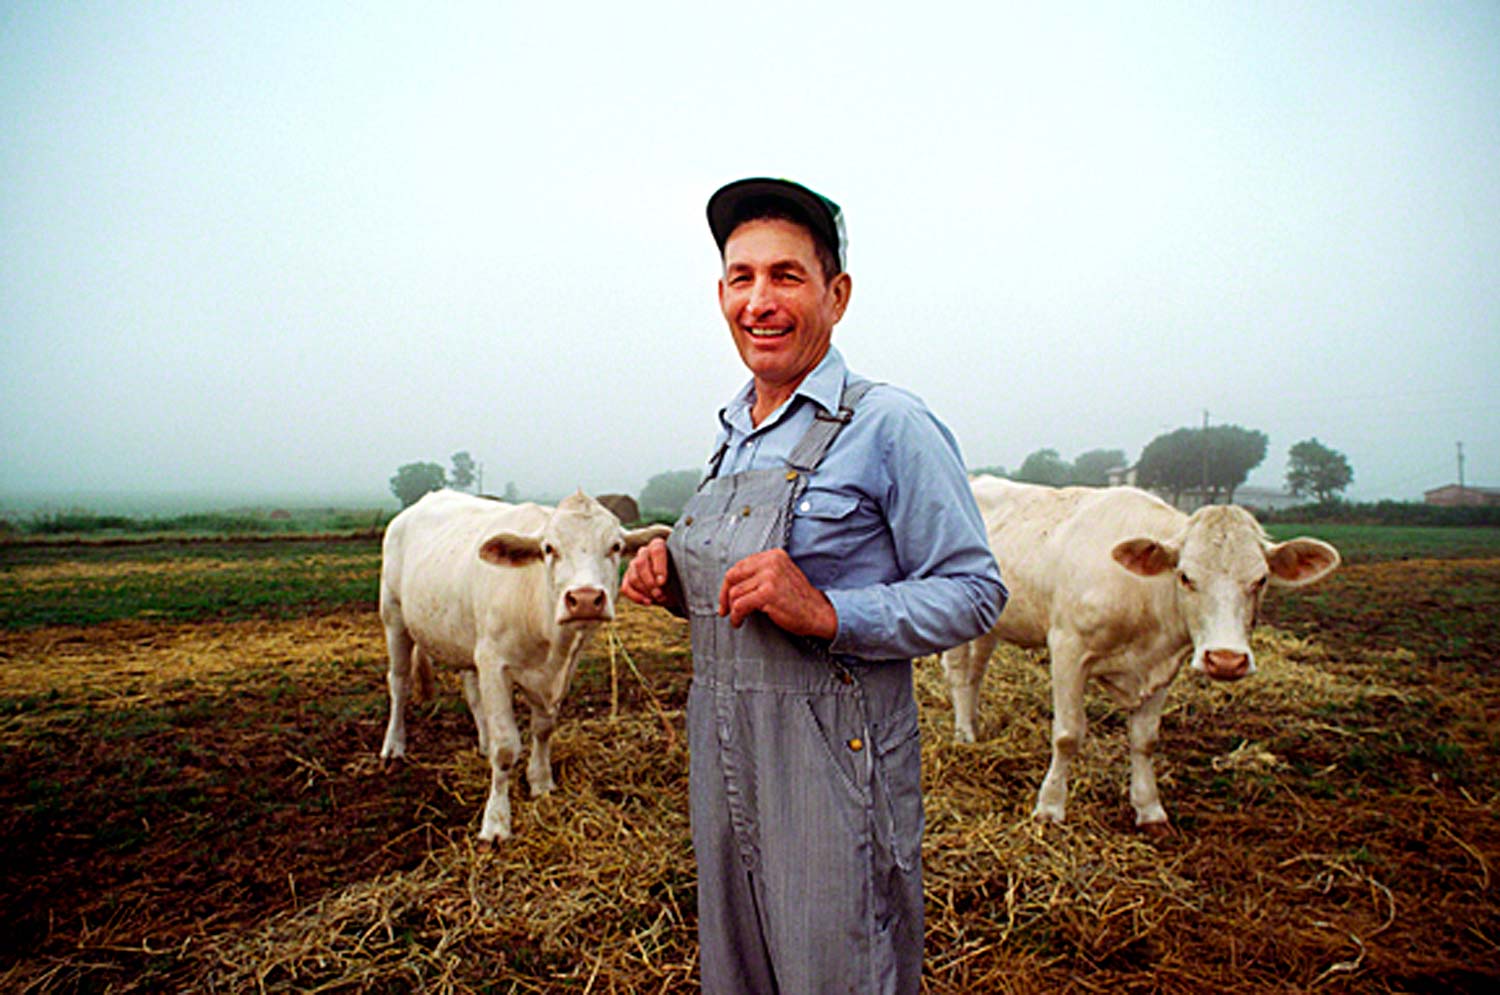
That could be in using Line to move the viewer around the frame, or entertaining him with interesting Patterns, Shapes, and Textures at a location you found; to name just a few. As in the photo above, it could be in an interesting dichotomy that shows an American Flag, a sign that says Tamales for sale, and with a Hispanic woman posing for me in the back of her trailer.
The photo tells a story, and it’s one that the viewer will write himself. He has all the ingredients: An Hispanic woman, an American Flag, a trailer, and a sign that says Tamales for sale.
So when you’re out looking for ideas to shoot, keep a dichotomy in mind. Look for interesting parts of a puzzle that mean something totally different when photographed by themselves, but when added together convey a completely new and different meaning; that often works well together.
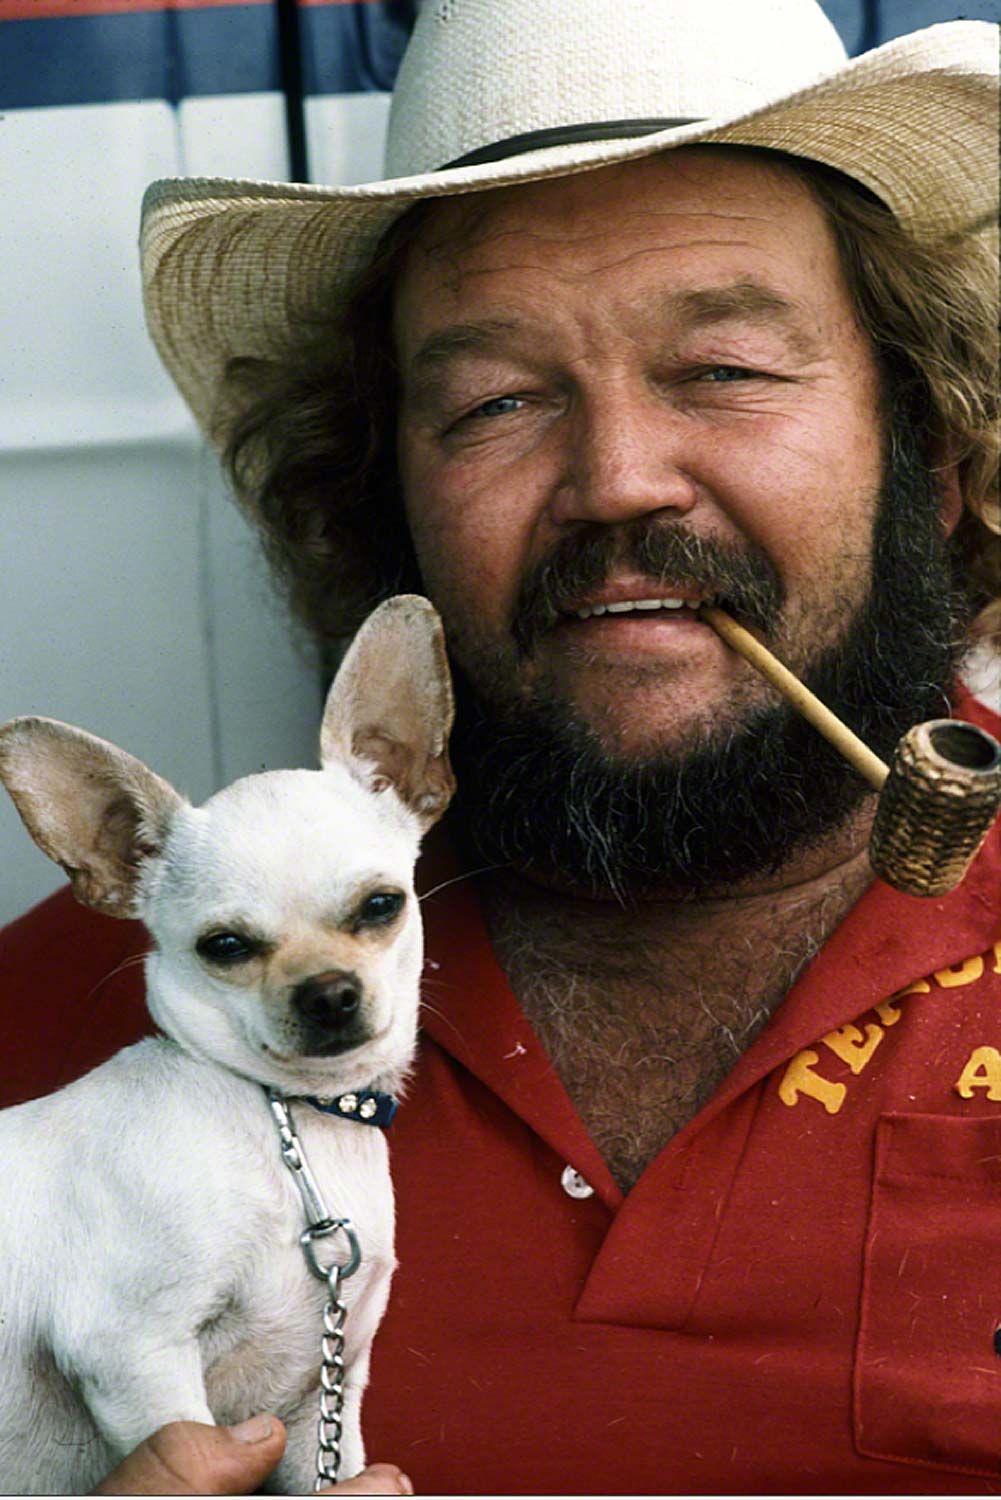
Man and his dog.
Here’s another example of a dichotomy at work. This huge bearded tough-looking man with a very small pet.
Visit my website at: www.joebaraban.com, and check out my workshop schedule at the top of this blog.
For anyone new to this blog, I teach online classes with the BPSOP, and I also conduct my “Stretching Your Frame of Mind” classes everywhere on the semi-round Earth.
In those classes and workshops, I show photographers how to incorporate the elements of Visual Design into their imagery; one of them is Balance.
An image is balanced when subject areas command a viewer’s attention equally. Balance is about visual weight. A balanced photo is what we as photographers try to achieve because it makes for visually inviting images. A balanced photo gives the viewer a feeling of stability. We all are more comfortable when the environment around us is feels firm and steady. Balance helps to guide the viewer’s image around the image without resting too heavily on any one particular part, creating a sense of satisfaction.
Take care to think about the distance of each object from the center of the frame — even objects that do not normally draw attention will appear obvious if they are near the edge of your photo. Placing the subject (S) close to the edge of the frame is one of the ways to create visual tension.
When I’m composing, I’m looking for harmony between the various shapes, colors, and one of the most visually powerful compositions is the balance between the Positive and Negative Space; important in creating either symmetrical or asymmetrical balance. There is positive space, that area that has mass (visual weight), and the negative space that is everything else. Paying close attention and you’ll provide a way to pull the viewer throughout the frame, creating a feeling of balance. The balance occurs when the viewer’s ‘eye’ moves in a steady flow without one single area stopping it or bogging it down.
To keep your photo balanced, it’s important to counter-weight an element with another object with a similar mass. This can be done with different degrees of contrast, different colors, and different areas of light and shadows.
BTW, if you’re in doubt, just turn the camera upside down and look at your photo. If it doesn’t look right, it’s probably not balanced.
Visit my website at www.joebaraban.com, and check out my workshop schedule at the top of this blog. Come shoot with me sometime.
Maybe it’s a touch of voyeurism and maybe I’m just a people watcher who likes to observe how people go about taking pictures of each other. Either way, it offers up a great photo opportunity. Be honest, haven’t you stopped and watched people as they photograph their friends or family? It’s one of my favorite things to do, and I usually end up asking if they want me to take the picture so all the family can be in the photo…which I also love to do.
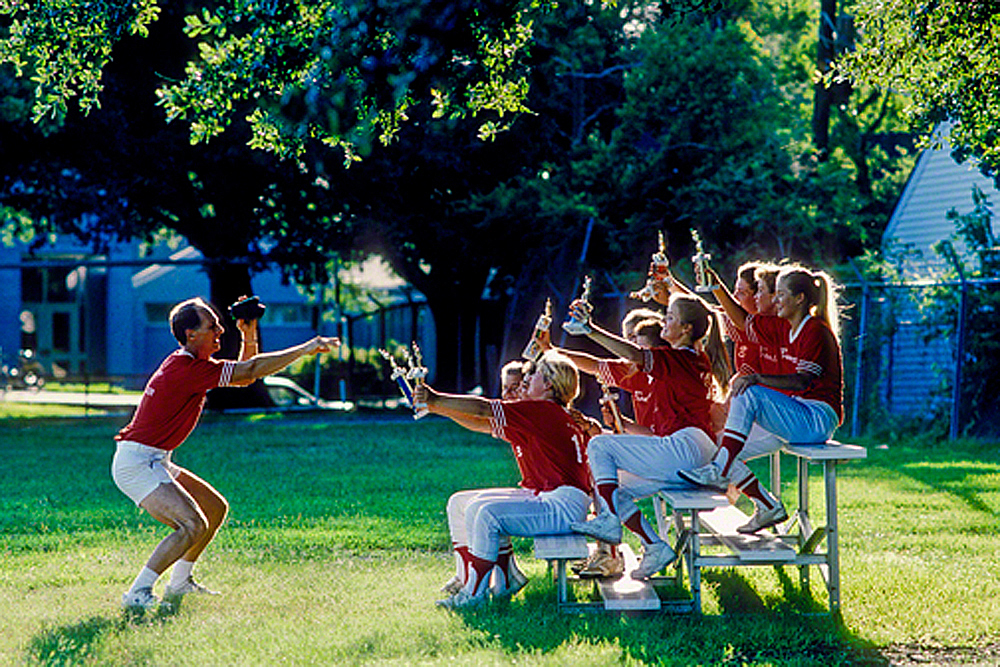
First place finish.
There’s something endearing about the way people take pictures of others. The way they try to direct, their body language as they compose, especially if the ones being photographed are giving them a hard time. It makes for great subject matter when families take pictures after someone has done something important, even if it’s just important to them. For example winning a trophy is a good one. Or families traveling together.
I’ve been lucky enough to catch that happening on several occasions.
One of the things I find fairly common in my online class with the BPSOP, and in my “Stretching your Frame of Mind” workshop I conduct around the plane, is that students/photographers will frame a subject and either shoot it vertically or horizontally then walk away. I’ve even had people frame something horizontally (mostly because it’s the easiest), not like what they saw then walk away.
REALLY!!!
OK, here’s the problem simply put: We perceive in a rectangle, so it’s the way we see the world. Having said that the camera was designed to be brought up to our eye horizontally; the objective of the camera’s designer Gods was to make the camera easy to be held. If you ever want your photos to be what I refer to as “up a notch”, GET OUT OF THAT HABIT!!!!
Except for the early years of my career (fifty-three and counting) when I was shooting for AP and UPI, and since I may have been chased down the street shooting riots I didn’t have time. After moving into the advertising and corporate world I have always shot everything both horizontally and vertically. It’s just a natural movement that I don’t even think about anymore.
Next time when you’re out shooting, do yourself a favor and right after you’ve shot something horizontally, make your very next picture a vertical of the same subject. When your next picture is vertical, then make your next picture a horizontal of the same subject.
When you’re composing, keep in mind that a horizontal format is calming and mimics the horizon. A vertical format has more energy, strength, and of course stresses height.The reason why a vertical has more energy is because the viewer will start at the bottom of your frame and move his eyes upward. It will take him longer to go from the bottom to the top while viewing a vertical, and that time takes more energy. Also remember that when you put vertical subjects in a vertical composition, you achieve even more energy. Keeping that in mind still shoot both ways, if nothing else for options…options are a good thing!!!
My next shot was a vertical.
Visit my website at: www.joebaraban.com and keep a lookout for my workshop schedule. Come shoot with me sometime.