Quick Photo Tip: Don’t Underexpose to be Moody

pearl of wisdom

I have found that in my past online classes and also in my “Stretching Your Frame of Mind” workshops I conduct around our planet, so many people think that to create a mood, especially one that pulls at the proverbial “heart strings”, while drawing out an emotional response, you have to underexpose your photos. I mean underexpose to the extent that the viewer has no idea what he’s looking at. My fellow photographers also will try to underexpose a scene that was taken at a time of day where there is no possibility of created the kind of mood they want…as in high noon!!!!!

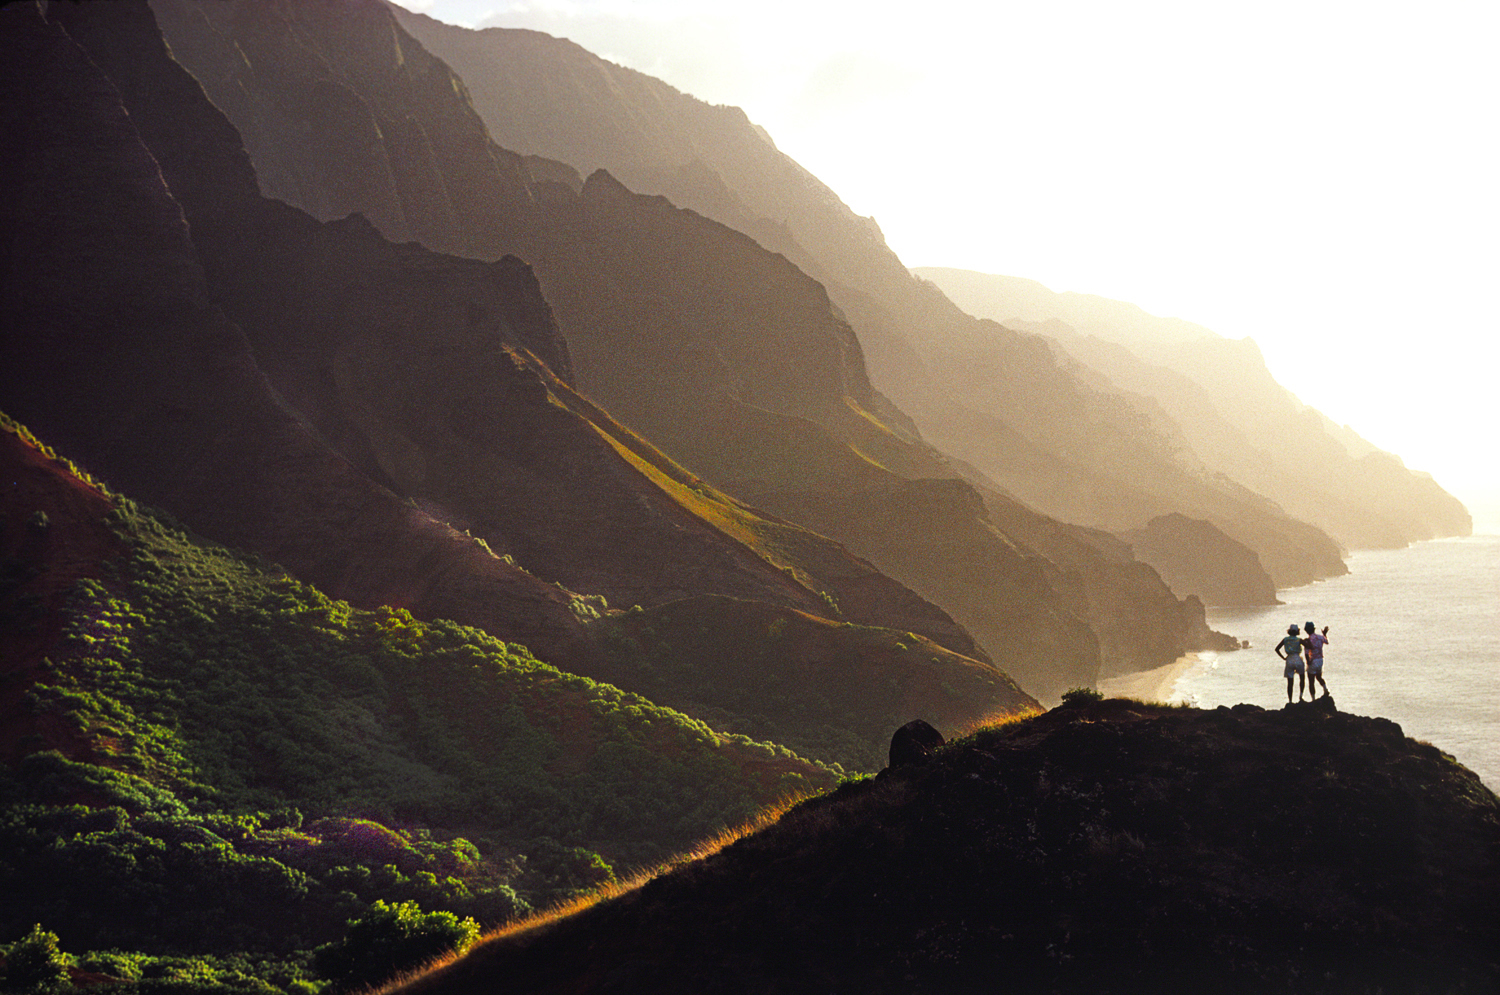
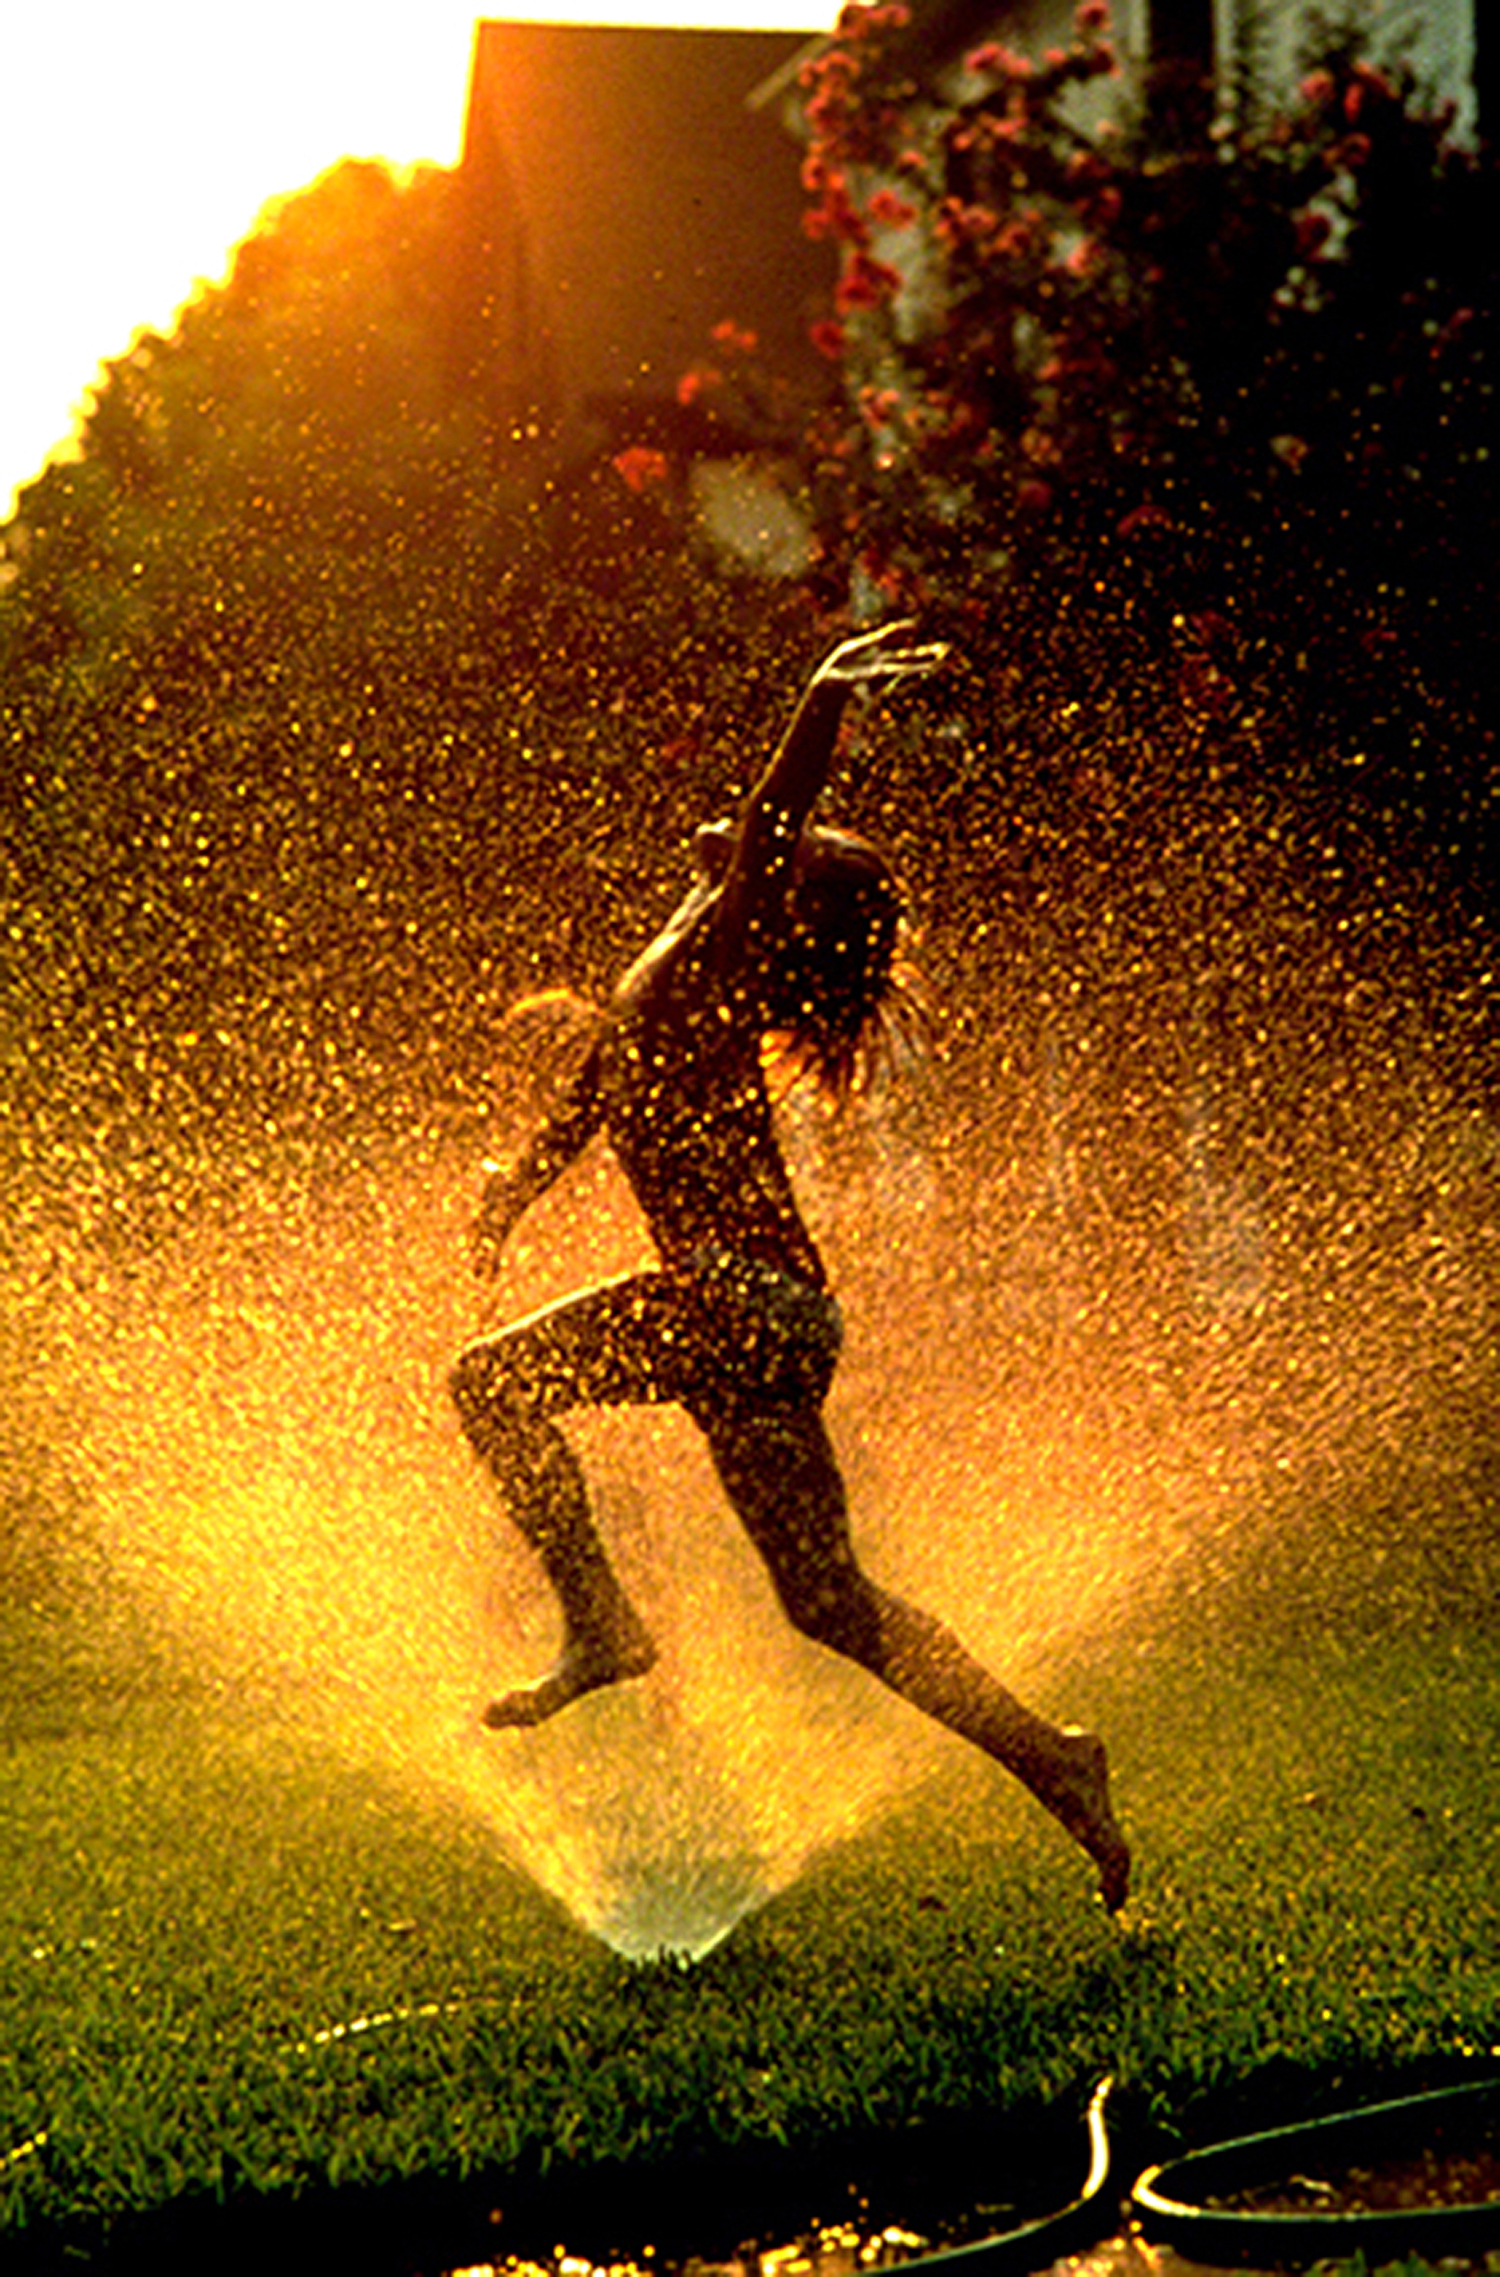
My answer is always the same, and fairly simple. If you’re trying to take a picture and your message to the viewer is dark and moody, then start out with something that’s already dark and moody and occurring naturally in nature. Or, at least a good start and adding ancillary lighting to finish the job.

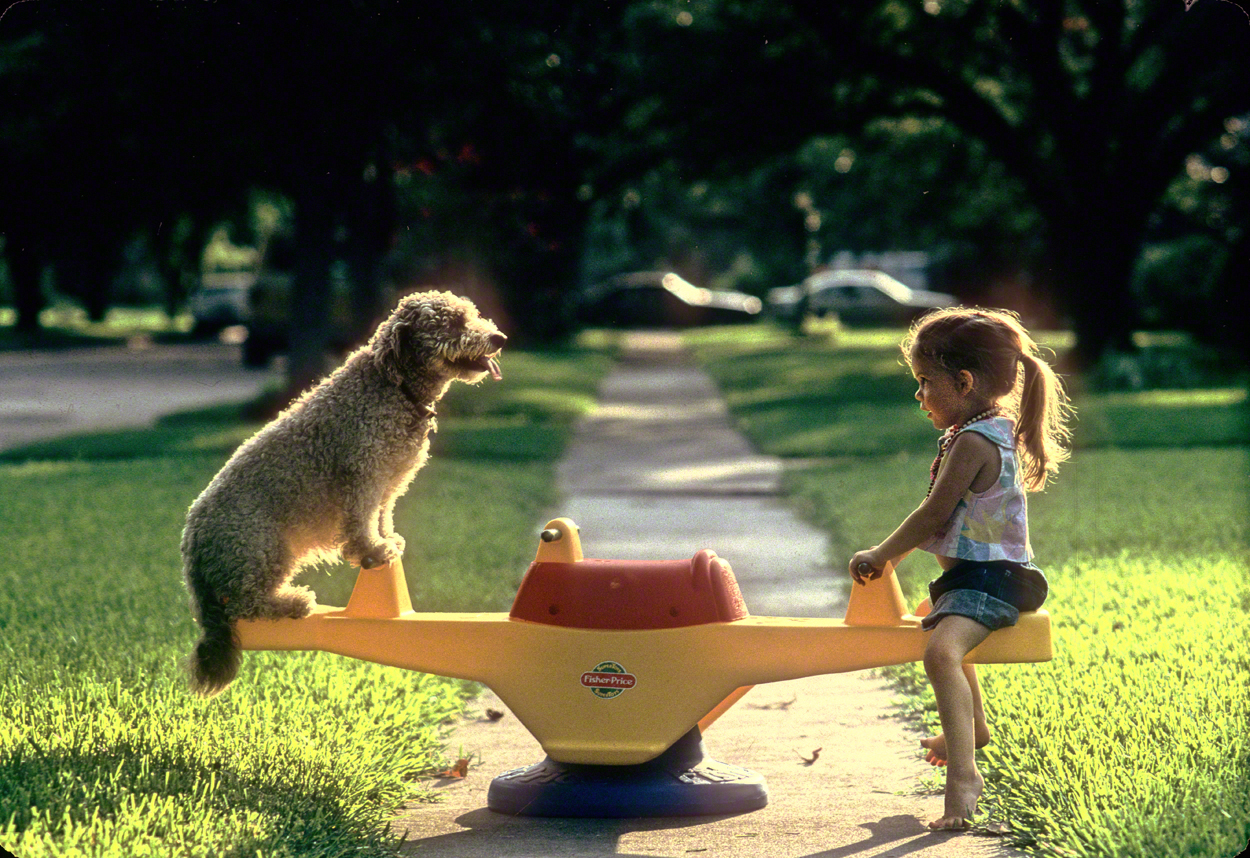
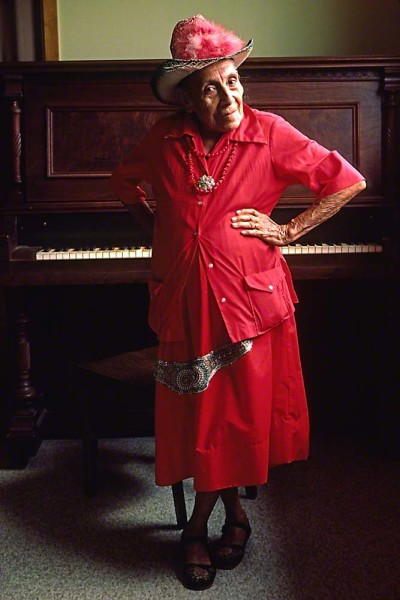
OK, you can’t expect to find this happening outdoors naturally if you go out after breakfast…say mid-morning. You also can’t expect to see this if you go out after an afternoon nap and before dinner. If those are the only times you can shoot, for one reason or another, then go indoors where it will be easier to create a mood. This is also a good idea if it’s overcast outdoors…I don’t mean stormy, stormy is good. I mean a midday gray overcast sky.

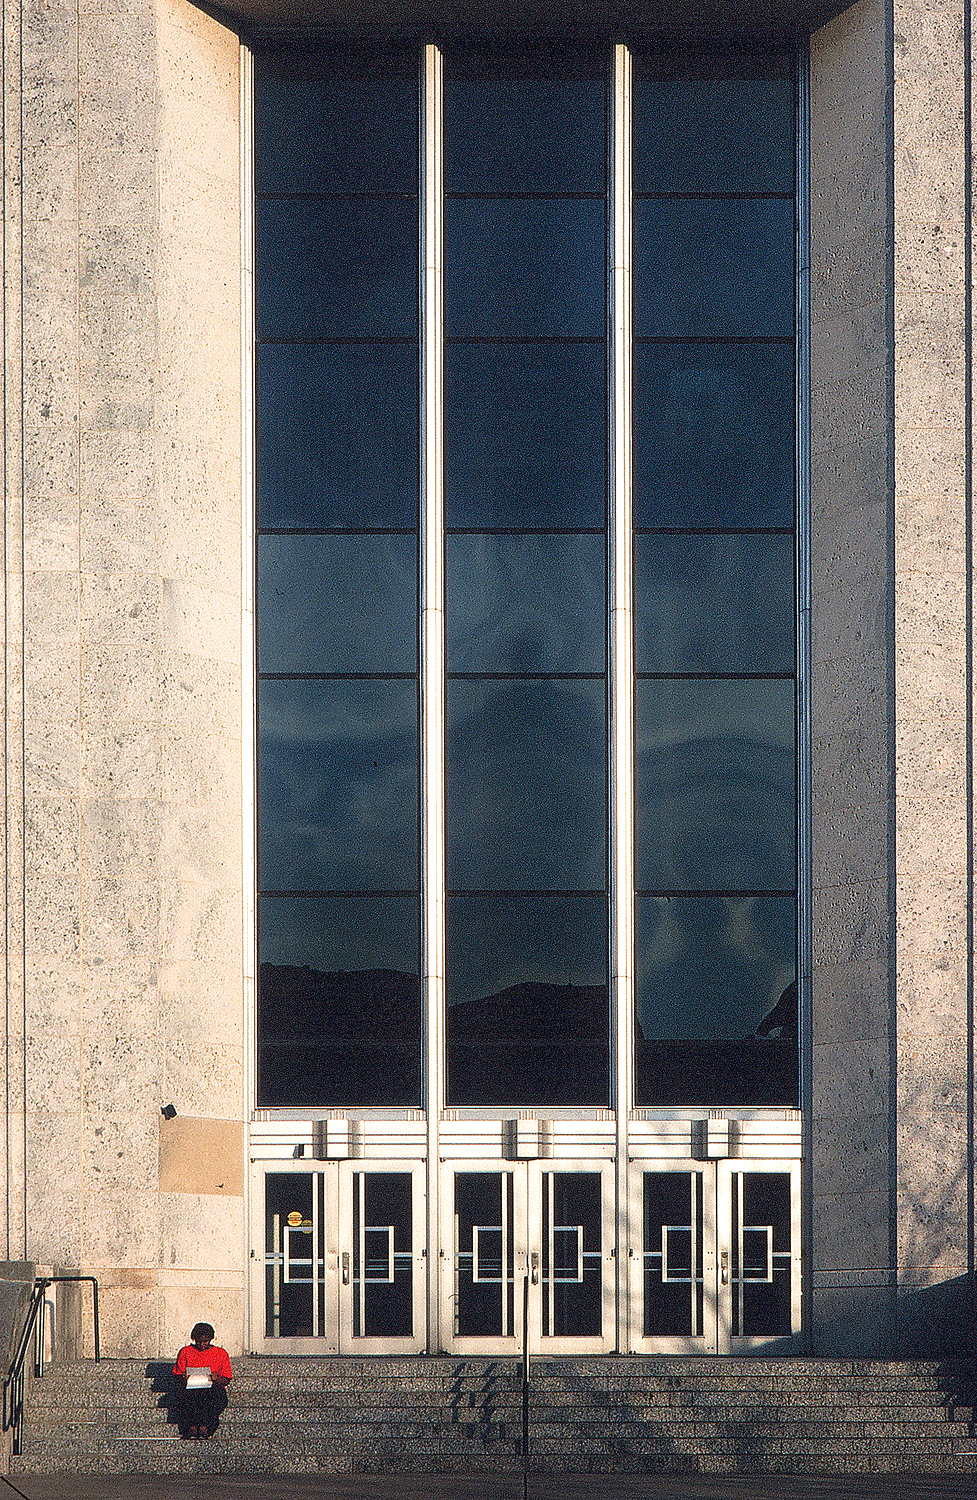
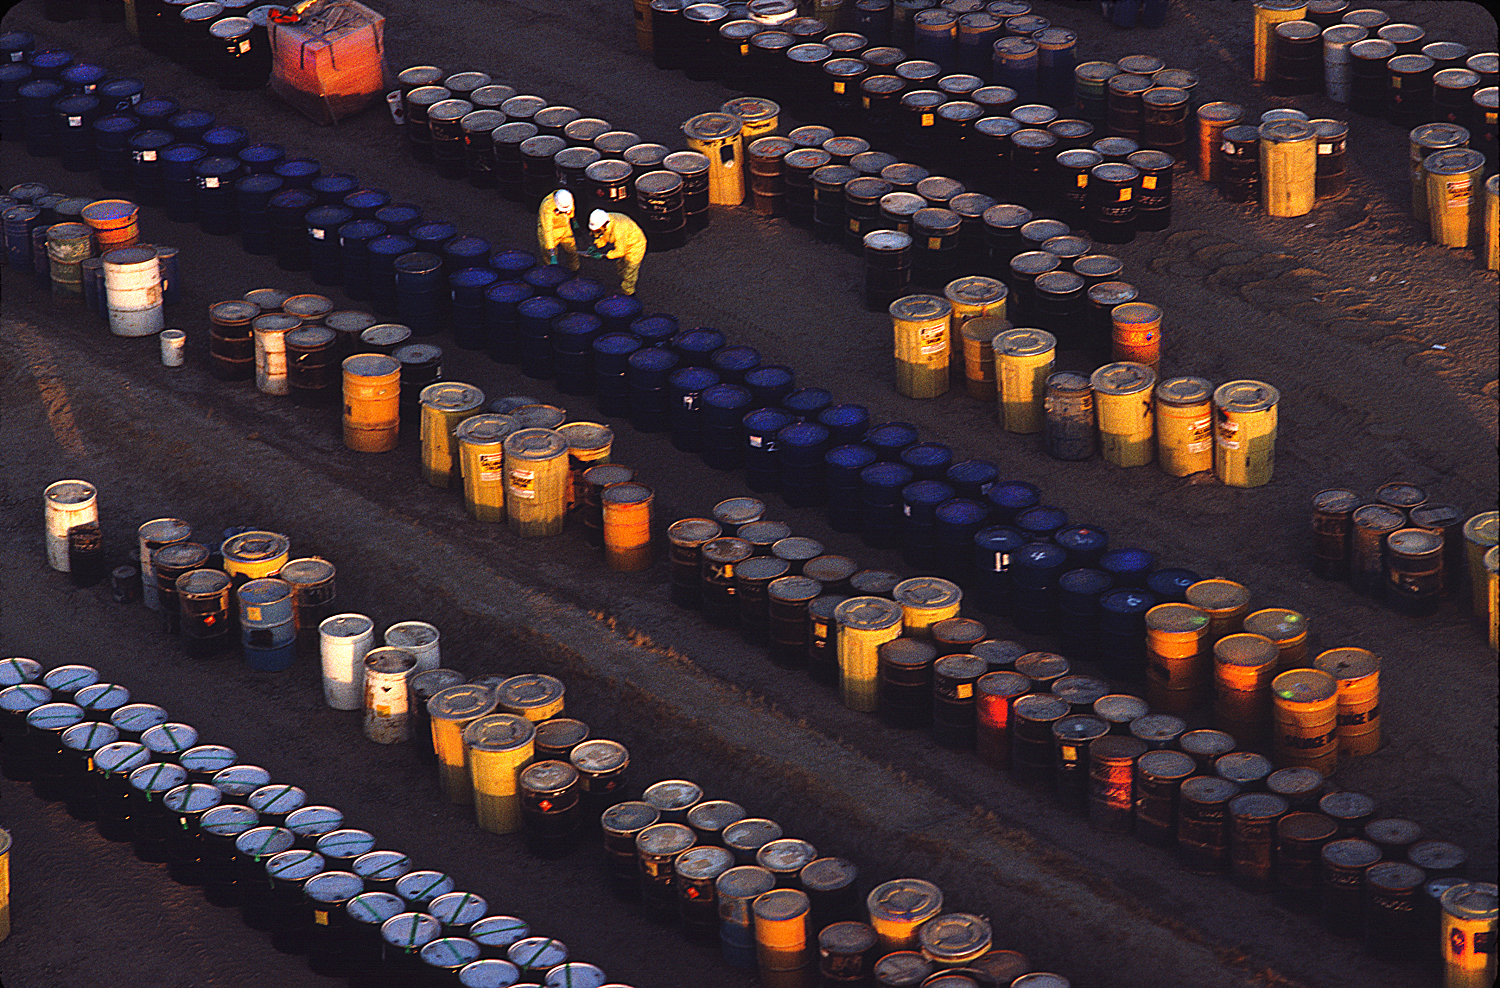
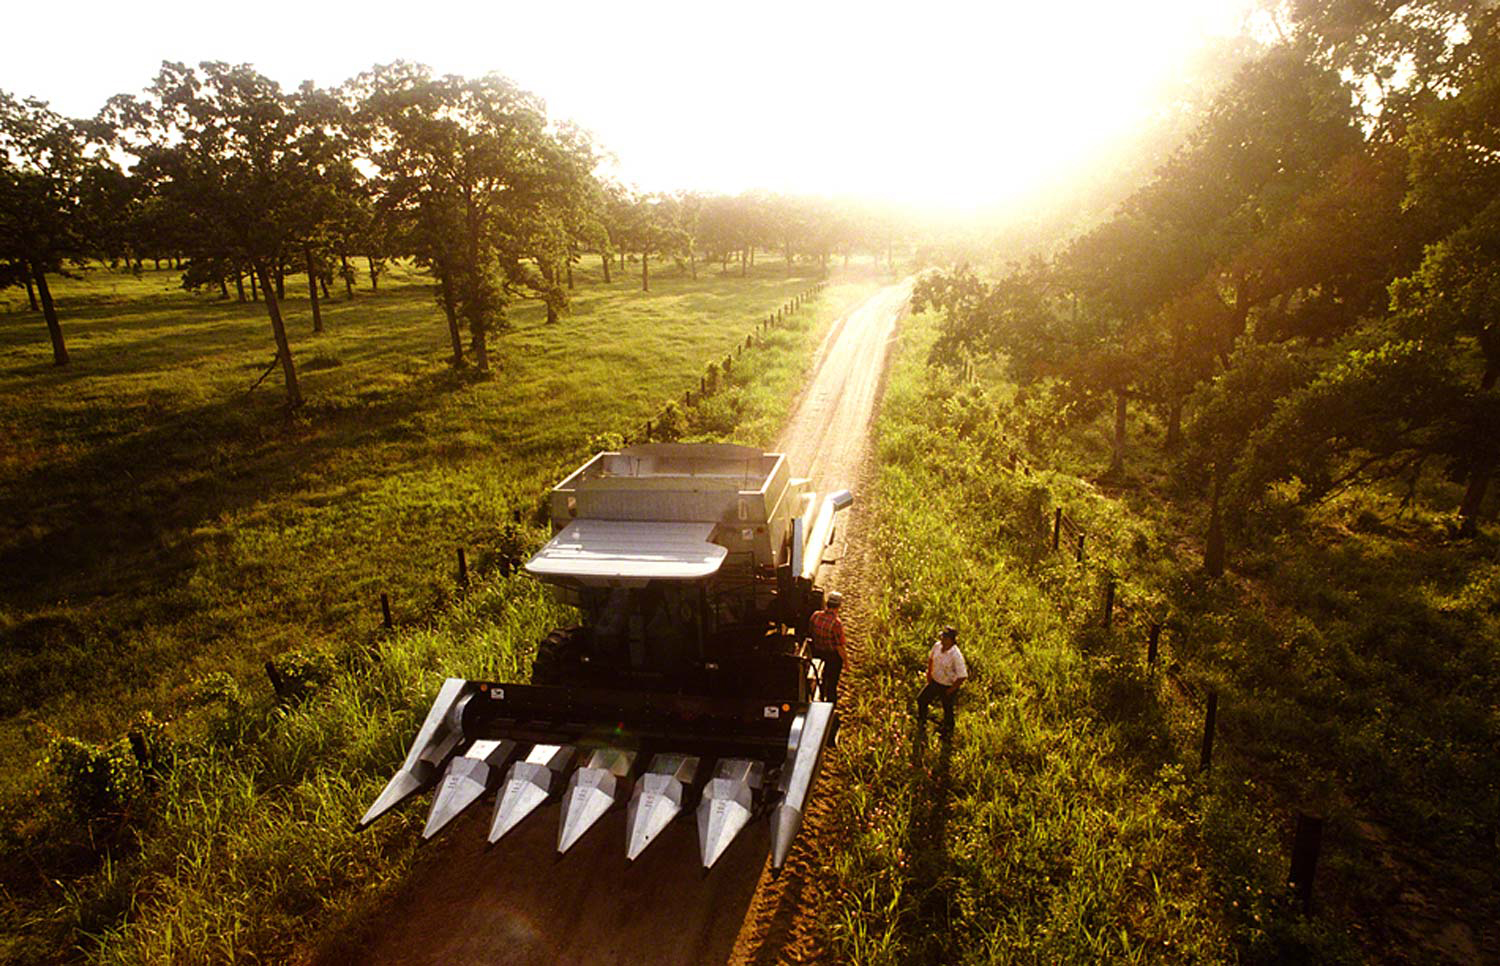
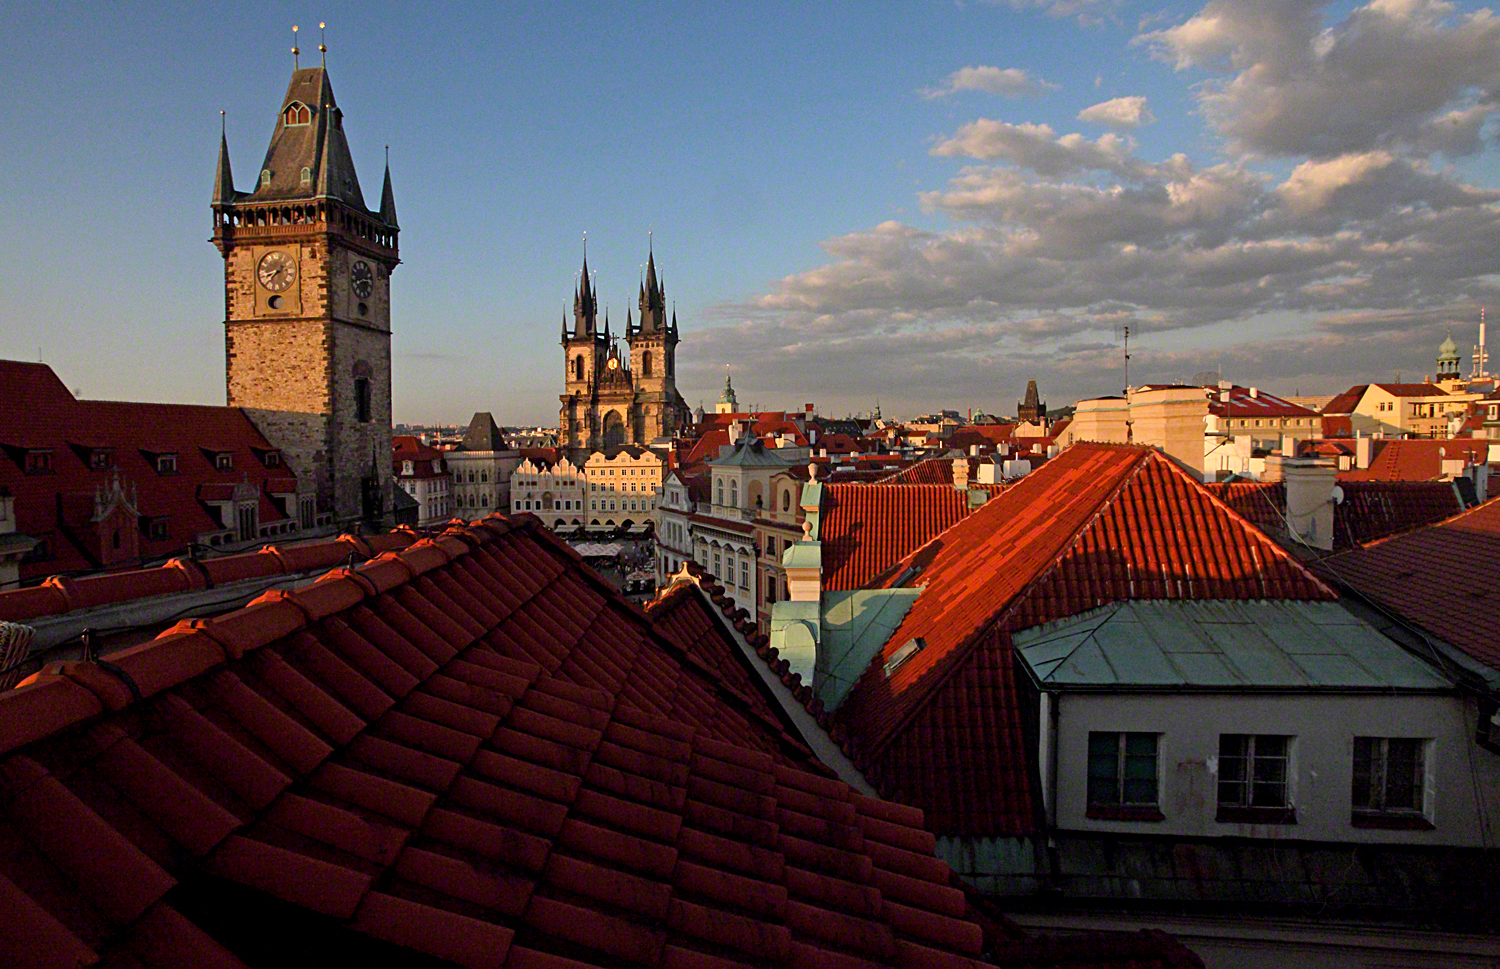
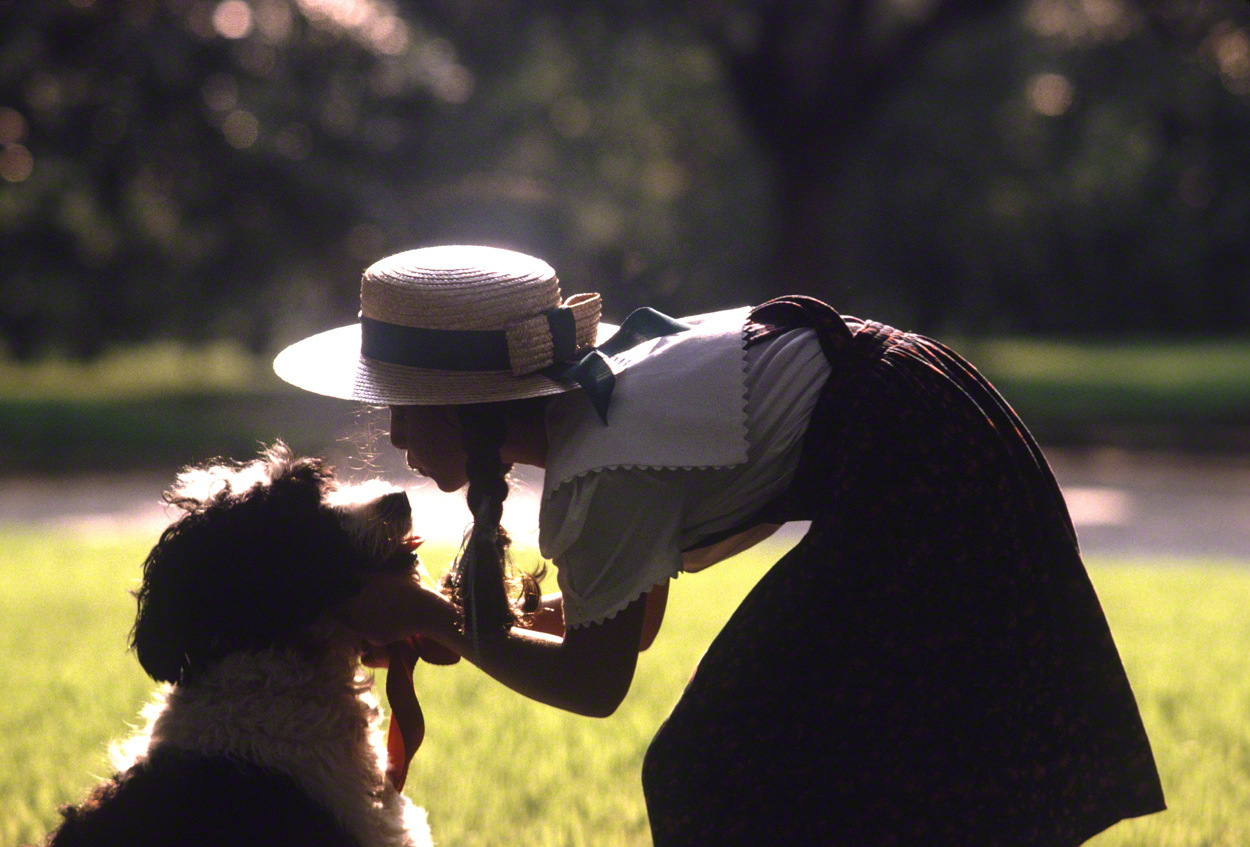
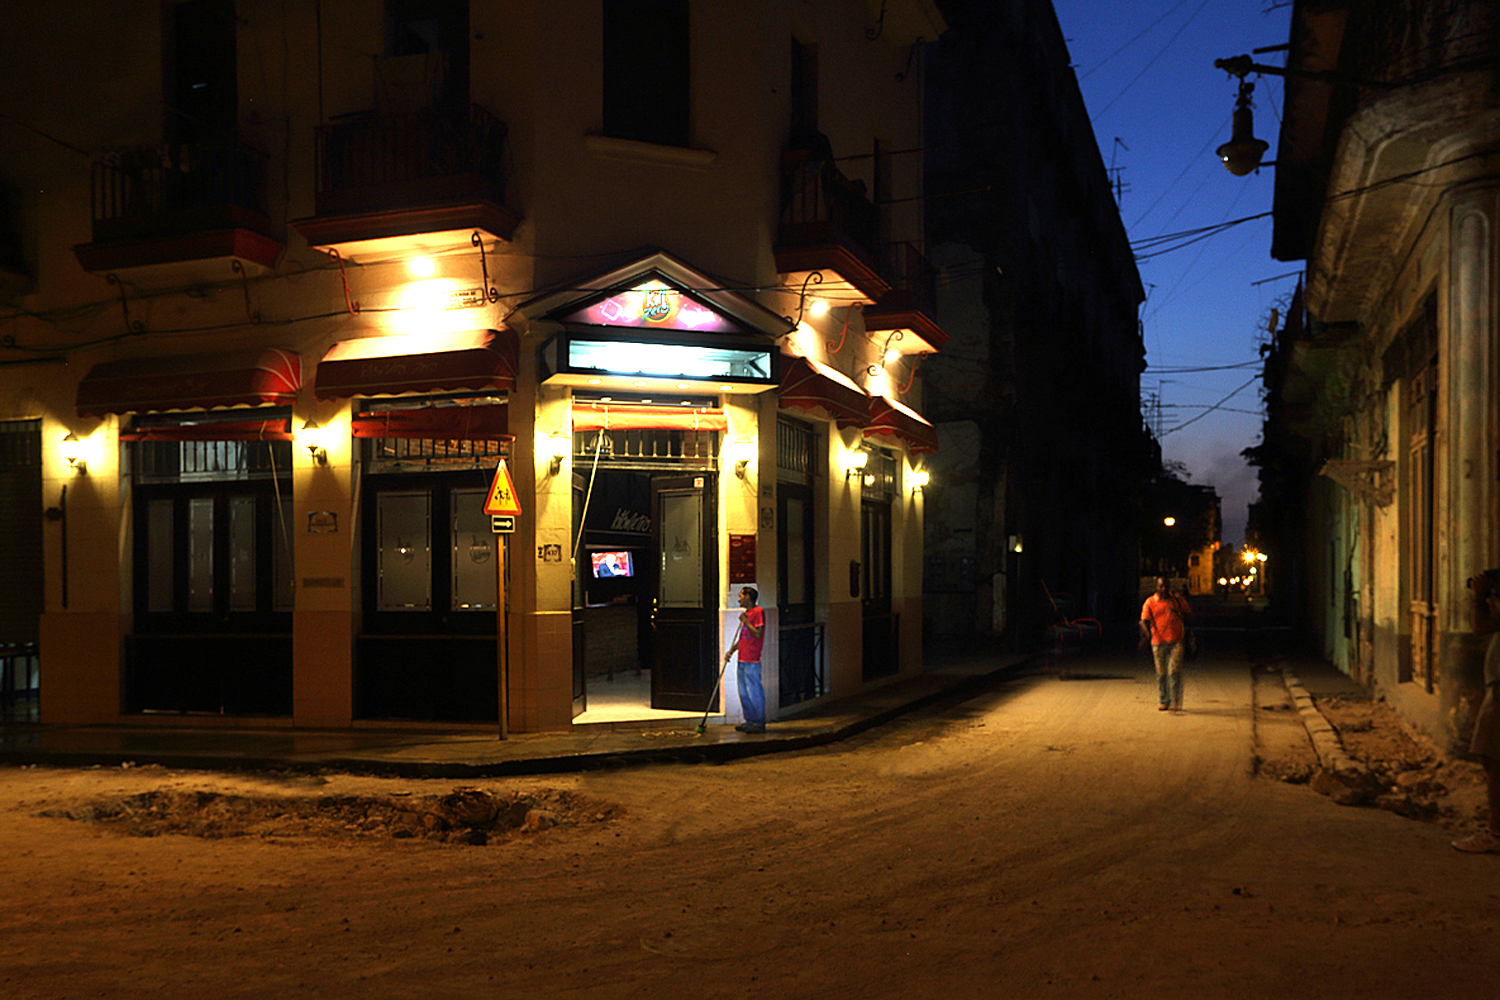
If you can go out early or late, then it’s going to be a lot easier to pull on those heartstrings and create a photo that’s moody. Look for areas in shadow with little or no ambient light coming in. Or better yet, look for those dark areas that has a little natural light coming in from somewhere out of the frame and hitting your subject.

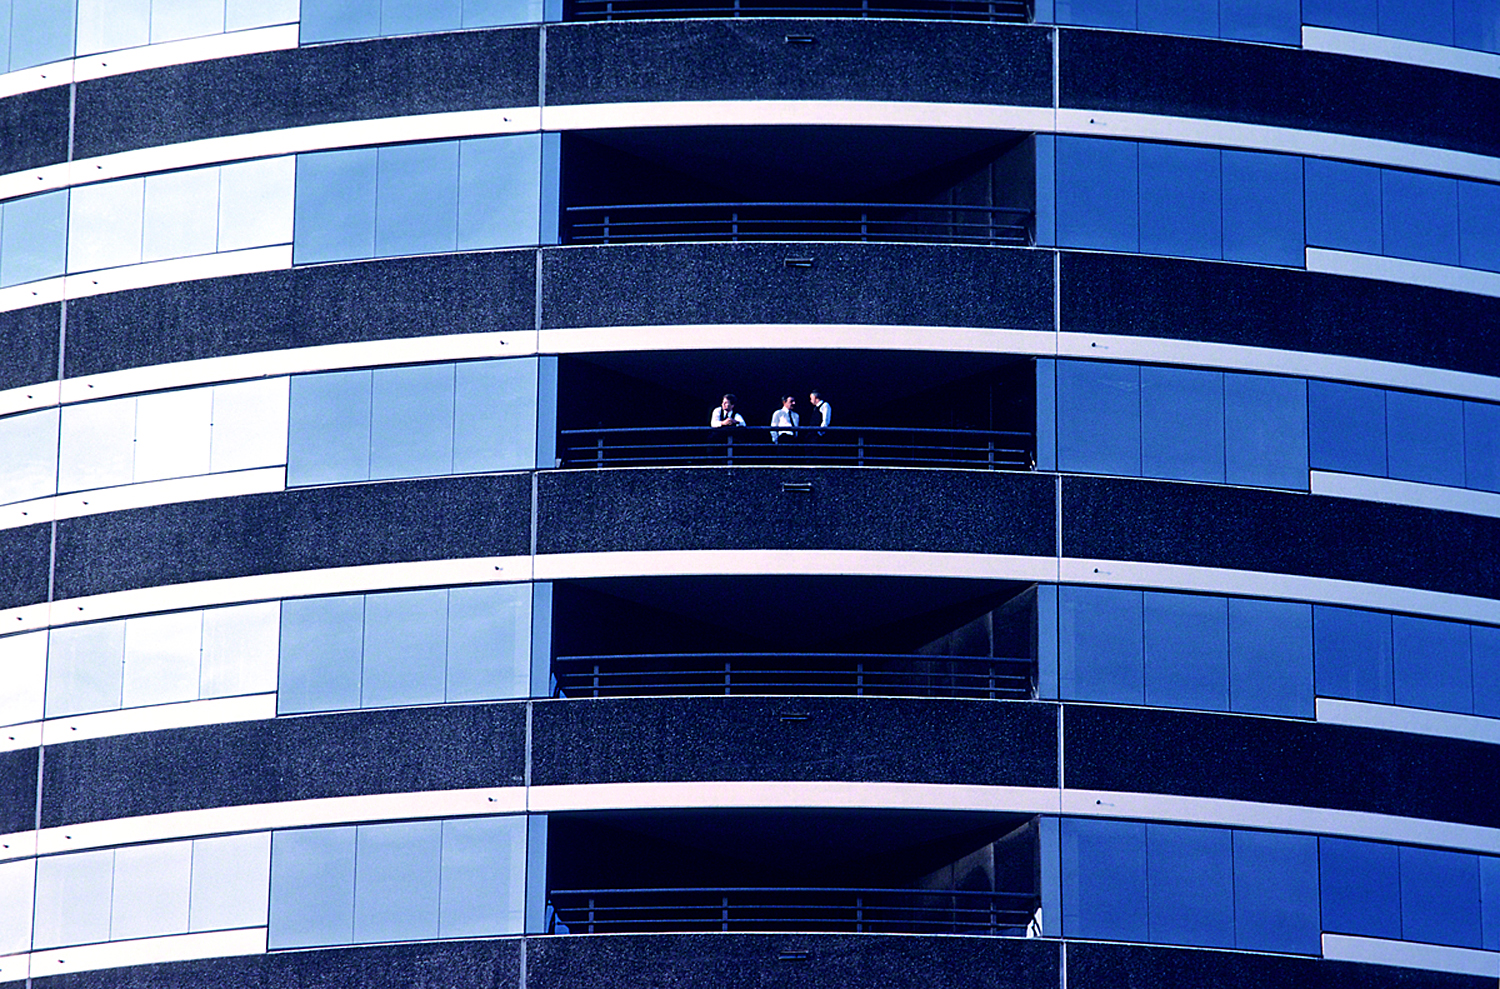
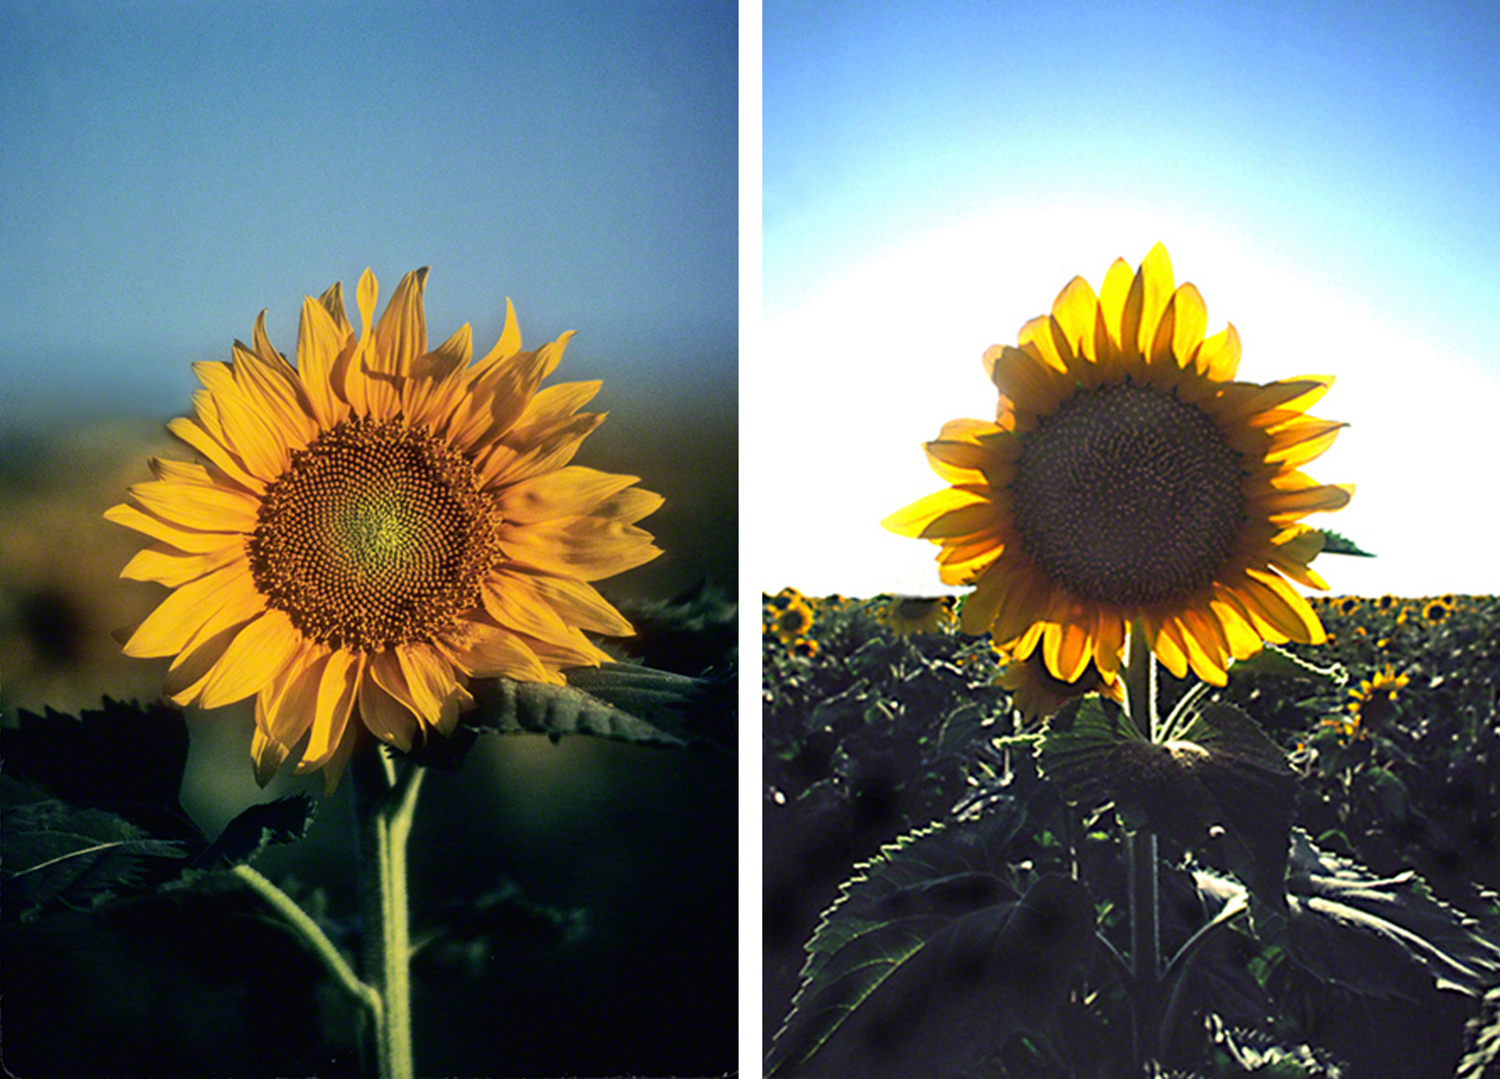
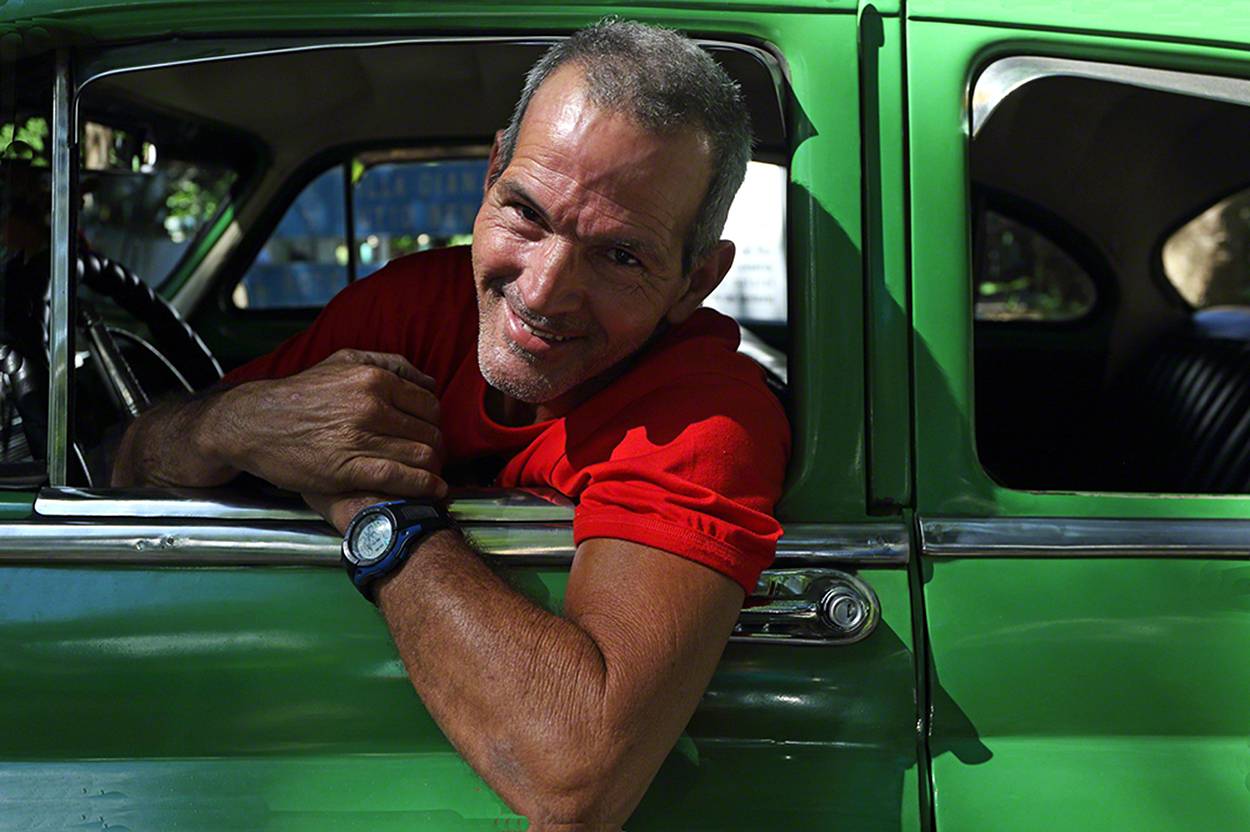
If you expose for the brightest part of the composition, as in the light falling on your subject, then everything else will be darker and the mood will be forthcoming.

Having said this, if you want a piece of advice don’t rely on the meter in your camera to help; because it won’t. Shoot on manual because the meter doesn’t know that you’re going for a mood. It will read the area in shadow and try to give you some detail in said shadows. If and when that happens, you can kiss the mood goodbye.

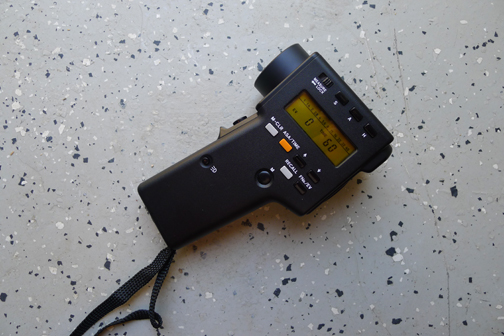
Shoot on manual (which is what I’m always preaching to the choir), take control and put your camera on spot metering, and expose for just the highlights. Do that, and you’ll achieve the mood you were after.

Visit my website at: www.joebaraban.com and follow me on Instagram: www.instagram.com/barabanjoe. Watch for my workshop schedule at the top of this blog. Come shoot with me sometime, and we’ll be moody together.

JoeB

Quick Photo Tip: Using People to Show Scale

Giving some sense of scale

Besides the fact that people like to see people in photos, I like to have people in my shots to bring a sense of scale to them; not all the time, just some of the time.

Not only will adding a person show scale, but it will also change the genre of the photograph. In other words, adding people will editorialize the original idea. for example, taking a picture of a building with no people in it makes it lean towards the architectural side of photography.

When you add a person, not only will it reveal the actual size of the building, but it will ask the viewer why the person is there. When you do that it you’re creating a story for the viewer to read visually; it asks the viewer to express an opinion making it editorial instead of architectural.

 The same thing happens with a landscape. Simply stated, a landscape represents all the visible features of a countryside that the viewer can see all at one time from a single viewpoint.

Before the passing of the school’s founder Bryan Peterson, I’ve had ‘landscape photographers’ take my online class with the BPSOP and I’ve also had them sign up for my “Stretching Your Frame of Mind” workshops I conduct around our planet, and I can tell you that they can be a stubborn lot; not all of them but a lot. What I’m getting at is that they can be adamant that a landscape cannot be a landscape if there buildings in the composition, and certainly not a person.

These people call themselves purists, but they have no compunction to do a little work on them in Lightroom or Photoshop; it makes me wonder just when you can begin or stop being a purist?????

I digress again.

I’m not going to get into that, but I will say that when you add a person it gives scale to the image. The viewer doesn’t know the actual size of a building nor does he have any idea of the vastness of the landscape he’s looking at. What he does know is the average size of a person, and that will help him identify the size of a building or the scope of a landscape.

BTW it also, like an architectural photo, makes the viewer wonder who that person is, where did he come from, and why is he there. These are questions that will keep the viewer around, and unless you’re shooting photos strictly for yourself and if you’re at all like me, you like people to look at your pictures.

Visit my website at: www.joebaraban.com, and follow me on Instagram: www.instagram.com/barabanjoe. Check out my workshop schedule at the top of this blog. Come shoot with me some time.

JoeB

Quick Photo Tip: Get rid of those blinking areas

I blow out highlights!!

During my Maine Media Workshop, I was working with a fellow photographer and the moment before she clicked the shutter, her LCD screen exploded with blinking black areas going on in the highlighted areas. This meant that those areas were being overexposed or “clipped” as what’s said by those that don’t know what they’re talking about.

I think “visually undesirable” is what I’ve been told by students (who were told this) that tøok my online class with the BPSOP. Since then the school has closed due to the passing of its founder Bryan Peterson. I’ve also had similar conversations in my own “Stretching Your Frame of Mind” workshops I conduct around the planet.

I digress.

“Egads”, I yelled to no one in particular, “make it stop blinking, I’ll tell you anything you want to know!!” The student relayed to me that she had been told that whenever she encountered the blinking, to immediately stop what she was doing because she was about to overexpose an area. It also annoyed her (not knowing what it meant) and how did she take it off.

Seriously? The only reason anyone (not in their right mind) would want to do that is if they wanted to be led (blindfolded) down that one way path to mediocrity. Or maybe they wanted to have the slightest chance in winning a blue ribbon at their camera club’s annual competition.

Here’s what I think…Get that blinking stuff off you camera. Go to settings on your camera and where it says “highlight alert” disable it. Believe me it’s a better thing you do than you’ve ever done before…why?

Because one of the ways to generate visual tension is contrast and another is the use of light. Those blown out (clipped) areas brings energy to your images. I don’t always blow out the highlights because there’s a time and place for everything. That said, whenever there are bright highlights in my composition I’m always looking to blow them out.

It’s easier said than done because if you use the meter in your camera, more than likely it’s going to give you an average exposure of the highlighted and shadow areas; based on what the meter is set on. For best results, set your meter on spot and try exposing just for the areas in shadow; this will blow out the highlights.

For most of my fifty-three year career, I’ve used a Minolta One-Degree Spot Meter. It’s an external hand held meter (you can find them on e-Bay) that can read just one degree of reflected light, which gives me total control to do as I please to my photo.

I prefer the energy, so next time blow out the highlights my fellow photographers and you won’t spend eternity in photographic purgatory.

Visit my website at: www.joebaraban.com, and follow me on Instagram: www.instagram.com/barabanjoe. Check out my workshop schedule at the top of this blog. They don’t stay up very long since they fill so fast. Come shoot with me sometime

JoeB

Quick Photo Tip: Adjust

It’s all about making adjustments.

For me, the easiest way to walk away with the best shot possible is to make a series of adjustments as I’m shooting. Photography is all about making adjustments from your first frame to your final composition.

As I’m shooting, I look all around the frame. I’m doing my Fifteen Point Protection Plan, my Border Patrol, and the Four Corner Checkoff. Each time the shutter opens and closes I’m making adjustments, some minor and some major…a new final composition, and I take several “final compositions” before I’m through….shoot adjust, shoot adjust, shoot adjust, etc., etc., etc.

The reason? To achieve what I want in the camera, and not have to rely on a computer to fix the problems I could/should have done prior to clicking the shutter.

I rarely use the first image I take unless I’m street shooting and I have one shot at it. It’s always the second, third, fourth, etc., before I’m satisfied.

I’ve discovered after thirty plus years of teaching that my fellow photographers will generally bring the camera up to their eye and aim, shoot, then move on to the next shot. Doing that really lowers the odds of that one photo being the one that can stand the test of time. The proverbial ‘OMG’ shot, a ‘keeper’, one that makes it to the ‘wow’ category of picture making.

In my online class with the BPSOP I use to critique so many images that could have been so much stronger had they made just a few adjustments. I say that in the past tense since Bryan Peterson, the founder recently passed away and the school closed. In my personal “Stretching Your Frame of Mind” workshops, I’ll observe a photographer shoot an images and immediately walk away. Slow down and smell the flowers I’ll say to them; don’t be in such a hurry.

Maybe the horizon line is off, perhaps it’s something growing out of someone’s head. It could be something coming into the corner or edge of the frame (those dead branches for one example) that you really don’t want to be there…I call those UFO’s, which would not be considered something that was hidden in Area 51. These may be nothing but minor nuisances, but they could also be something that even a computer can’t fix and therefore winds up on the cutting room floor…as in painfully deleted.

In the above photo of a dance instructor in Cuba, there were several adjustments before I was satisfied: I had her standing with no chairs, sitting with no chairs against the wall, then I added a chair, then I added another chair, then I had her looking out the window, then straight at me, then at me through the mirror…shoot adjust, shoot adjust, shoot adjust, etc., etc., etc.

If you consider yourself a painter as I do, then a good analogy would be to not think about your camera being on a tripod, think about it being a blank canvas on an easel. A finished painting is achieved by adding and subtracting pigment. Mixing colors to get just the right shade of blue, adding white or black to change the value of an area. Switching from one size brush to another is akin to changing lens. Then there’s always the option of using a palette knife of various shapes.

If you’re into getting the right light, then you’re shooting from different points of view and thinking about my clock. Shoot then adjust by moving around to see how your subject looks lit from the side perhaps to bring out the texture, then make another adjustment by placing the sun behind your subject to backlight it.

The digital age has had a profound effect on photography. some good and so many not so good. One good thing that has come about is the ability to shoot a photo and immediately look at the back of your camera to check it out. It’s so easy now to make those adjustments that will undoubtedly take your photography to where you’ve never gone before; and what I refer to as ‘up a notch”.

Visit my website at: www.joebaraban.com, and follow me on Instagram: www.barabanjoe.com Check out my workshop schedule at the top of this blog. I’ll be conducting a workshop every so often, so be sure to check them out at the top of this post.They fill rather quickly.

JoeB

Quick Photo tips: Let That Sunshine…Shine In

I exposed for the two men.

I like to have complete control over all aspects of my final composition/photo. That means being in control of the final exposure as well. Letting the meter in your camera decide your exposure takes you out of the control you need to create strong images with lots of Visual Tension/Energy, and interest. I can tell you that the meter in your camera, no matter the brand, is not giving you the right information.

One of the many areas I cover both in my online classes with the BPSOP, and in my “Stretching Your Frame of Mind” workshops I conduct around the planet is how to take meter readings that will provide you with this tension, interest, and energy.

Most of my fellow photographers have the meter in their camera set on Matrix. The problem with that is the meter doesn’t know exactly what you want. It will read a large area of reflected light, and that’s not the best way to have control of the final photograph.

For me, I want more control than that. I want to know what every area of my composition reads so I can compare one part of the frame to the other. I want to know what it’s going to look like before I look at it on the back of my camera, and certainly before I sit down in front of a computer. By that time I had lost control and now I’m left to devices, computer software, and programs to help out.

The next time you go out, try setting your meter on ‘spot’ so it will read a smaller portion of your composition. Read the highlights and then the shadows and see what you get. If you really want to master the light, get a handheld meter like the one I’ve used for the past forty-four years. I use a meter that’s not made anymore but you can find them in mint condition on e-Bay.

I use a one degree spot meter that was made by Minolta, and in it’s day, it was the state of the art. I can read just one degree of light at a time and can compare readings from the highlights to the shadows…and everything in between.

Minolta One-Degree Spot Meter

In the past couple of years, this meter has become very popular again. I guess there’s more people out there that want the challenge of being a good photographer and not a good computer artist.

Of course these days you don’t need that, but to me it’s fun and challenging to get exactly what I want in a photo…before I click the shutter.

In the photo above, I wanted that sunrise energy so I read the reflected light on the two men. Once I set my camera to expose for them, the early morning sky behind blew out creating the Visual Tension, interest, and energy.

I’m sure some of you out there are horrified because I clipped the highlights. All I can say is…get over it. Stop being predictable and following rules written by people a long time ago that never colored outside the lines.

Visit my website at: www.joebaraban.com, and follow me on Instagram. Check out my workshop schedule at the top of this blog.

JoeB


Quick Photo Tip: Selective Focus When it Matters.

Selective focusing saved the day.

Since so many of my fellow photographers always hand hold their camera, it’s very difficult to stop down to F/22 to get everything in your composition in focus; without having to jack up the ISO. The problem I’m always hearing in my online class with the BPSOP, and also in my “Stretching Your Frame of Mind” workshops I conduct around the planet is that inevitably, they always forget to change the ISO back which as you know can lead to more issues.

If I’m walking around with a camera over my shoulder and not knowing what to expect, my go to lens, the lens I almost always have on my camera is a 17-40 35mm Canon lens. I shoot everything from landscapes to portraits with it, and have always loved the len. On of the main reasons is that I can get more in focus at a shallower DOF with a wide angle rather than any other lens that’s longer.

However, there are times when I can’t stop down enough and be able to hand hold. This is important to me as I always want to have complete control, so it’s the reason I’m almost always on a tripod…and very fast with it. That said, I’m occasionally hand holding my camera and come up against a situation where I’m not going to be able to stop down enough (I never jack up my ISO because I will most likely forget to change it back) to get everything I want to be sharp.

So, what do you do? Go the opposite way and use “selective focusing” to get the shot you want…and just maybe it will turn out to be a better idea.

In the shot with the man playing the trumpet, While walking around an outdoor event, I heard the jazz trio and went to investigate. I wanted to take this man’s portrait but I couldn’t get him all sharp while getting “up close and personal” to his trumpet. I decided to shoot wide open and just have the front of the instrument sharp and let everything else be soft. It still says the same thing I was trying to say, and to me it “colors outside the lines”…one of my favorite things to do. BTW, it is a lot easier if you set your focus to manual instead of auto-focus. Auto-focus is a luxury, not a necessity. Just remember to change it back!!!!

Visit my website at: www.joebaraban.com, and follow me on Instagram: www.instagram.com/barabanjoe. Check out my workshop schedule at the top of this blog. come shoot with me sometime.

JoeB

Quick Photo Tip: Those Hot Summer Days in August

Standing just inside the building.

I always try to be at a location either very early or very late in the day so the light is softer and warmer, and the shadows are longer…The Golden Hour. That’s not always possible especially when you’re somewhere that’s just a small part of the overall shoot. You just have to weigh all your options, then decide what’s the most important location to be at during the best light; providing the most photo ops possible in a short amount of time.

While working on a project for a company that raises crayfish in Louisiana, I was given a shot list that had to be covered in the three shoot days that was budgeted. As always, I sit down with the client and designer ahead of time in a pre-production meeting and talk about their wish list. What’s the most important photo? What will be on the cover? To me, it doesn’t matter as I will spend the same amount of energy for a photo that will be small and one that will be a full page.

In my forty plus year career, I think that the expression I disliked the most is when someone would say to me, “It’s not that important of a shot, so don’t spend too much time on it”…Really? I shouldn’t care what it looks like?

I digress!!!

Since we shot all day, there were times when the sun was high in the sky, rendering everything hot, harsh, and lots of contrast. The above photo was shot during that time of day. So what do you do, especially when you’re taking a portrait of some local workers and you don’t want “Raccoon eyes”? You know those eyes that have deep shadows from the sun being almost overhead?

You place them just out of the sun, where the light is just missing their face and the reflections coming off the ground help bounce light evenly on all their faces.

Works like a charm, and it’s what we often talk about in my online classes with the BPSOP, and in my “Stretching Your Frame of Mind” workshops I conduct around the planet.

Visit my website at: www.joebaraban.com, and follow me on Instagram: www.instagram.com/barabanjoe. Be sure to check out  my workshop schedule at the top of this blog.

JoeB

Quick Photo Tip: A Room with a View.

My view at sunrise.
My view at sunrise.

Check out my new workshop on the six concepts in the Psychology of Gestalt: Gestalt Workshop link

As I tell my online students with the BPSOP, and in my “Stretching Your Frame of Mind” workshops I conduct around our planet, light is everything and I’m constantly thinking about it.

That said, I’ve been a professional traveler for almost fifty years, and my job has been to take pictures in the best possible light. That’s what I do, and that’s what I think about all the time…especially when I first research then check into a hotel.

The first thing I think about is the view I’m going to get every time I look out the window. I can tell you from experience that some of your best photos can be taken with your pajamas still on…or even if you sleep in “the all together, in the buff, or in the raw” as some call it.

Here’s what I suggest to my fellow photographers that are traveling on business, pleasure, with a group, or just by themselves:

When checking in ask what direction the rooms face. If you’re an early riser by nature, ask for a room that faces East. If you’re not then ask for a room that faces to the West. A suggestion here would be to take an East facing room over one that faces North or South. That way you’ll at last have a choice as to getting up early or not.

Another factor for me when I have a choice in picking a hotel is the number of floors it has. If you’re only interested in seeing the entire city and taking an overall panoramic, then ask for a room close to the top. If you’re interested in seeing more of a close-up, than ask for something closer to the ground floor.

The absolute best advice I can give you is to ask to see the room first. That way even if you get an East or West facing room, you won’t be disappointed when you pull back the curtains only to see the hotel’s roof top parking lot and/or the air-conditioning units.

Depending on the time of year, a North facing window would be my third choice after East and West. The light will be coming in from the side, which can be a great way to show the textures and the three-dimensional qualities of the city.

I can’t suggest strongly enough to set your clock to at last take a look out the window, you can always go back to sleep if nothing interesting happens. If it does and you get something great, going back to sleep is easy even if you’re only wearing a smile.

🙂

Visit my website at: www.joebaraban.com, and follow me on Instagram: www.instagram.com/barabanjoe. Check out my workshop schedule at the top of this blog. Come shoot with me sometime.

JoeB

Quick Photo Tip: Back light Those Flowers

front and back light

Check out my new workshop on the six concepts in the Psychology of Gestalt: Gestalt Workshop link

I’m always after visual interest while at the same time generating visual tension. It’s not something I live or die for, it’s just something that’s always in the back of my mind. As I tell my online class with the BPSOP, and in my “Stretching Your Frame of Mind” workshops I conduct around our planet, one of the ways to create visual tension is the use of light.

I go on to say that whenever I see anything that’s translucent I always try to backlight it. This especially holds true for me when it comes to photographing flowers. I just love to see them glow, and the only way to do that is to have the sun behind them. Actually, if you read my post on “The Clock”, the sun would be somewhere between eleven and one to make it pure backlit.

In the two photos shown above, and if you remember my clock, the light on the sunflower on the left is coming from behind me at 6 O’clock. This is front light and although it’s still fairly nice (only because it’s about a minute after sunrise), to me it doesn’t have the visual tension as the sunflower on the right does.; where the light is coming from 12 O’clock. FYI, both sunflowers were taken a few seconds apart and are next to each other in a field.

So, the next time you’re out and about shooting, before you bring your camera (hopefully secured on a tripod) up to your eye, consider the clock. No matter where you are and what the subject might be, think about where the sun is in relation to your subject first and foremost, and I’ll guarantee you that your photos will jump up to what I always refer to as “up a notch”.

Visit my website at www.joebaraban.com, and follow me on Instagram: www.instagram.com/barabanjoe. Check out my upcoming workshops at the top of this blog. Come shoot with me sometime. country.

JoeB

Quick Photo tip: Peak of Action

The Peak of Action
The Peak of Action

I will often walk up to one of my fellow photographers on some street in Sicily, France, or in another of my ‘springtime” destinations workshops or my “Stretching Your Frame of Mind” workshops I also teach and I’ll observe him/her shooting a subject that includes some kind of action. I often notice this in photos that are submitted in one of my online classes with the BPSOP.

What I observe and notice (right away) is that the photo was not taken at the optimum point in time; to achieve the most visual interest and tension. They will quickly reach for their camera whether it be over their shoulder or around their neck and just start clicking away.

Of course one might be luckily enough to capture that moment, the peak of the action, but don’t count on it. I’ve heard soooooooooo many times someone saying, “if I would have waited I would have gotten it”…or “If I would have shot earlier I would have gotten it”. Either way you missed.

In every situation that has action in it there’s usually a moment in time that tells the story about the action you’re photographing; there’s always one exposure that the most important, and that’s the peak of the action.

Since the environment around us exposes us to various action, being at the right pace at the right time is crucial in capturing that moment. Or setting up the action and shooting it in a reportage style to make it appear as though you were in the right place at the right time (like I like to do) will work.

What I mean by the peak of action can be explained this way: If you were to through an apple up in the air, there’s a moment in time that it’s no longer going up, but has not started to come down. That split second in time is the peak of the action.; and it’s different from the decisive moment.

I know it sounds difficult, bu in reality it’ quite simple to capture. The key is knowing it’s going to happen, and slow down just a touch…and preparing yourself for it. Having your camera set on continuous shooting is a very good way to get it. For me it’s a visual reaction I’ve come to rely on automatically since I’ve been doing it for a long time; certainly before the digital age.

In the above photo of the little boy, I had him jump over the sprinkler several times in front of different houses. Clearly, the boy is frozen in air. He’s no longer going up, but has not started to come down…thus, the peak of action.

Visit my website at: www.joebaraban and follow me on Instagram: www.instagram.com/barabanjoe. Check out my workshop schedule at the top of this blog. Come shoot with me sometime.


JoeB


Quick Photo Tips: Front and Center

Front and center.
Front and center.

I don’t remember when I first fell in love with my 20mm F/2.8 lens. I’m sure it had to do with the fact that I was shooting Kodachrome 25 (the ISO), and when I wanted a high speed film, I switched to Kodachrome 64. That was in the film days and that was the film of choice. Being that slow made me use a tripod, and it was the best thing I ever did, because now I’m as fast with it as most people are when thy hand hold.

I digress.

The 20mm lens became my all purpose lens and I shot everything with it from portraits to landscapes.  Because it was so fast, I didn’t have to stop down very much to usually get what I wanted in focus. I could also get my subjects “up close and personal” and if I kept them in the middle, or if I kept my camera level when I did put them close to the edge they wouldn’t be distorted. That also included not having their arms and legs too close to the lens or they would be weird and too large for the rest of their body.

I loved to put my subjects what I always referred to as “front and center”. In my online class with the BPSOP, and in my “Stretching Your Frame of Mind” workshops I conduct around the planet, I’m constantly getting my fellow photographers to get “up close and personal” to their subject. For one thing it generates Visual Tension and interest. For another, It anchors them in the foreground and creates layers of interest and depth. Since the camera just has one eye (the lens) it can only see in two dimensions…height and width. You can trick the camera into creating the third dimension…depth by placing your subject front and center.

Btw, I also like to put them smack dab in the middle and to hell with that silly “Rule of Thirds” thing that everyone thinks you have to follow to create good photos.

So try it next time and see if you like it. Put your subject front and center and close to the lens. Once you see how it works and you get over the hump, give it a try, you’ll see that it’s not such a bad idea after all.

Here’s some examples, and all of them were shot with a 20mm lens. Some were shot during the film days and some in the more recent digital age:

Visit my website at: www.joebaraban.com, and follow me on Instagram www.instagram.com/barabanjoe. Check out my workshop schedule at the top of this blog. come shoot with me sometime.

JoeB

Quick Photo Tip: If It Ain’t Broke, Why Try To Fix It.

If I had a dollar for every time a student of mine opened Photoshop and unnecessarily worked on one of their photos…that didn’t really need anything, I would be writing this from poolside at my summer home with a blue and frothy drink sitting on a table by my side.

It’s sad that although their are some great things about Photoshop, there are just as many unfortunate things as well. But that’s our world today.

In my online classes with the BPSOP, and in my workshops I conduct all over the place, so many of my fellow photographers started shooting while the digital age was beginning to boom.

They though and are still thinking that you need Photoshop to complete your ‘wall hanger’, as well as all those ill-considered things your camera either tells you do do, or they’re on the back of your camera beckoning you to take the one way path to mediocrity i.e., the Histogram, or those obnoxious blinking lights that are telling you that you’re about to ‘clip a highlight’…sidetracking your thought process while you’re trying to “color outside the lines” and create something worth a damn.

For those of you that sit in a camera club meting eating goldfish and washing them down with diet drinks, while looking at someone’s image that he or she worked on…and damn proud of it, do not, and I repeat, do not think you have to go down that road.

Photographers that use Photoshop or Lightroom to enhance their photos, more than likely (and I’ve seen it for years) will over process a good image. It will become garish, glitzy, and generally in bad taste, and the sad part is that there are those out there (and you know who you are), that will simply love it.

If that’s what you want, then ‘Lay on McDuff'”…(Shakespeare’s Macbeth)!!!!

If you would rather not, then study what makes a good photo as far as the composition, balance, the light, and ways to keep the viewer around longer. I can tell you that it’s a fifty-fifty proposition that you can find that in a camera club.

Visit my website at www.joebaraban.com, and follow me on Instagram: www.instagram.com/barabanjoe. Check out my workshop schedule at the top of my blog. Come shoot with me sometime.

JoeB

Quick Photo Tip: Photographing Children

Let kids be kids.
Let kids be kids.

Fortunately, I’ve never had to photograph kids to make a living, but over the course of my almost fifty years as a professional photographer, I’ve had my share of  advertising and corporate assignments where children of all ages were the end users for the company that made the products that fed them, clothes them, protected them, fixed them, and played with them; as a result I took the little darling’s  pictures.

My approach was always to lower my thought process to their level and photograph them the way they wanted to be photograph. Whatever pose they had in mind is the pose I almost always went with. As I tell my online students with the BPSOP, and in my “Stretching Your Frame of Mind” workshops I conduct around our planet go with the flow. Don’t try to force an idea on them, because I can bear witness to the fact that it’s a good way to get them NOT to do what you want…just to spite you!!!

I’ve had many kids that wanted to be photographed with their pet. YIKES!!! I can tell you from many years of experience, as far as subject matter goes kids and animals are the two hardest  to photograph…especially at the same time!! Forget about anything predictable (not a bad idea anyway) and again, let them dictate how they want to be photographed with their pet.

Alex and her dog Lucy.
Eye to eye
Eye to eye

Another tip is to get down on their level. I’ve seen way too many photos where the photographer bent over and took the picture from their height.If you’re down where they are, it’s a lot more engaging and whatever direction you’re able to give them will work better “eye to eye”.

I’ve even gone to the extent of having them look in the viewfinder and let them take my picture first. You would be surprised on how often this works. Last but certainly not least, is to pay them. You would really be surprised with how often this works!

Finally, if you’re good enough you can direct them to do something that might look natural, but in reality the idea was conceived by you, the photographer.

😉

Visit my website at: www.joebaraban.com, and follow me on Instagram. https://www.instagram.com/barabanjoe Check out my workshop schedule at the top of this blog. It will be Autumn in France and it’s next October of 2023. Come shoot with me sometime.

JoeB

Quick Photo Tip: Using Body Language

His body language tells it all

Check out my “Autumn in France workshop” under workshops at the top of this blog.

14One of the ways to bring visual interest and tension into your imagery is the use of body language. It’s a way to communicate without the talking, and can disclose a person’s character or attitude without a word being said. this is very important in still photography for obvious reasons.

I teach an online class with the BPSOP, and I conduct my “Stretching Your Frame of Mind” workshops around the planet. One of the areas we work on is ways to create Visual Tension,  and the use of body language is one of them.  I shoot a lot of environmental portraits, so for me body language is an important part of the overall composition. Body language is one of the pieces that make up a good photo, and other pieces of the same puzzle will influence how we interpret non-verbal information by the subject.

The use of hands is so important in expressing thought and conveying the feeling of warmth or strength. If the way people use their hands wasn’t significant, and you doubt that it can help you take your imagery what I refer to as “up a level”, then one only needs to think about sign language and the way the hands are used in a way to send a message to others.

What about the face? A simple expression can send so many different meanings and can portray the range of emotions we all have; don’t we all occasionally carry our disposition, mood, and temperament on our faces.

When taking photos of just one person, the body language can be both compelling and enchanting, but when there’s two or more people, then the outcome can be extremely entertaining and thought-provoking when put in the right situation; especially when light plays a big part…as it always should.

The next time you’re taking pictures of people, try to incorporate some body language and see how much it helps in generating visual tension and interest.

Here’s are a few examples of both one and more than one subject. Can you tell by their body language what’s happening?


.

Visit my website at: www.joebaraban.com, and follow me on Instagram. Check out my 2023 workshop schedule at the top of this blog. Come shoot with me sometime. My next one will be “Autumn in France” and you can read the description at the top of this blog.

JoeB