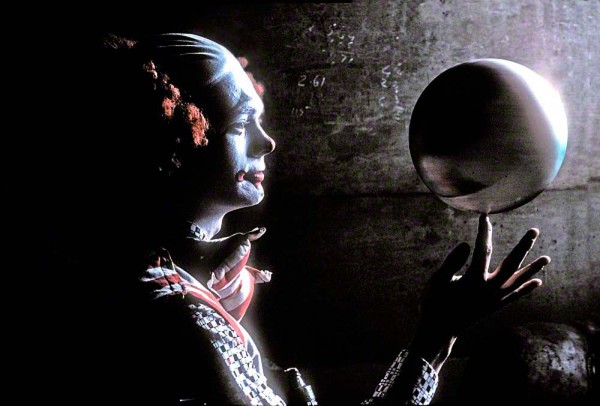
In my part I post on the “Law of the Light” I talked about positioning my 57’Chevy in a position where I could get a “POP” on the front grill. By placing the car in such a way as to have the Angle of Incidence (the light falling on the grill) being the same as the Angle of Reflection (the light reflecting off the grill to the lens).. I also said that it was my favorite way to light …anything!!! Well that, next to backlight, is my favorite way to light people as well.
In my online class with the BPSOP, and in my “Stretching Your Frame of Mind ” workshop I conduct around the planet, I provide my students with a diagram of a clock as I’ve provided here. If you notice, I have my subject right in the center and my camera right above the six. I tell them to imagine this clock on the ground (or behind your subject depending what is easier for you to imagine) and the person they want to photograph standing where I have the subject (in the middle of the clock).
In order to light the person so that they’re in the “Law of the light”, I want the sun, or the light source to be either around 10 o’clock or around 2 o’clock with the camera at 6 o’clock. This would be when the angle of the light source hitting the subject is the same angle as the light sources reflecting off the subject hitting the lens.
As you can see by my clock diagram, the source of the light is coming from about 2 o’clock and from behind the jockey. The angle from the ‘2’ to the subject is the same angle as the subject to the camera.
Here’s a few more examples of shooting people in the “Law of the Light” In each of these photos, imagine the clock superimposed over the photo:
Making pictures is a lot more fun than taking them.
The first workshop I ever taught was at the Maine Media Workshop in 1984, and up until the last few years I’ve been teaching while shooting advertising and corporate photography ever since. That’s thirty years of looking at my fellow photographer’s photos.
Thirty years later, I’m semi-retired and now teaching online with the BPSOP, and still conducting my “Stretching Your Frame of Mind” workshops around the planet.
If I were to pick out one thing that I’ve seen over the course of my teaching career, it would be the fact that the majority of all my students just go out with their camera and take pictures. I wrote a post about it called “I came, I shot, I left”, which somewhat touches on the subject at hand.
One of my favorite lines that I say to my students is, “I don’t photograph what I see because I never see what I want, so I photograph what I’d like to see”. What does that mean you say? It means that I’m in the business of making, not taking pictures. My background isn’t in photography. Truth be known, I didn’t hold a 35mm camera until I was twenty-one. I was an art student who loved painting and design. The day I picked up that camera was the day I changed my favorite medium, a paintbrush, to a 35mm Pentax Spotmatic with a 50mm lens.
I still consider myself an artist. Now, instead of a canvas on an easel where I was making works of art, I have a camera on a tripod, and I’m now making pictures.
If you’re out with a camera over your shoulder with the intent of coming back with your ‘work of art’, and you’ve taken my online class or my workshop, you have an ‘Artist Palette’ with you. You’re using the elements of visual design to help you see things you wouldn’t normally see and be able to make a picture from what you looking at by using one or all of these Elements.
Think about going out and making pictures, here’s what I mean: Before you click the shutter, take some time to walk around your subject, center of interest, or even the entire location your about to shoot in. Shoot it from different points of view. Before you even bring the camera up to your eye, look where the sun or light source is coming from. Position yourself to side light then backlight your subject. I’m not a fan of front light, but there’s time when it works so look for it as well. I wrote a post about looking at things in a new way. It’s also about making pictures.
Think about scouting the location ahead of time to check on the direction of the light. Maybe there’s some props you’d like to bring to help tell some kind of story. Being a storyteller is about making pictures. Maybe adding a person would help, so you drag one of your kids (you do have to pay them something if you want their undivided attention), or a spouse or friend. If you live in or close to a large city, Google up that cities Tourism Bureau or Film Commission for places to shoot; they love to help photographers. What about festivals (lots of photo ops) that come once a year? These are the kinds of things that change your thought process, and now you’re also in the business of making pictures.
Visit my website at: www.joebaraban.com, and follow me on Instagram: www.instagram.com/barabanjoe. Check out my new workshop schedule at the top of this blog. Come shoot with me sometime.
Since humans rely on their perception of the environment that surrounds them, visual input is a part of everyday life. This is a part of what I teach in my online Gestalt class with the BPSOP. I also talk about it at lengths during my “Stretching Your Frame of Mind” workshops I conduct around our planet.
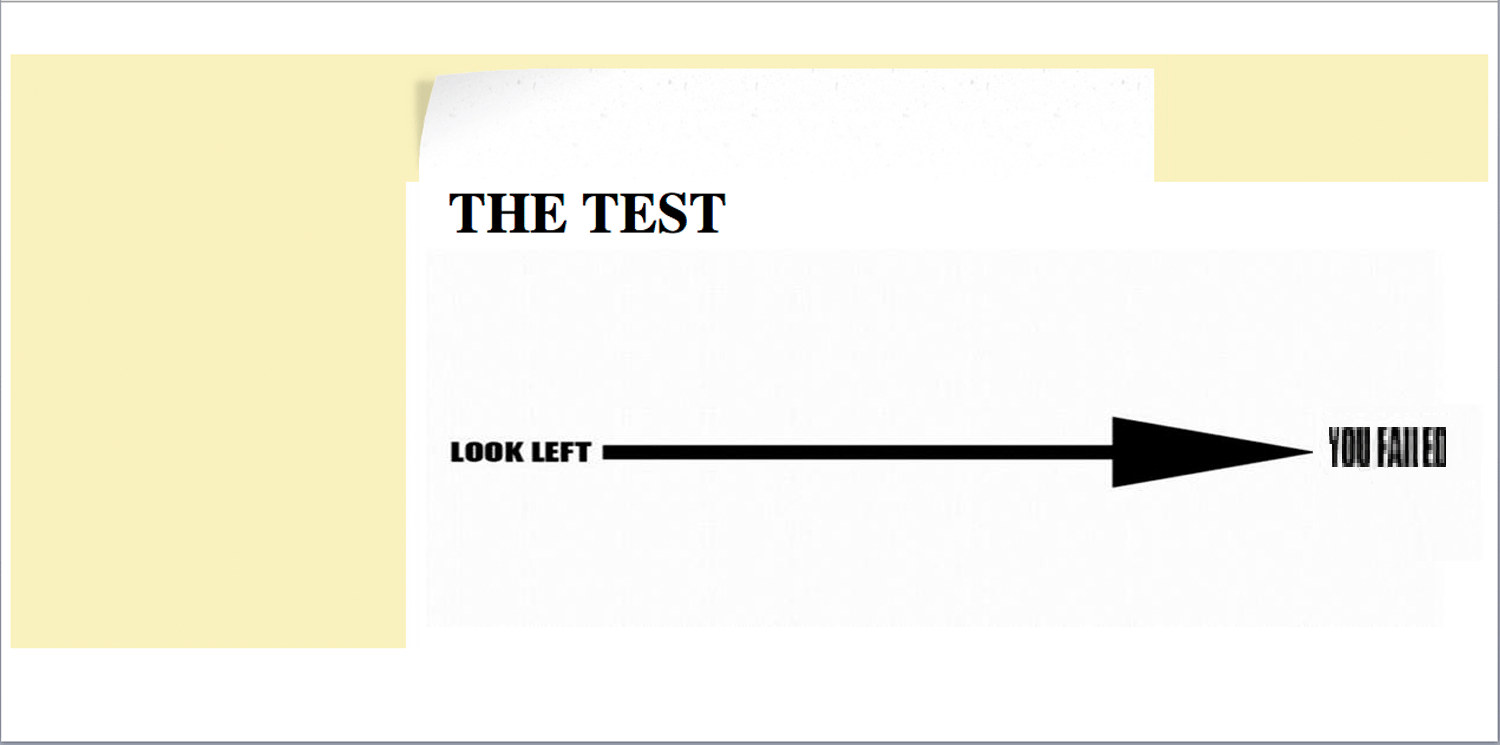
One of the six concepts we work on is called Continuance, and it’s about directing the viewer to areas in our composition while moving him around the frame.
Instead of putting up my usual photo, this time I put up a diagram that I show to my fellow photographers. The last time I counted, no one passed the test!!!!
If you can use this concept, and apply it to your thought process, you’ll create images that not only will keep the viewer around longer (isn’t that just what we want?) but can also stand the test of time.
The viewer will look where they’re looking.
The next time you’re out shooting, think about this diagram, and try to incorporate the theory behind it into a photo. Think of the arrow as an analogy as far as directing the viewer to look in the direction you want. You can also get the viewer to look in the direction you want (or directions) by having people in your photos act like arrows and use their eyes to do the looking. If you can create two directions, all the better.
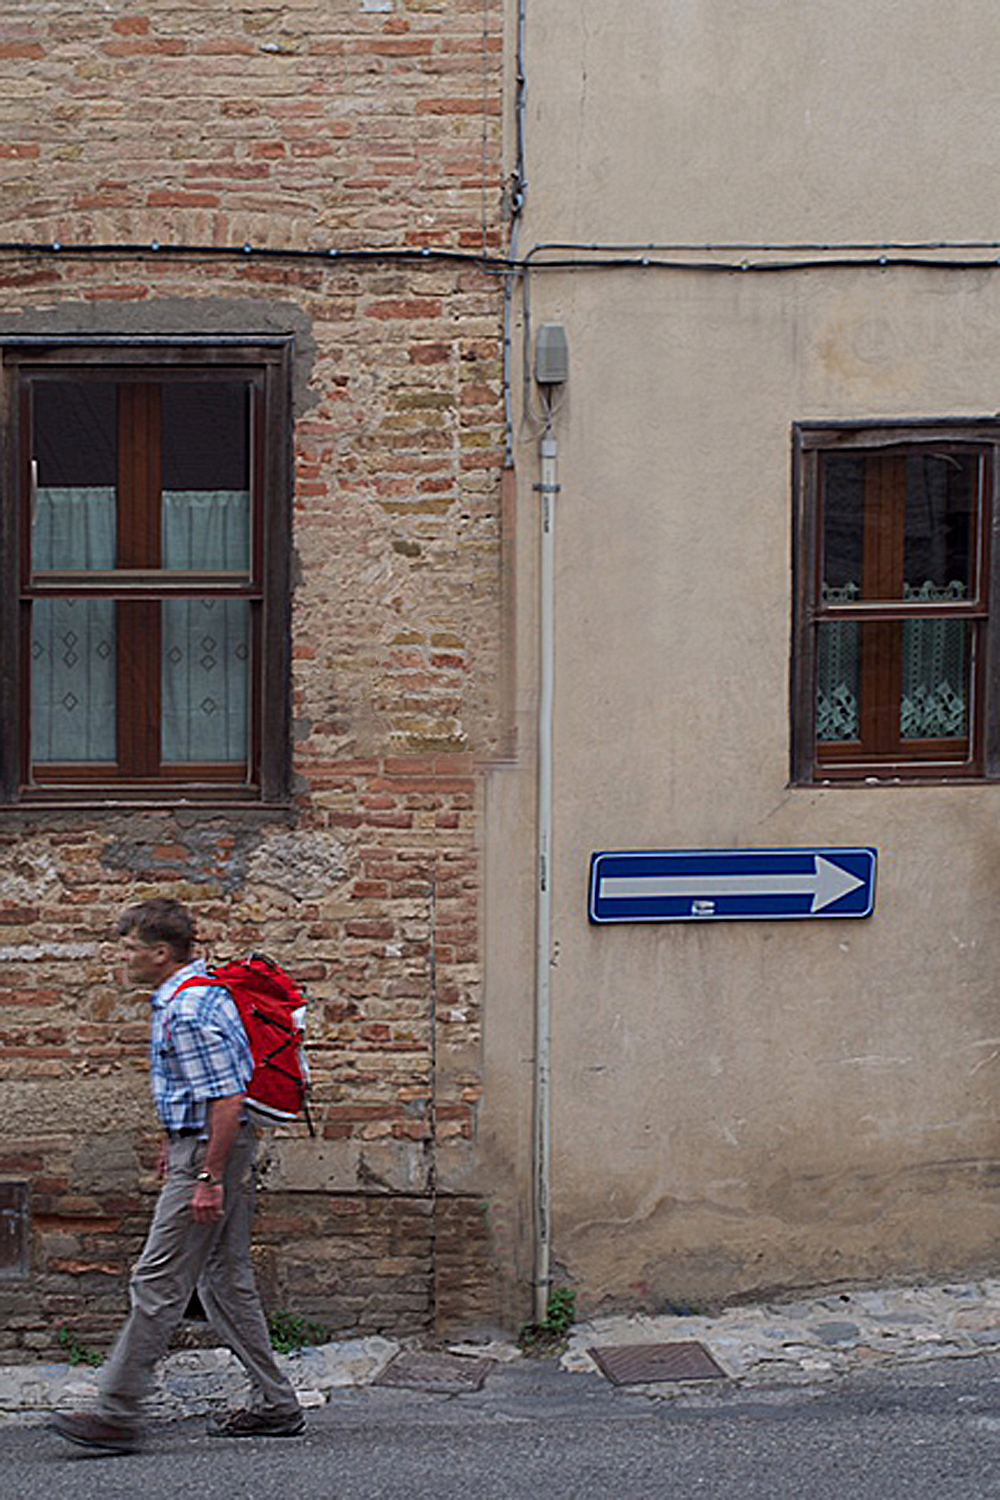
When I saw the man walking down the cobblestone street in Tuscany, I immediately saw it as a way to lead the viewer in the opposite way the man was walking. It might not be one of my best photos, but it sure does show how important the Psychology of Gestalt is.
Visit my website at: www.joebaraban.com, and follow me on Instagram: www.instagram.com/barabanjoe. Check out my upcoming workshops at the top of this blog.
In the pat few years I’ve written several posts that included, to some degree, directional and leading lines and have talked at some length about the Vanishing Point. It’s time to dedicate an entire post on one of the most powerful tools in taking our photos what I refer to as “up a notch”…the Vanishing Point.
Back in the very old days (as in medieval times) when artists, or draftsmen wanted to show linear perspective, they would either overlap objects to indicate position and create a visual sensation of depth, or they might place one set of objects or subjects below each other to try to create the same effect.
In the early fifteenth century, an artist named Fillipo Brunelleschi demonstrated a method to create the illusion of making distant objects appear smaller than closer objects. It was a method of perspective that we now refer to as a Vanishing Point.
Brunelleschi had created a way to create the third dimension (depth) on paper, in a two dimensional plane, existing of only height and width.
In the modern world, describing a Vanishing Point to a person without specialized knowledge would be the point where parallel lines appear to converge.
In my online class with the BPSOP, and in my “Stretching Your Frame of Mind” workshops I conduct around our planet, we work on ways to keep the viewer an active participant when looking at our photos. How we manage what the viewer perceives and processes is an important step in doing just that.
How we can get the viewer to perceive a Vanishing Point goes back to the principle of making things appear smaller as they move away from the lens towards the horizon. A Vanishing Point is an important tool when you’re trying to create depth on a two dimensional plane. Besides depth, it will add realism and a sense of drama; it can be coming from any direction the viewer looks.
A classic Vanishing Point is made up of three elements:
The Point: is the spot on the horizon or just past it. This is where your eye will eventually end up after you’ve composed your photograph and put whatever subject matter or objects you have incorporated into your composition.
The Plane: is the image seen through the camera in two dimensions.
The Line: refers to the parallel lines that appear to get closer together the further away they get. In fact, they remain the same distance apart as they lead to the point on the horizon. These lines are perpendicular to the lens axis and start in front of the photograph. When they reach the point on the horizon, everything you observe comes together, then seems to disappear.
There are those that say that the parallel lines do not need to go all the way to the horizon, as long as they converge at a point somewhere past the middle of the frame; and/or converge close enough to the horizon to be implied.
I realize that it sorta reminds one of a tongue teaser, but take it from me it isn’t.
For those that might be new to my blog, I have been putting out a post every five or six days since 2011. I teach an online class with the BPSOP, and I conduct personal workshops all over this perfectly round planet.
As most of you know, I prefer the challenge of getting it right in the camera with little or no Photoshop/Lightroom help. However, if there’s nothing I can do before clicking the shutter, a.k.a., moving forward, backwards, raising the camera up a little, or down to eliminate or adding an object, then as part of my thought process, and before I click the shutter I will realize what I have to do in post, and I have no qualms about doing it.
Having said that. I want to make sure that what I do, doesn’t look like I did it. So many of my students or even when they’re not, tend to over process their photos to the point of looking like some kind of cartoon. The real problem I face is that when they tell me how much someone loves their image, it’s hard to discourage them from stopping.
The general public basically has no taste and has no idea when something looks garish. It’s a dilemma that I constantly face when working with fellow photographers.
All I can do is to point something out and then rely on their photographic integrity and resolve to rise about any one sided compliments that are coming from family, friends, fellow photo club members and even to go as far as any service animals…”Oh the Horror”!!
All I can say, with years of experience, is that if it ain’t broke, don’t try to fix it. It will take firmness of purpose, and if I’m there to help you down the road of righteousness leading to a better world, you can count on me to supply the backbone you’ll need for those first few steps to photo glory.
WOW, now there’s a mouthful of utter BS!!!!
:-)))))))))))))))))))))))))))))))))))
Bottom line is to take a look at what you’ve done and ask yourself…Do I believe it?
First of all, I still have a spot open for my next trip to Cuba. This time we’re going to Santiago and Baracoa, the end of January and it’s a small group of seven. With these trips you don’t have to be a photographer, you can just come for the historical and cultural aspect. We always have a Cuban Historian with us and you can just use your iPhone if you want. Click on workshops at the top of this blog for the complete description.
If you’re interested and have questions, you can email me at: joe@joebaraban.com.
Ok, back to business! For those new to my blog, I have been writing these posts since 2011; one coming out every six days…that’s lot of posts. I teach an online class with the BPSOP, and I conduct workshops all over this completely round planet.
Photography is not about the camera. A camera didn’t make a great picture any more than a typewriter wrote a great novel. What’s important is the ten inches behind the camera that really counts.
Take a moment and think about all the famous photographs that were shot by: Alfred Steiglitz, Margaret Bourke-White, Henri Cartier-Bresson, Ansel Adams, Dorothea Lange, Edward Weston, just to name a few that immediately comes to mind.
These photographers and their photographers have stood the test of time and their cameras were antiquated and archaic compared to the sleek new mirrorless cameras we use today that can do everything except snap the shutter…and they can ever do that for you!!!
So, my fellow photographers, don’t worry about the camera you use, although at the very least I would recommend a full frame camera so what you saw looking through the viewfinder, you got. Concentrate on your composition and incorporating the basic elements of design. Shoot on manual, get rid of those insidious blinking lights. Also, you don’t need a Histogram. Learn the light all by yourself. I’ve been shooting for fifty-three years and I’ve never even thought about it…and my pictures have come out pretty good.
FYI, the above photo was shot with my little Lumix DMC-LX7. If you look at the photos on my website, you would be surprised how many were shot with this camera.
I would also highly consider taking my classes!!
Visit my website at www.joebaraban.com and follow me on Instagram www.instagram.com/barabanjoe. Check out my workshops at the top of this blog and come shoot with me sometime. How about coming to Chicago with me September 4th to the 11th for a great workshop in a great city.
Check out my new workshop on the six concepts in the Psychology of Gestalt: Gestalt Workshop link
I recently had an online student in one of my three classes with the BPSOP that for the four week class keep telling me that as a purist it was wrong to move anything before you photographed it. He also said that it was going “against my grain” to add or subtract something in his composition. Btw, I’ve had several similar discussions in my “Stretching Your Frame of Mind” workshops I conduct around the planet.
He claimed that he was an idealist, and he only photographed something the way it was. Well, that’s a real bone of contention with me and I’ll tell you why. First of all let me define what the idiom “bone of contention” means. It’s basically an argument between two groups or persons that can rarely be settled.
Let me backtrack a bit and I’ll tell you that this person also uses Lightroom, Photoshop, HDR, and an assortment of plug-ins. He uses them to a point where the actual photograph doesn’t resemble a photograph any longer. Whether the end result looks good or not is in the eye of the beholder, but in my way of thinking it is more computer art than photography. If my fellow photographers want to use the computer to help them then that’s their business and it’s fine with me.
OK, herein lies the bone of contention. How can someone call themselves a purist when they manipulate their pictures in the computer? Whether they’re well done or not isn’t the issue here. The issue with me is that in my opinion a photographer who calls himself a purist should never do anything at all to his photos. That means before the shutter is clicked, and especially after.
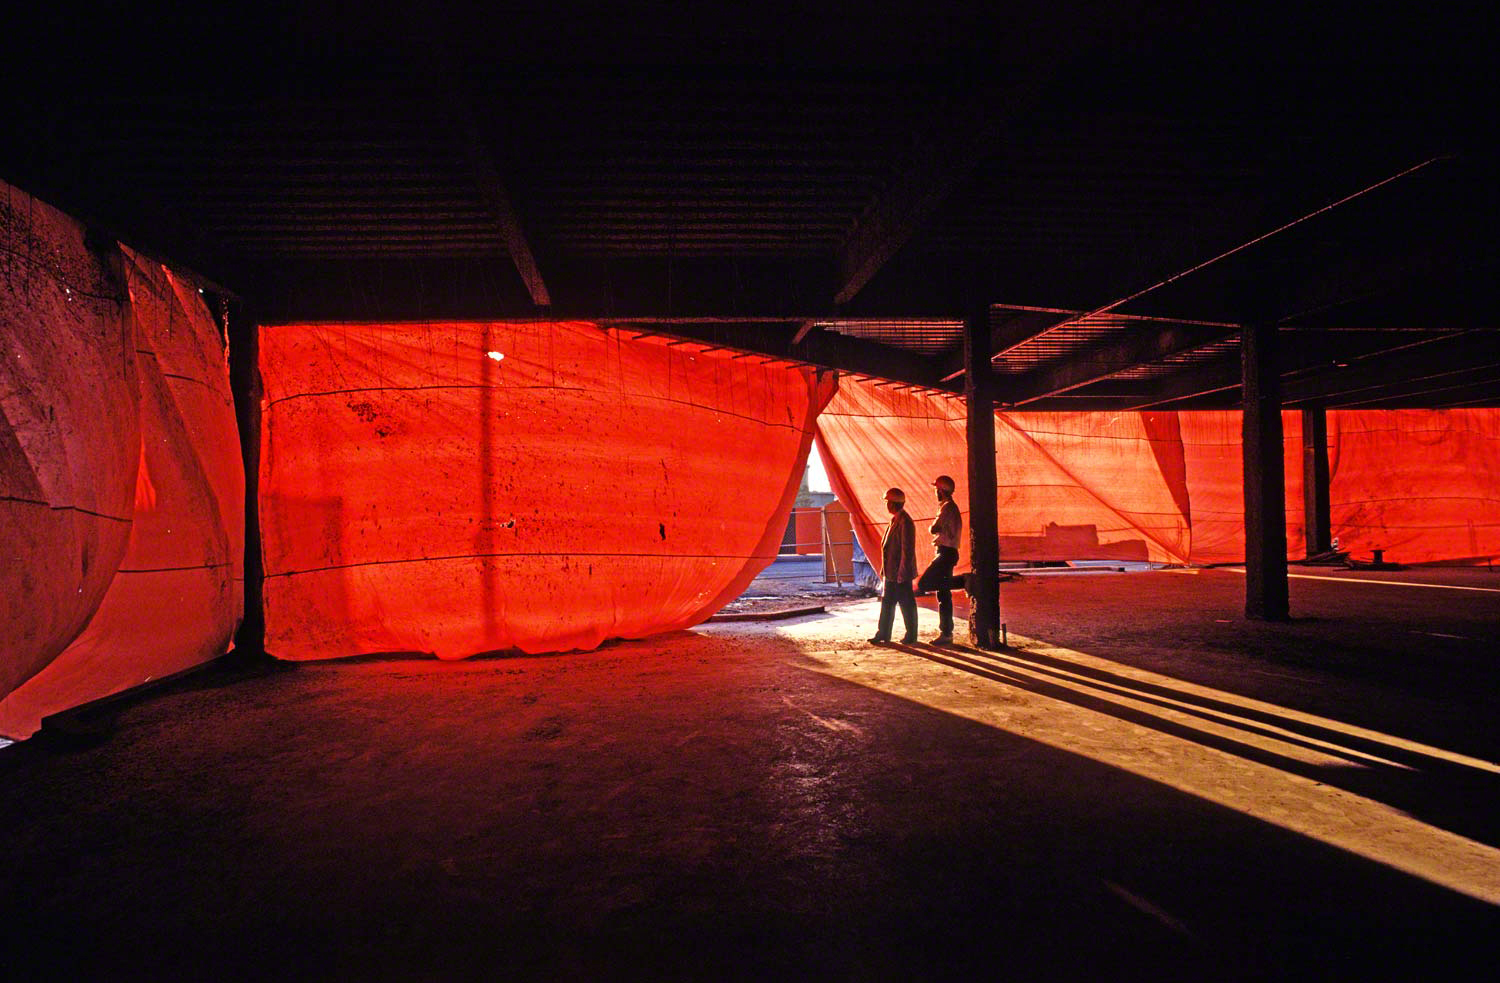
In the above photo, I moved the two men from where they were and positioned them in the light. Although I did nothing in post, I would not be considered a purist…and that’s perfectly ok with me. I photograph what I’d like to see, not necessarily what I see. My background is in painting so to me the camera on a tripod is the same as a blank canvas on an easel.
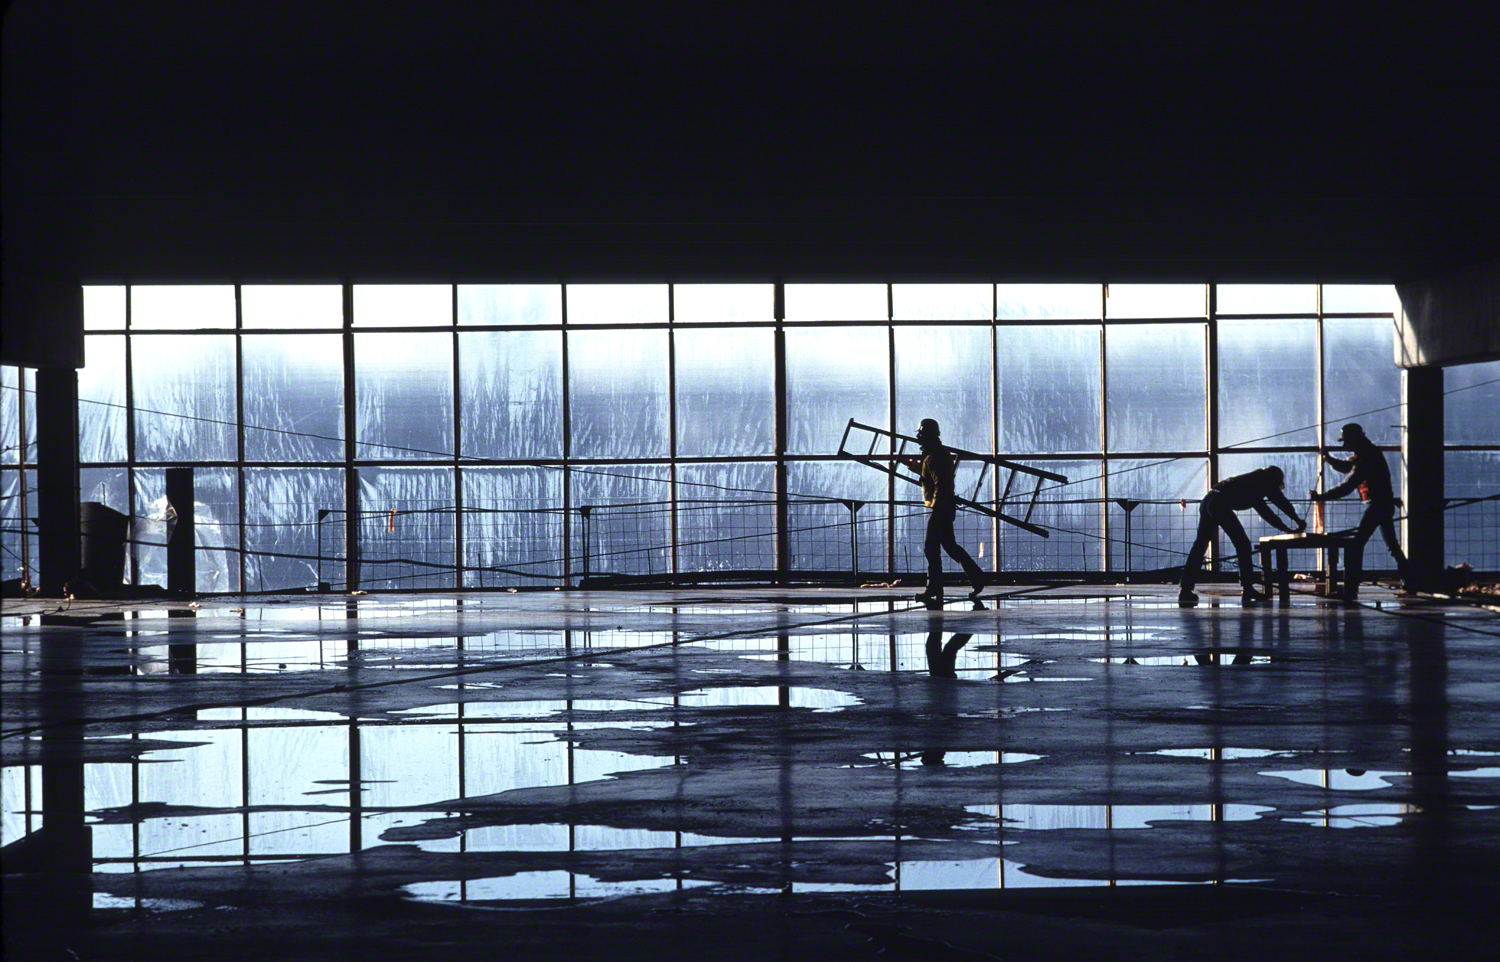
The second photo depicting a similar construction situation was not manipulated in any way, either before or after the shutter was released. I like shooting what I see as much as anyone else, and if the situation comes where I can, I will. It doesn’t make me feel any different than if I had placed all the workers and wet down the concrete. The only thing that matters is if it’s a good photo.
The purist in me coming out!
I’d love to get a response from some of you out there that follow my blog. What do you think?
Visit my website at: www.joebaraban.com, and follow me on Instagram: www.instagram.com/barabnjoe. Check out my workshop schedule at the top of this blog. come shoot with me sometime.
Check out my new workshop on the six concepts in the Psychology of Gestalt: Gestalt Workshop link
Actually, the actual line came from one of my favorite all time movies, On the Waterfront from one of my all time favorite actors, Marlon Brando. Here is the actual scene for those old enough to remember it: http://www.youtube.com/watch?v=A_GGVDVrIcM
I’m writing this post as a result of another of my students taking my online class with the BPSOP just telling me that the Histogram is a great tool for figuring out the proper exposure..
It’s also come up a number of times when during one of my “Stretching Your Frame of Mind” workshops I conduct around the planet, I’ve walked up to a fellow photographer during the last rays of golden light coming from a beautiful sunset and he was studying the histogram on the back of his camera.
“What????? Are you kidding me?????” I say to them. Ok, let me get this straight, they’re standing there looking at some diagram on the back of their camera, deciding if the exposure is correct? When there are seconds of great light left? You do know what could and will probably happen…right? When they decide on the right exposure, the light will be gone.
Light is so fleeting, that even for someone like me who has made light the number one priority in his photography over the past fifty-three years and is damn good at it, still has to react quick ( as in very quick) to get the shot.
I can say that in all these years, I’ve never thought about a Histogram or any device created by the Digital Dork Gods that are supposed to make you a better photographer.
What about these insane yet comical blinking lights that they also put on the back of your camera…why? So you won’t clip the highlights. What do I mean?
Here’s one of those definitions, and would I love to meet the person that wrote it!!!!!
“The clipped area of the image will typically appear as a uniform area of the minimum or maximum brightness, losing any image detail. The amount by which values were clipped, and the extent of the clipped area, affect the degree to which the clipping is visually noticeable or undesirable in the resulting image.”
UNDESIRABLE??? SERIOUSLY???? If you’re the one that wrote this please contact me so I can try to get your head screwed back on so you’ll see where you’re going instead of always looking behind you and in the past.
I digress.
Why would these digital dork Gods want to put these helpful tools on the back? To lead you down a one-way ticket to mediocrity.
Why would you want to take a normal picture with an average exposure that a Histogram will do for you? I suppose it’s the safe thing to do and to me safe means average.
Be a student of light and exposure, and the best way to achieve that is to learn how to bracket. Learn the shutter speed/aperture combinations, know when to overexpose more and when to underexpose more.
Yes, I know that you really don’t need to know all that because that’s what Lightroom is for. Knowing how to adjust exposure in front of a monitor will definitely make you a better computer artist/digital technician but why not strive to be a better photographer. When it’s all said and done, twenty, thirty, or forty years down the road, you won’t have a clue as to what makes a good photo. What makes your pictures stand out from all the others.
In all these photos, including the one above, If I had looked at a Histogram to decide on what exposure looked the best, I would have lost the light and the shot in every one of them.
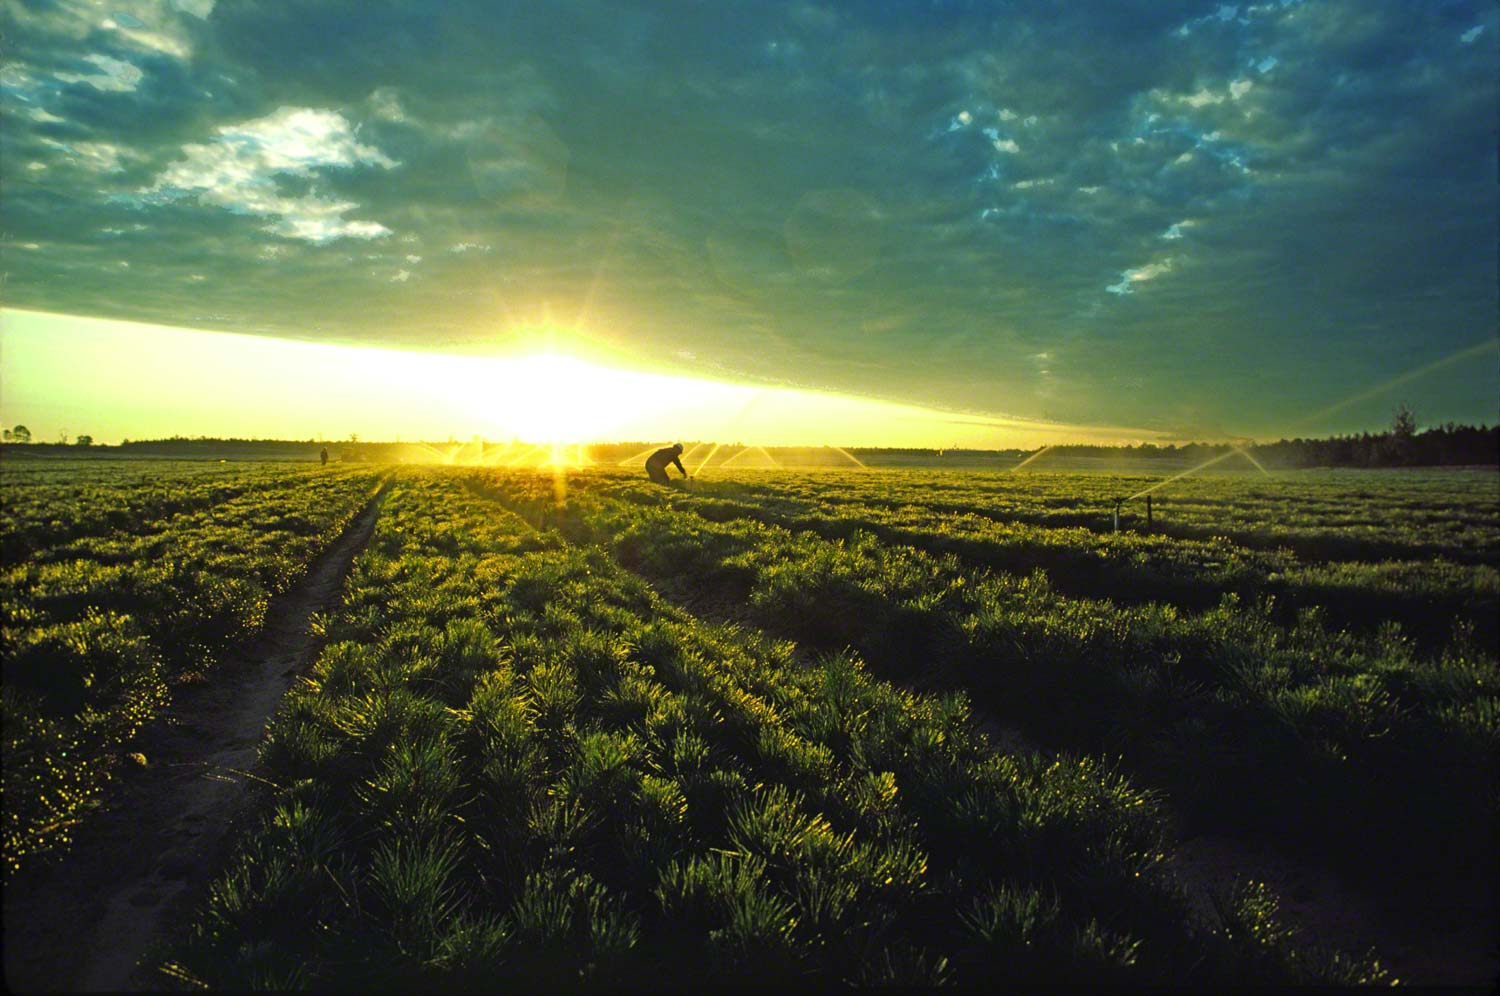
My favorite sunrise, clear with a chill in the air.
Check out my new workshop on the six concepts in the Psychology of Gestalt: Gestalt Workshop link
What do you do if you know you’ve just taken a great photo…a keeper…an OMG shot???? Do you do react differently when you’re alone verses when you’re shooting with someone else?
I teach an online class with the BPSOP, and I also conduct my “Stretching Your Frame of Mind” workshops around our planet, and I just love it when one of my fellow photographers submits a photo that he or she is very proud of.
Is it a series of fist pumps, hootin’ and a hollering, jumping up and down? An end zone really stupid dance? Maybe you’re the discreet or quiet type of photographer that just whispers “yes’ under his or her breath…or just maybe an ear to ear smile to a small smirk with one raised eyebrow.
Here’s how it often happens to me: After a conversation with yourself in the mirror, you’ve decided to set your alarm clock at an ungodly hour so you can get to a location at sunrise that you’ve always wanted to shoot.
You load your equipment in the trunk, and after a quick stop at a convenience for a cup of black coffee, your off. As you’re driving, you’re head is halfway out the window looking up at the slightly brightening sky, hoping and praying to see some color and stars towards the area of the horizon where the sun will be coming up; an hour or two later.
You arrive at your destination and everything so far looks good. You still have a couple of minutes before the start of the Blue Hour.
This is a great time to work on silhouettes, and I for one love this time of the morning, especially when there’s a little nip in the air.
Now the sun is coming up and the Blue Hour has turned into the Golden Hour. For the next thirty to forty minutes (depending on the time of year and your location) you’re shooting everything and anything that has this beautiful light falling on it.
You see an opportunity to shoot something that has caught your attention out of the corner of your eye. Bracketing to make sure you’ve captured a good exposure, it’s now forever embedded in your mind and more importantly on your card. There’s a sensation that comes over you because you know you got it, and it makes you feel really good.
During the drive back home your mind flirts with visions of all the beautiful and different shots you took, but that one, that keeper keeps coming back and all you can do is just smile.
So next time you’re on holiday, set the alarm clock the night before with all the best intentions of getting up and going shooting, don’t roll over with the pillow on your head because it’s dark outside and there’s a chill in the air. Get up while the others are sleeping, get dressed grab your equipment and tiptoe out; you just never know when something will make you feel really good.
Check out my new workshop on the six concepts in the Psychology of Gestalt: Gestalt Workshop link
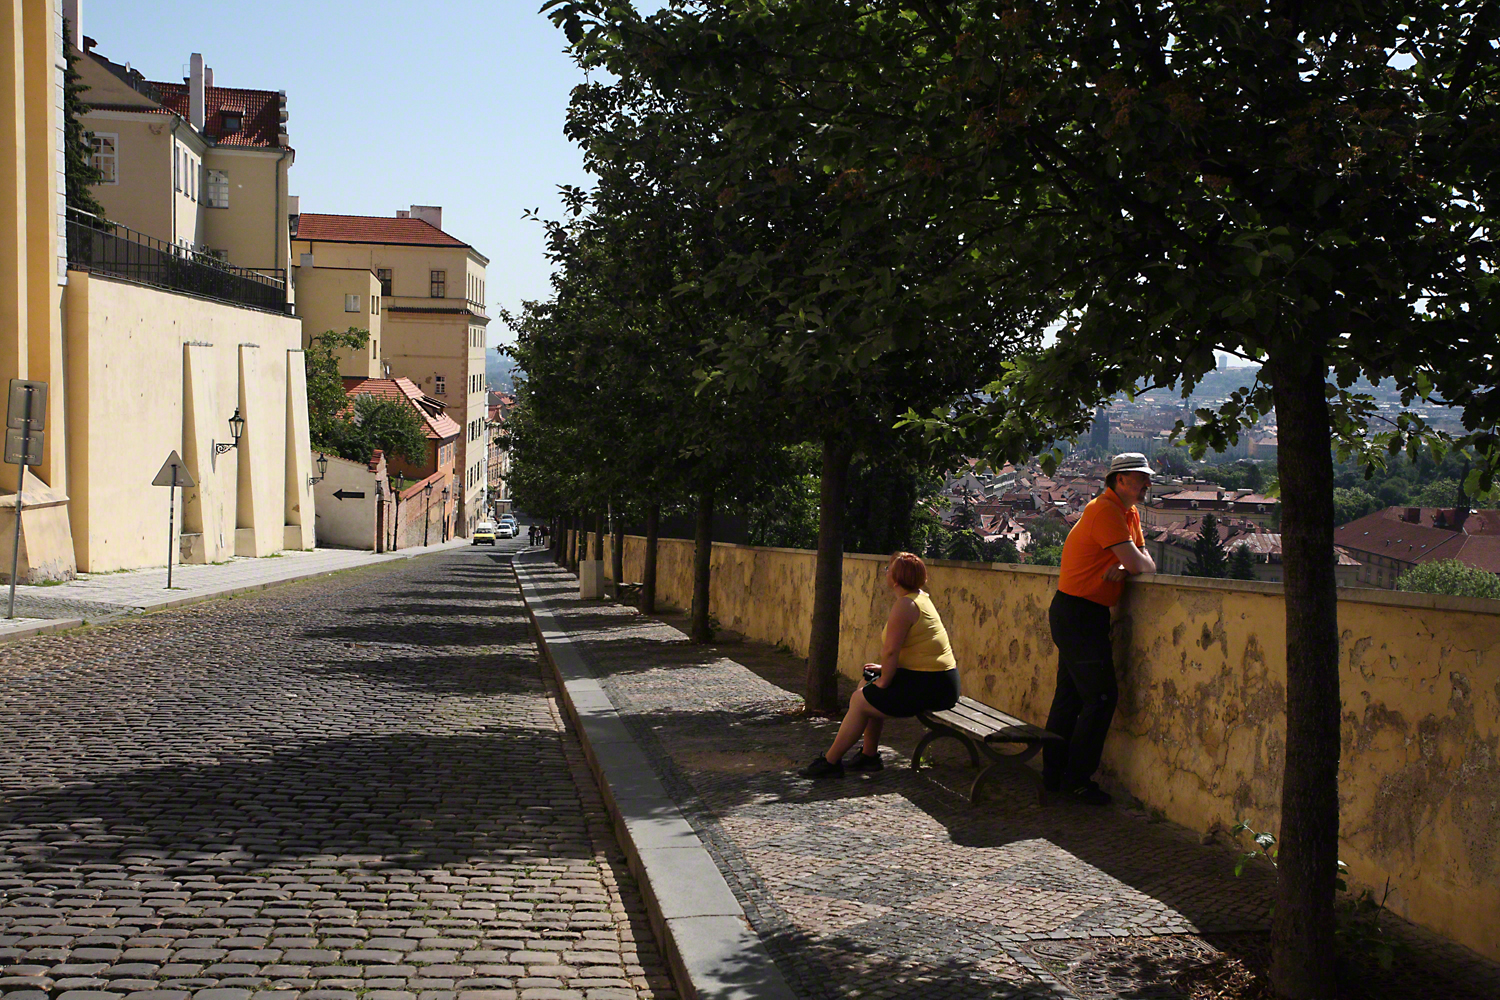
It was during my Prague workshop when one morning before the sun came up, a woman came up to me to show me her new $60,000 Leica System.
She said, “Now I’m ready to take some great pictures”. For some reason she thought that because she had the top of the line, most expensive 35mm DSLR camera she would be able to take some ‘wall hangers’.
Even if that were true, it would have been a good idea to learn how the camera works well before the start of the workshop instead before sunrise at one of the locations. I knew it was going to be a problem when she asked me what to do…but we’ll save that for another post!!
But it’s not true. I say we should judge the photographers by their pictures, not their camera equipment. What I tell my online students with the BPSOP, and the ones that take one of my workshops, It’s not the camera, it’s the ten inches behind it that matters.
Lumix DMC-LX7
When I’m walking around with some of my workshop participants, I have a Canon 5D Mark III with a 17-40mm lens on it over my shoulder, and a small Lumix DMC-LX7 with a 24-90mm zoom around my neck. This gives me a range 0f 17-90mm which covers everything I need.
If you were to look at my website at: www.joebaraban.com, you wouldn’t know what photo was taken with what camera.
I keep thinking about spending a lot of money on a new Canon mirrorless EOS R5 with some lens…around $10,000. I also think about taking that money and using it on a fabulous trip for two somewhere and use my old cameras. I’m pretty sure that the images I take will still turn out pretty good!!!
Follow me on Instagram: www.instagram.com/barabanjoe. Check out any new workshops at the top of this blog. Come shoot with me sometime, and bring your old camera, it will be ok!!!
BTW, the reason you might not see the new workshops posted is that they fill faster than I can post them…but please keep trying!!
Check out my new workshop on the six concepts in the Psychology of Gestalt: Gestalt Workshop link
Back in the old days, besides being a print photographer for advertising, editorial, and corporate clients, I was also a director/cameraman and worked on TV commercials.
First POV
The first set-up was referred to as the Master Shot. It was like an establishing shot where all the other set-ups from the storyboards were derived from. For me, it was the set-up that triggered my imagination to segue into another POV…and different lighting scenarios if needed.
Well I’ve brought that idea to my online class with the BPSOP where I’ve given as one of the four week assignments. I also talk about it to my “Stretching Your Frame of Mind” workshops I conduct around our planet.
This a great exercise because so many of my fellow photographers walk up to a subject at a particular location, bring up the camera to their eye, take a picture, them move on usually leaving a lot unseen on the table.
Second POV
So, the next time you go out shooting, take a “Master Shot”. This is the first composition you set up before you start looking for other ideas. It’s the first thing you see and shoot before you start “seeing past your first impressions”. It sort of loosens up your thought process. It’s just like stretching before you jog or hitting a bucket of golf balls before you start playing, or taking a few swings in the batter’s cage before your game begins.
Third POV
Then take two or more photos of the same location/subject. These two shots should come to you while you’re taking the first shot…and looking for ways to segue this first photo into a better way to look at it…at the same time. What I don’t mean is to stay in the same position and just zoom in or out in the same composition.
For example:
Up close and personal or back up
Change lens
Up high then down low
Different light
Change a prop
Put in a person, or take one out
Etc.
If you’re diligent about creating a “Master Shot” like I’ve been doing for the past forty-eight years, I can tell you that the results will be immediately seen and your work will move up at least one notch…if not several.
In the photos I’ve featured as examples I show to my classes, the top photo was the “Master Shot”, and the others were different ways of looking at the same subject.
A camera, handled correctly, is a passport to wonderful places and experience. You’ve noticed that I put ‘handled correctly’ in italics, and there’s a good reason for that.
I teach an online class with the BPSOP, and I also conduct workshops everywhere in the world. It’s the workshops that I want to talk about because it’s there where I find the biggest problems.
Case in point. During my workshop in Prague, we were shooting sunrise at a famous cathedral know for being one of the first to use a Flying Buttress in it’s architecture. Right at sunrise a woman came up to me with her new Leica (with lens was $60,000) and asked me if I knew how to use it.
Apparently, she had bought this system right before the workshop and had no idea how to use it….boggles the mind!!!
I said that I had no idea and asked her if she had practiced with it and read the manual before coming. I also said that there’s lots of instructions you could find on YouTube.
She responded with a strange kind of look and then said that she had never thought about it. She thought that there would be people in the workshop that could help her.
I can’t tell you how important it is to try out new equipment before going anywhere. Whether it be a new body, a lens, or switching to a brand new system…especially a new system. Sit down with the camera and manual and go through each and every page so you’ll have a complete working knowledge and
be in a position to come back with photos of a lifetime.
The second most important thing I strongly suggests to all my fellow photographers and students is to learn how to shoot on manual. Make your own decisions as far as the camera settings, and not let the camera (a machine) make them for you. I can guarantee you that you’ll become a far stronger shooter.
Visit my website at www.joebaraban.com, and follow me on Instagram: www.instagram.com/barabanjoe. Check out my workshop schedule at the top of this blog. Come shoot with me sometime.
Ok, now that I put the emphasis on what this post is about, I can further explain.
I’ve been writing posts here since 2011. For those that are just now tuning in, I teach an online class with the BPSOP, and I conduct workshops all over the place. I can tell you from personal experience that so many of my fellow photographers don’t pay attention to what’s going on inside the four walls of your composition…or barely outside.
Your field of vision narrows down to your subject or your center of interest, without considering what else is going on. One of the best ways to help with this problem is what I’ve been teaching forever. It’s called my 15 Point Protection Plan.
There’s two ways to use it effectively. The first is easy, just move your camera up a little, down a little, move to the right or left, take a step forwards or backwards.
The second comes when the first one can’t be accomplished. First, let me say what I’ve been telling students as long as I’ve been teaching. Make no mistake, you and I are artists who has chosen the camera as our medium. The camera on a tripod is the same as a blank canvas on an easel.
We paint. What that means at least what it means to me, is that like a blank canvas we add pigment until we feel like we have painted our ‘work of art’. In photography, the art of subtraction, we add or subtract things in our compositions until we have create our ‘work of art’.
What that means is that if something is in the way, move it out of the frame. If you need something that’s out of your composition, move it in.
Of course this is predicated whether you needed to obtain permission or not. I know…I know…I know, that there are people out there that call themselves a purist, and wouldn’t think about doing something so utterly distasteful. Those same so called purists have no qualms about using Lightroom or Photoshop to enhance their photo.
I teach my fellow photographers how to incorporate the elements of Visual Design into their imagery both in my classes with the BPSOP, but also in my workshops I conducts around the planet…the round planet!!
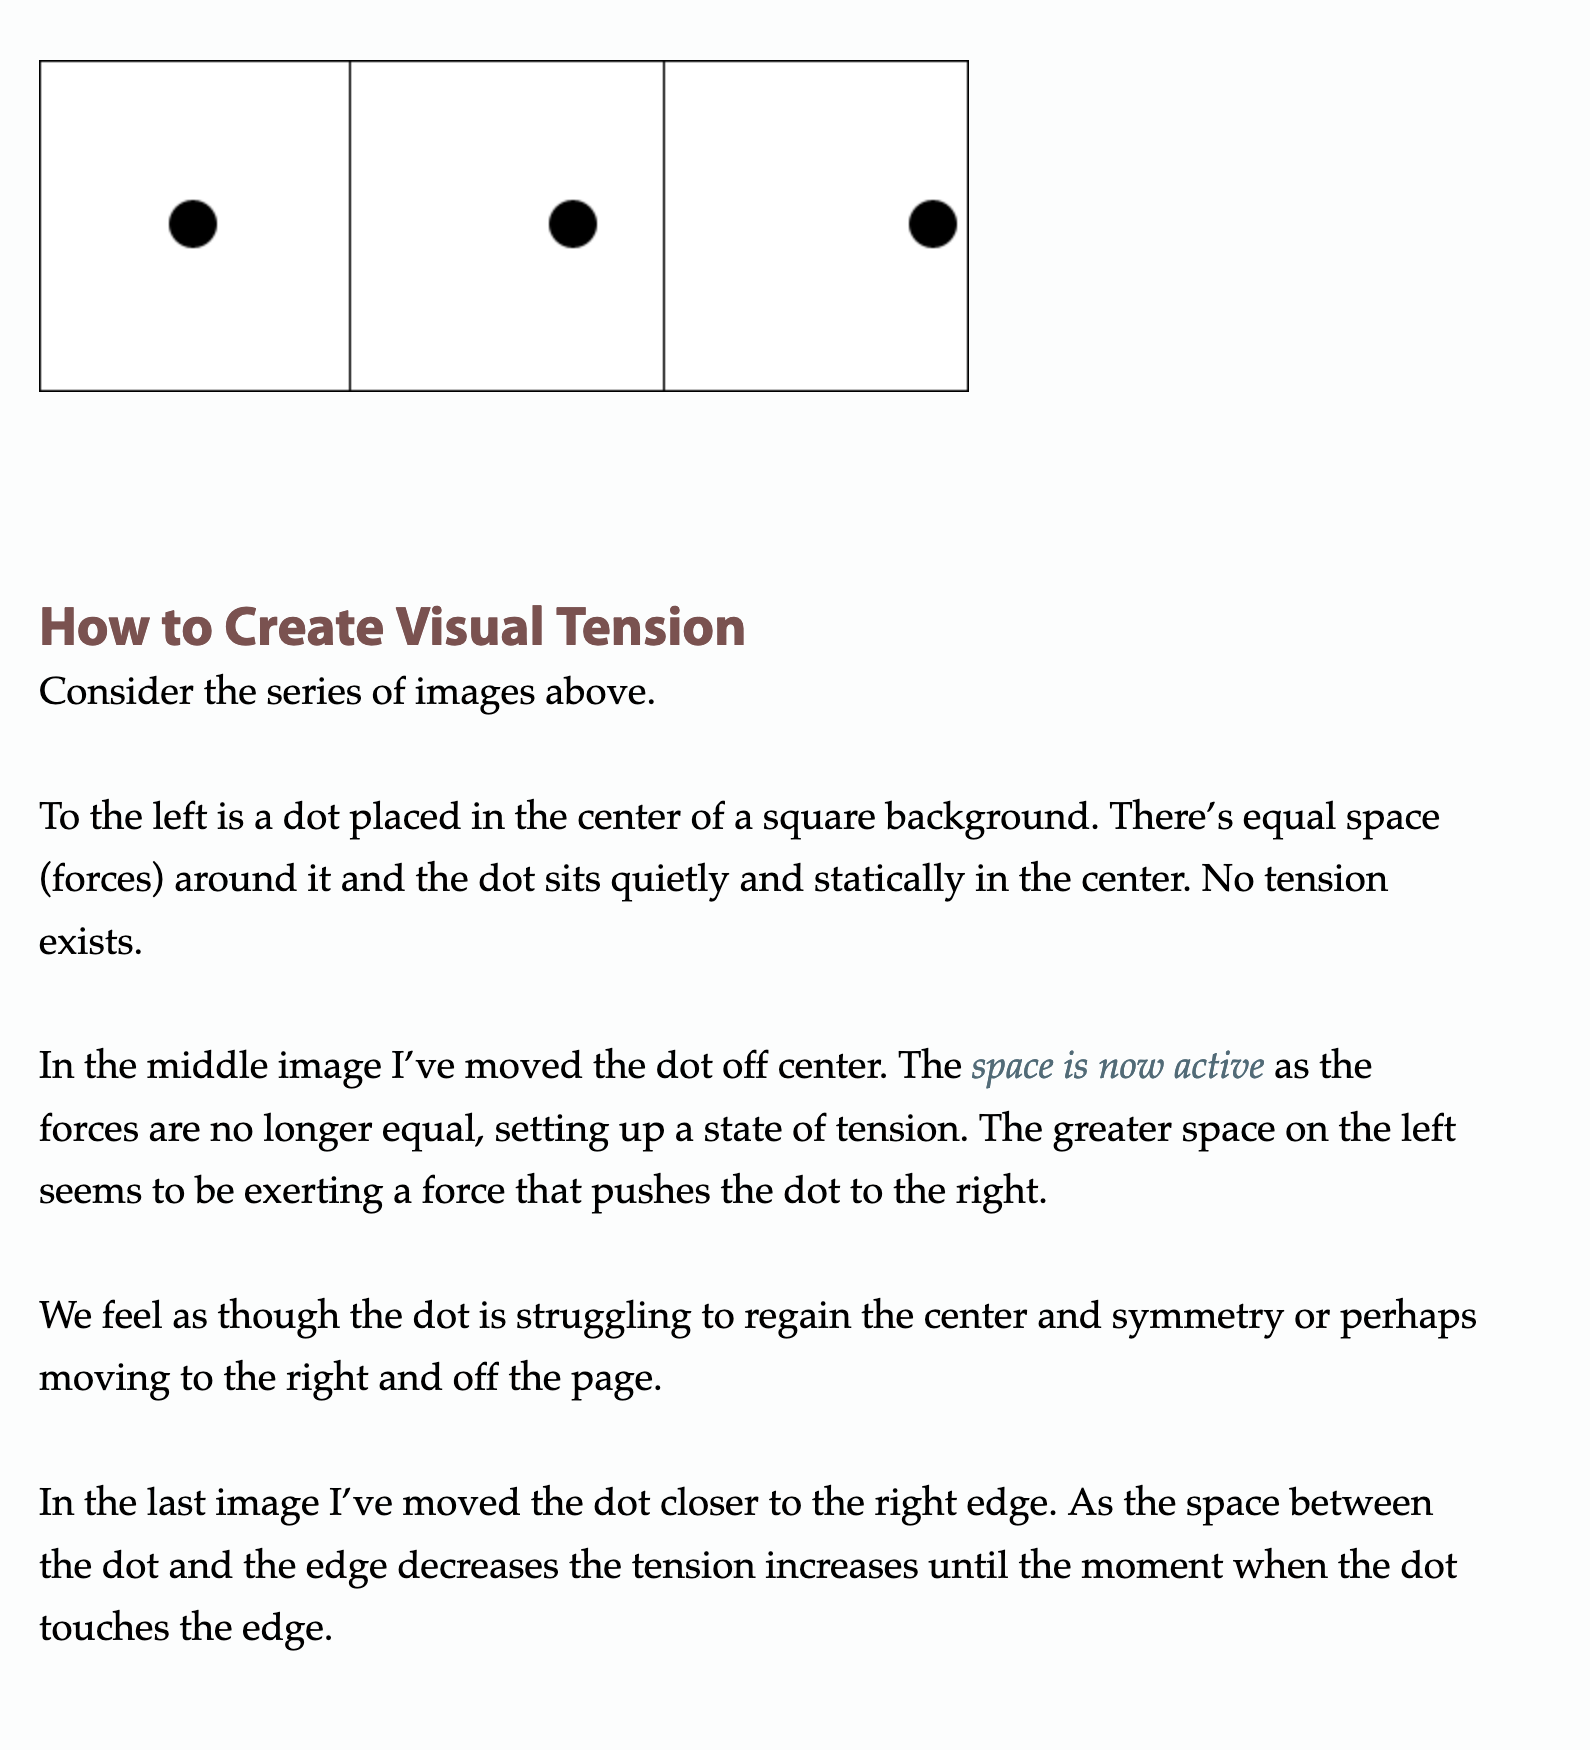
I also show photographers how to use visual tension. One of the ways is to place your subject close to the edge of the frame. I see no better way than to show you how through a diagram.
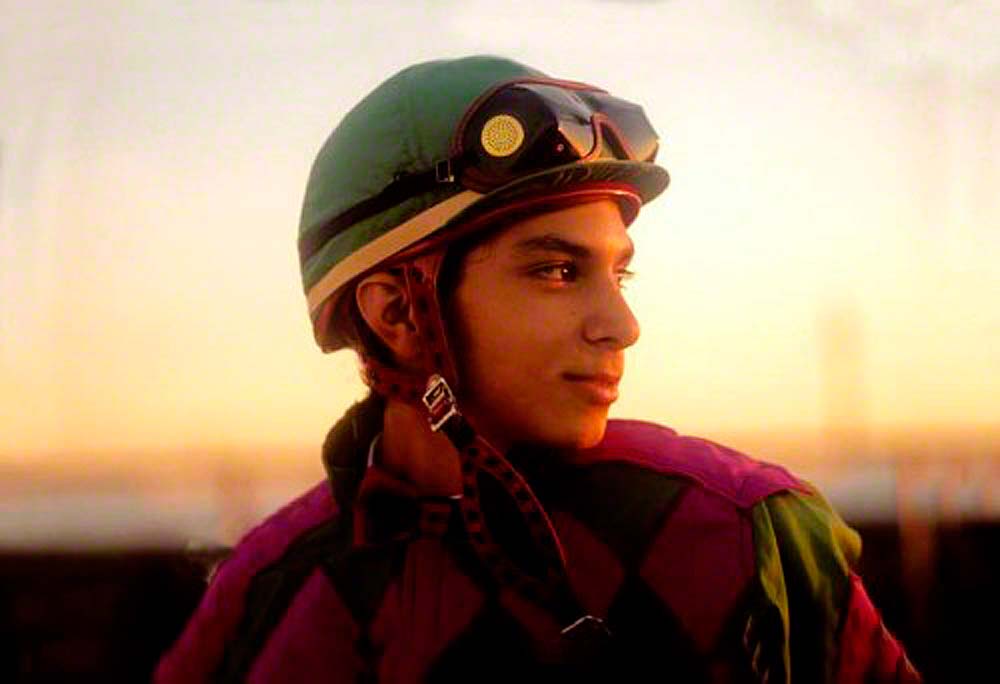
 As you can see by my clock diagram, the source of the light is coming from about 2 o’clock and from behind the jockey. The angle from the ‘2’ to the subject is the same angle as the subject to the camera.